Think of opening your new iPhone, and being eager to use it, only to find out that all your favorite photos are still locked in your old Android. The idea of moving hundreds or thousands of images may seem daunting, particularly when you have never done it. Lots of users face the problem of the inability to transfer images between Android and iPhone, and have to spend a lot of time on complex procedures.
Fortunately, it is easy to transfer your photos easily and without any problems. You can transfer images, videos, and albums safely in a few steps, whether you choose Move to iOS or the more versatile tool. In this article, we will see some of the ways on how to transfer images from Android to iPhone so you can decide on the fastest and least cumbersome method.
Part 1: Official Way to Transfer Images from Android to iPhone
Apple created its own tool, Move to iOS, which is specifically aimed at assisting the process of switching between Android and iPhone. This application allows transferring images, messages, and other data in the process of initial iPhone setup. It’s a straightforward choice for beginners, but it comes with limitations. For your better assistance, here is how to transfer images from Android to iPhone with this method:
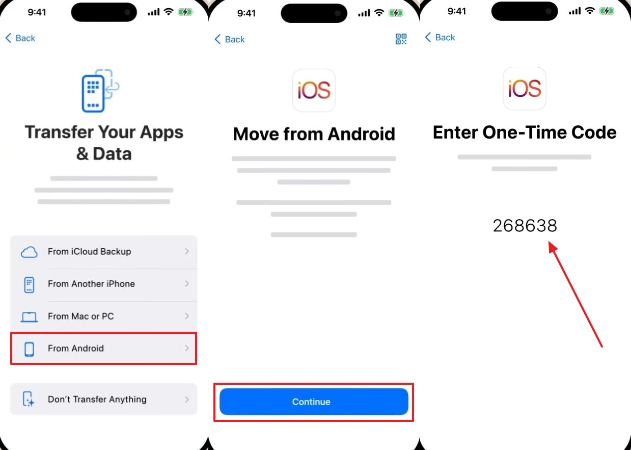
Step 1 Download “Move to iOS” on Android, and during your iPhone setup, when you reach the “Transfer Your Apps & Data” screen, select “From Android”, then tap “Continue” to display a unique 6-digit code.
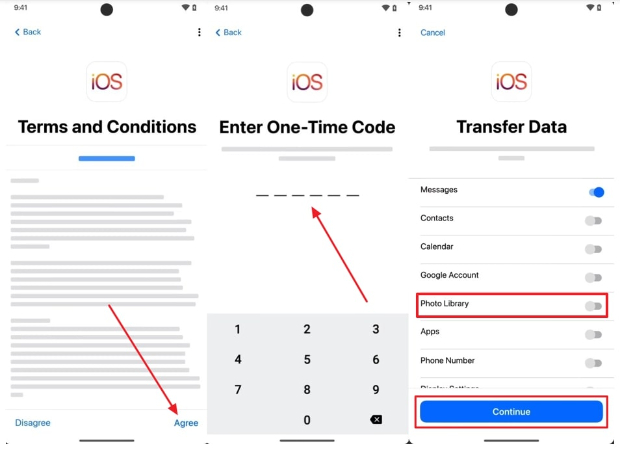
Step 2 Launch the Move to iOS app on your Android device, press “Agree” to access the terms, and enter the code shown on your iPhone. After that, switch on the “Photo Library” option and tap “Continue” to begin transferring your pictures.
Drawbacks of Move to iOS
- It is only applied during the first-time iPhone setup, and thus, you will have to reset your iPhone if you did not do this.
- This may be slow, particularly if you have thousands of photos and videos on your Android.
- Sometimes, certain files like large videos or specific album structures don’t carry over properly.
- With the Move to iOS method, you cannot pick what to transfer, which means you cannot select specific albums or individual photos.
Part 2: The Best Way to Transfer Photos from Android to iPhone
For a better way to transfer photos from Android to iPhone, you can use iToolab WatsGo for Android, which supports USB-C to Lightning or OTG connections, unlike other methods. You can move not just photos but also videos in multiple formats like MP4 and MKV, along with documents and other multimedia files.
Opposite of the previous method, it doesn’t force a factory reset on your iPhone and instead adds new content while keeping the existing one. It is most recognized for its compatibility and flexibility, since it allows you to have the freedom of deciding whether you want to transfer photos, videos, or an entire gallery.
Besides, it is compatible with Samsung, Xiaomi, and the majority of Android phones running Android 9 and newer, and iPhones iPhone X and later running iOS 13 and newer. Moreover, the 16-language support makes WatsGo a user-friendly application that allows cross-platform migration wherever you are.
A Comparison Table Between Move to iOS and iToolab WatsGo
Despite the attempts to use both convenient ways, there are still many users who are uncertain about which of them is the most suitable for their demands. To help you make your choice more easily, here is a comparative table with the most important differences between iToolab WatsGo and Move to iOS:
This table clearly shows that iToolab WatsGo gives you more control and flexibility than Move to iOS. So, are you ready to switch without losing your data? Download iToolab WatsGo now and transfer with ease.
Step-by-Step Tutorial to Transfer Data from Android to iPhone via iToolab WatsGo
Now that you know the features of this tool, you might be wondering about its usage. The following section will cover a complete guide on how to move images from Android to iPhone with iToolab WatsGo:
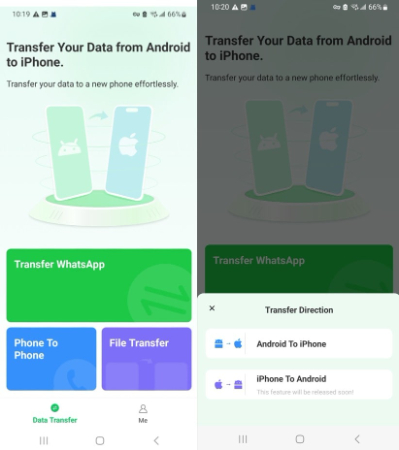
Step 1 Open the WatsGo app on your Android device and select the “Phone to Phone” option, and choose the “Android to iPhone” option to set the transfer direction.
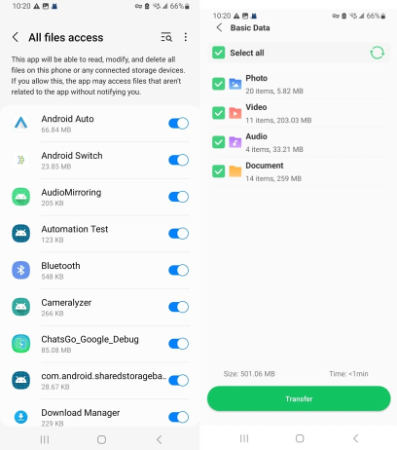
Step 2 Give the required access to your files through the preferred apps and then enable the “Photos” option (along with any other data you want to move) before tapping the “Transfer” button.
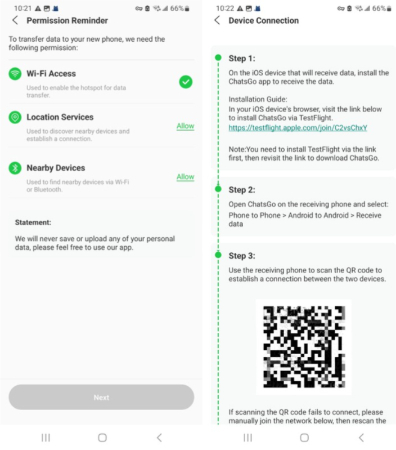
Step 3 Allow the required permissions for “Wi-Fi Access,” “Location Service,” and “Nearby Devices,” then press the “Next” button. Afterward, scan the QR code shown using your iPhone to start the transfer procedure.
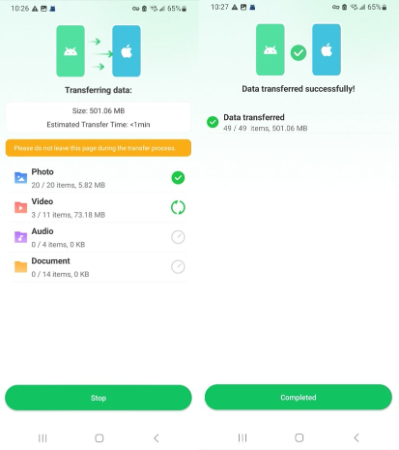
Step 4 Monitor the migration status straight from the Android application. When finished, press the “Completed” button to wrap up the process.
Part 3: Other Feasible Ways to Send an Image from Android to iPhone
If you’re still exploring how to transfer images from Android to iPhone, iToolab WatsGo isn’t the only option available. There are also a few built-in methods given below that can help you move photos with ease:
1. Email
One of the oldest yet most reliable methods to share files between devices is by sending them through email. Many users rely on it because it doesn’t require extra tools, just an active email account and the internet. The biggest benefit is that your photo remains accessible from any device where you log into your email. If you’re wondering how to send images from Android to iPhone, follow these quick steps below:
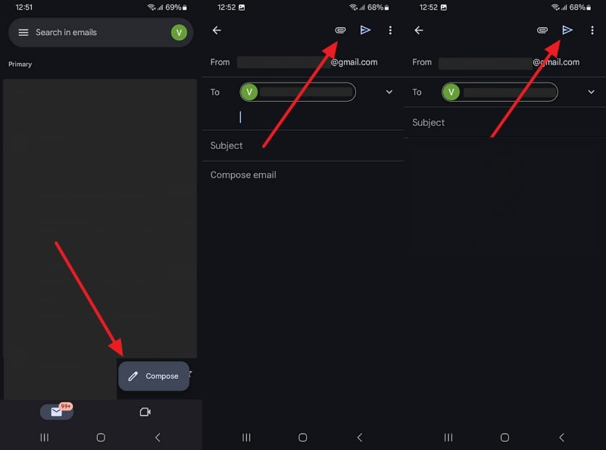
Step 1 Open your Gmail on your Android mobile, press the “Compose” button, and then choose the “Clip” icon to add the target image you want to move. When you bring the image from your gallery in Gmail, tap the “Send” button to share it with someone.
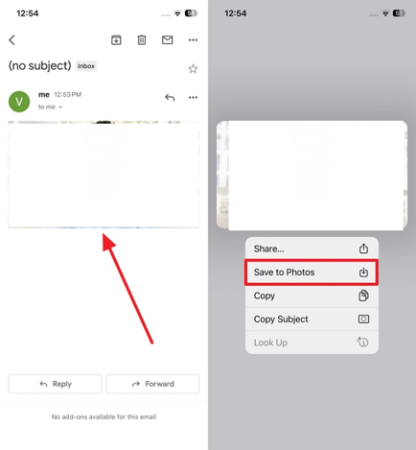
Step 2 Now, log in to your Gmail on your iPhone and open the image you transferred in the “Sent” tab. Now hold it for a second and choose the “Save to Photos” option.
2. Google Drive
It is another simple and effective solution for moving pictures across platforms. Since it works on both operating systems, you can quickly upload from one phone and access them on another. This makes it a practical choice when you want to go back and move multiple files at once. When it comes to this method, it’s very secure, and you can transfer photos from Android to iPhone with the given stepwise instructions:
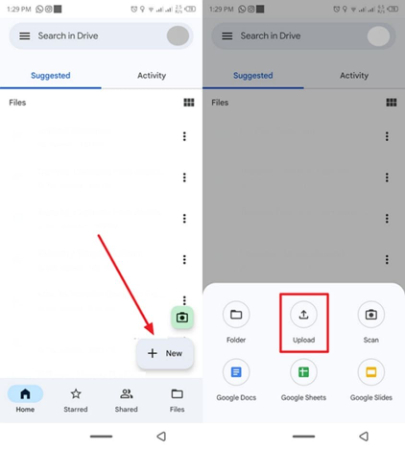
Step 1 Open Google Drive on your Android device, press the “+ New” button, and choose the “Upload” option from that menu. After that, pick the photos from your gallery that you want to move and upload them to the drive.
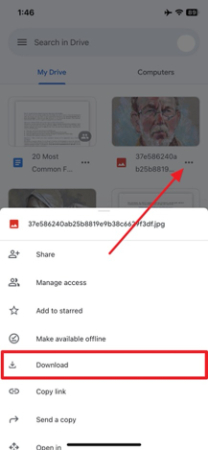
Step 2 On your iPhone, sign in with the same Google account, locate the uploaded photos in Google Drive, tap the “Three Dots” menu, and choose the “Download” option.
Conclusion
In conclusion, although tools like email and Google Drive are helpful for moving a couple of photographs, they are time-consuming and restrictive when transferring large photo libraries. When it comes to a quicker and more stable method for how to transfer images from Android to iPhone, iToolab WatsGo is the most appropriate. It guarantees a seamless migration with no more than a few clicks and saves your time and effort.


