A clear desktop establishes a concentrated working environment and makes your computer look nicer. Most users like to delete the unwanted icons to make it clear. The Recycle Bin icon is one of the targets. It is easy to hide the Recycle Bin in Windows and undo it. This article will discuss how to hide Recycle Bin from desktop. You can remove the icon without causing functionality problems, whether you want a minimalist appearance or do not want to delete it accidentally. Let’s dive in.
How to Hide Recycle Bin from Desktop
There are several easy ways to hide the Recycle Bin on your desktop. Such as:
- Way 1. Remove Recycle Bin from Desktop via Settings
- Way 2. Delete Recycle Bin from Desktop via the Registry
- Way 3. Remove Recycle Bin from Desktop Using Local Group Policy Editor
Way 1. Remove Recycle Bin from Desktop via Settings
One simple hack for hiding the Recycle Bin without activating Windows is customizing the settings of Windows. This technique does not need any other instrument and it only involves a few swift changes. Here’s how to remove Recycle Bin from desktop without activating Windows:
Step 1: Use the keyboard shortcut Windows+I to open Settings. Alternatively, right-click the desktop and choose Personalize in the context menu.
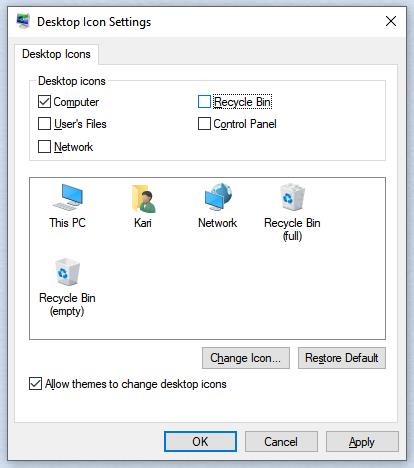
Step 2: In the Personalization section, select Themes on the left panel. Then, under Related Settings, select Desktop icon settings.
Step 3: In the pop up window, uncheck the box next to the Recycle Bin. Click Apply, then OK to make your changes.
Way 2. Delete Recycle Bin from Desktop via the Registry
The more experienced users may hide the Recycle Bin by modifying the Windows Registry. The approach permanently removes the icon on the desktop after restarting the system.
Step 1: Press Win + R to open the Run window.
Step 2: Type regedit in the run box and press OK to launch the Registry Editor.
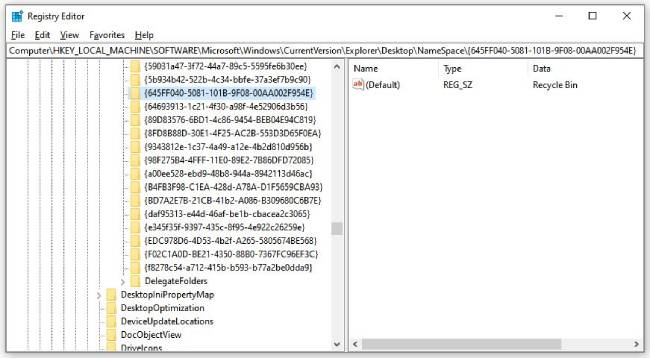
Step 3: In Registry Editor, go to: HKEY_LOCAL_MACHINE\SOFTWARE\Microsoft\Windows\CurrentVersion\Explorer\Desktop\NameSpace
Step 4: To remove the Recycle Bin on the desktop, find the key named 645FF040-5081-101B-9F08-00AA002F954E and delete it.
Step 5: Close the Registry Editor, and restart your PC. The Recycle Bin icon will be removed from the desktop.
Way 3. Remove Recycle Bin from Desktop Using Local Group Policy Editor
The Local Group Policy Editor allows Windows Pro users to hide the Recycle Bin icon with a few quick configuration changes. This method is effective and reversible.
Step 1: Right click the Windows button and click on Run.
Step 2: To open the Local Group Policy Editor, type gpedit.msc in the Run box and press OK.
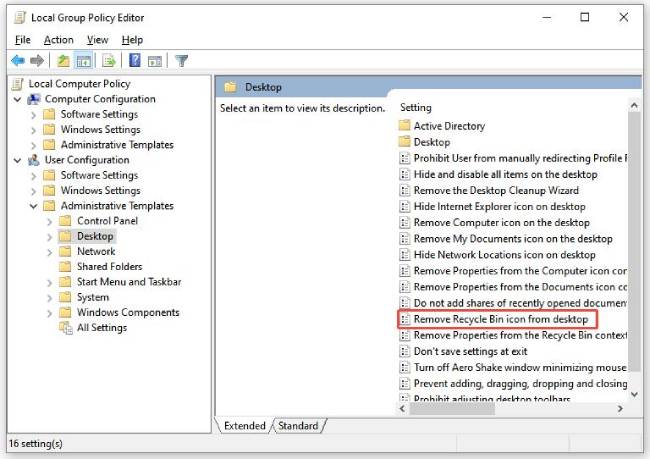
Step 3: Navigate in the editor to User Configuration > Administrative Templates > Desktop. Locate and double-click the Remove Recycle Bin icon on the desktop.
Step 4: Choose Enabled to conceal the Recycle Bin on the desktop and pertinent File Explorer windows. Press Apply and OK.
Step 5: Reboot the PC to make the changes. Set this policy to Disabled or Not Configured in order to enable the icon to be restored later.
How to Access Recycle Bin After Hiding It
Even if the Recycle Bin icon is invisible, you can still open it with simple commands or by adjusting folder settings.
Way 1: Open the Run Dialog and Enter Command
Press Windows+R to open the Run box. Type shell:RecycleBinFolder and hit Enter. This directly opens the folder of the Recycle Bin.
Way 2: Show Hidden and Protected Files (If Needed)
In case you want to browse the deleted files manually, turn on the viewing of hidden and system files:
- Launch File Explorer and navigate to your system drive (C: most of the time).
- Click on the View tab.
- Click on Options > Change folder and search options.
- Click on the View tab on the pop-up.
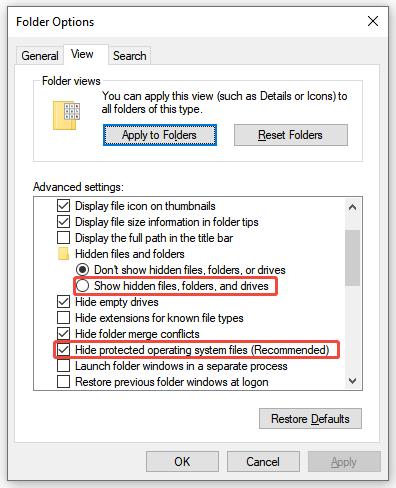
- Select Show hidden files, folders and drives.
- Uncheck Hide protected operating system files (Recommended).
- Click Apply, then OK to accept these settings.
BONUS: How to Recover Files Deleted from the Recycle Bin
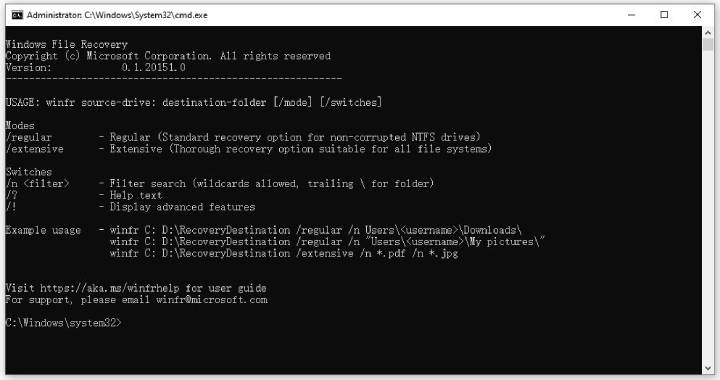
Accidentally deleted files from the Recycle Bin? Here’s how to recover them using Windows File Recovery.
Step 1: Search for Windows File Recovery in the Microsoft Store. Select the app and install it on your device.
Step 2: Press the Windows key, type Windows File Recovery in the search box, then open the app. When asked if the app can make changes, click Yes.
Step 3: In the Command Prompt window, type the command using this format: winfr source-drive: destination-drive: [/mode] [/switches]
For example, if you still remember the name of the deleted file on C: drive and you want to recover it to D: drive, you can run this command: winfr C: D: /regular /n myfile.docx
Step 4: When prompted, type Y to confirm and start the recovery process. The length depends on your drive size and the number of files. If you want to stop the recovery at any time, press Ctrl + C.
Read Also: 3 Ways to Restore Files Deleted from Recycle Bin for Free
Conclusion
Hiding the Recycle Bin from your desktop helps keep your workspace tidy and distraction-free. You can choose from multiple methods to do this. Whether using Settings, Registry Editor, or Group Policy, the process is simple. Even after hiding it, you can easily access or recover files when needed. Follow these steps to customize your desktop and efficiently manage your deleted files.

