
While Windows 11 has made significant strides in interface design and core system optimization, it cannot offer an absolute safety net for your data. Even with its enhanced efficiency, users can still find themselves in a situation trying to recover deleted files.
It’s common for Windows 11 users to experience data loss. It can happen because of accidental deletion or using Shift+Delete. Some just empty the Recycle Bin only to realize it had some important files.
So, a common question among users is how to recover deleted files Windows 11. If you also have a question like this, then don’t worry as we will discuss 4 easy methods to restore deleted files Windows 11.
Tip:
Please stop writing new data to the disk immediately to maximize the recovery success rate.
Why You Can’t Find Files: Common Windows 11 Data Loss Situations
There are many reasons why the files go missing on a Windows system. From human error to data corruption, a lot can go wrong & make you wonder why you can’t find the files.
Here’s a quick list of reasons that can lead to data loss (lost/missing files) in Windows 11:
System Update
It is not that uncommon for users to face data loss right after a system OS update. The updates are meant to improve the performance but they can also break things & delete files.
In fact, it is very common for users to ask questions like how to recover deleted files in Windows 11 after an OS update.
Read also: How to Recover Lost Files After Windows 11 Update
Virus/Malware
A virus + malware on your system can also be the culprit. These things can delete the important file or replace it with something else. Similarly, a virus or malware can also delete files that are essential for the Windows OS security.
Disk Error
Disk errors can occur due to aging hardware, power failure or improper shutdowns. A direct result of disk error is unreadable sectors on the disk (internal & external).
So the next time you start your computer and can’t find your files, it could be due to a disk error.
Human Error
The most common reason for all that causes data loss is human error. The new Windows 11 has easy to use interface, but it also makes it easy to accidentally delete important files.
Also, you may end up deleting a file by mistake only to realize it was important. Well whatever the reason, the good news is that you can recover permanently deleted files in Windows 11 easily!
How to Recover Deleted Files in Windows 11?
There are several data loss situations & each one requires a different solution for recovery. So, you should try all the methods listed here (one by one) to find the one that works for you:
- Method 1: Recover Deleted Files from a Recycle Bin in Windows
- Method 2: Use Windows File Recovery
- Method 3: Restore Via Command Prompt
- Method 4: Use Professional Data Recovery Software
Method 1: Recover Deleted Files from a Recycle Bin in Windows
One thing that is an integral part of the Windows is Recycle bin & it’s also included in new Windows 11. The overall design of the Recycle Bin in Win 11 is a little different but the functionality is same.
If you have deleted files (human error), then you can easily find and recover deleted files from recycle bin. However, you can’t use this method if you used Shift+Delete shortcut. It also won’t work if the file was large and skipped the bin.
This is how to use “Recycle Bin” to recover deleted files Windows 11:
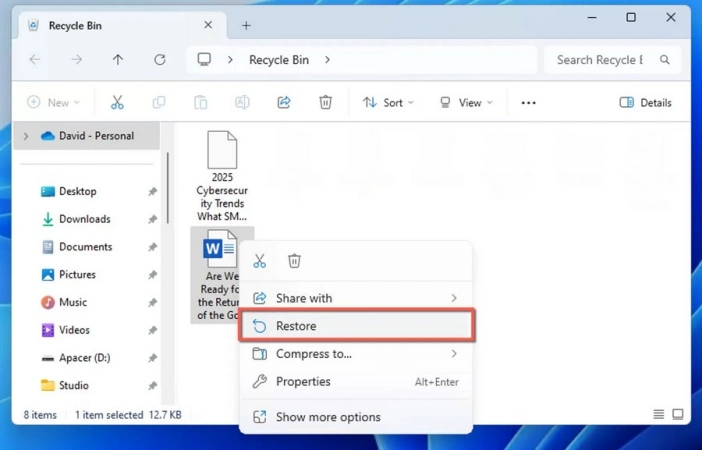
- Find + open the Recycle Bin from the Desktop.
- Locate the deleted files.
- Right click on the file(s) > select Restore.
- You can find the files in their original location (if it was deleted from desktop, the restored version will appear there).
Method 2: Use Windows File Recovery
Can you recover deleted files on Windows 11 if they are not in Recycle Bin? Yes, it is possible with “Windows File Recovery”.
The Windows File Recovery is a free tool offered available on the Microsoft Store. The best part is that it is made by Microsoft and can be used to recover files from HDD, SSD, USB, or memory card.
This method works when you act fast and do not overwrite new data. Like it may not work if the files were deleted months ago and you kept saving more data. With that in mind, let’s look at how to use Windows file recovery in Windows 11:
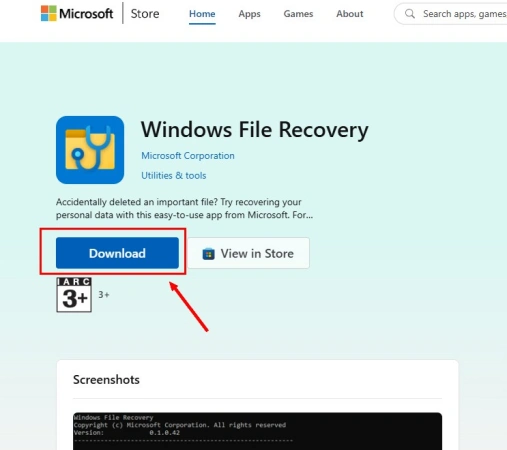
1. Install Tool
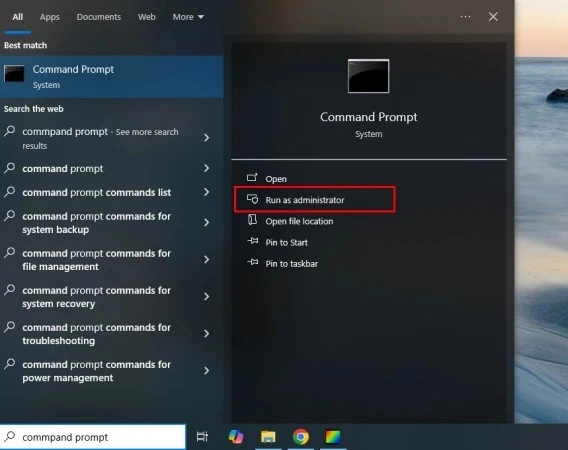
Open the Microsoft Store and install the Windows file recovery tool.
Then press the Windows button + S on the keyboard. Type command prompt & select the run as administrator option.
2. Run Command
Now, you need to type a command like this:
winfr source-drive: destination-drive: /mode /switches
The source-drive is the drive where the files were deleted and destinaton-drive is where you want to save the recovered files. You can also select between Regular/Extensive mode.
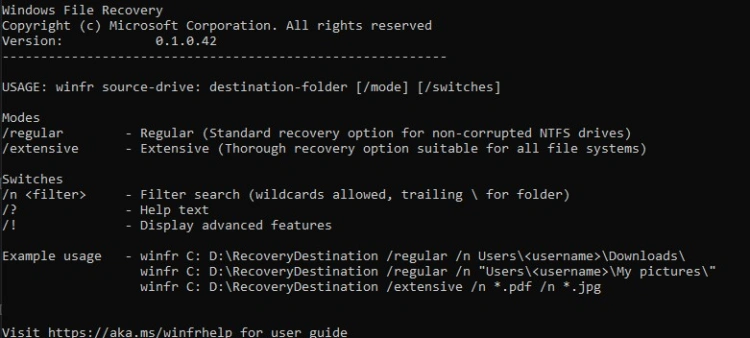
Here’s an example:
winfr C: D: /regular /n *.docx
Press Enter and wait for the recovery process to complete. Once it is finished, you can check the recovered files from the destination drive. So, if you are looking for a solution to restore permanently deleted files Windows 11 & aren’t scared of command line, then try this tool.
Method 3: Restore Via Command Prompt
The deleted files are not in the Recycle Bin? The Windows File Recovery also doesn’t work? In that case, you can try using the command prompt to restore files.
This method is useful when the files are corrupted or inaccessible (hidden) for some reason. So, let’s explore how you can recover deleted files Windows 11 via command prompt (CHKDSK):
1. Run CHKDSK
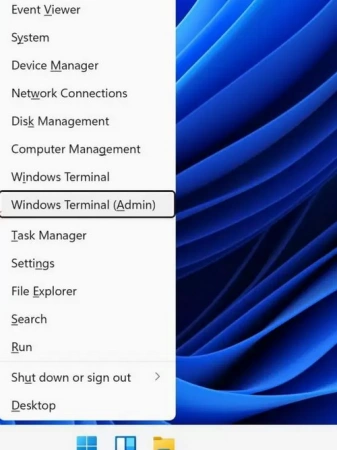
Press the Win + X key. Choose the “Windows Terminal (Admin)” from the options.
Next, type the following and press enter:
chkdsk X: /f
Note: Replace the X with the drive letter where the files were lost.

You need to wait for few minutes for system to completely scan the drive.
2. Run Command
Now type the following command and press Enter:
attrib -h -r -s /s /d X:\*.*
Note: Replace X with the drive letter.
After the process is finished, you can find the lost or deleted files in the original folder or in a newly created folder on the drive. This method is ideal if the files disappeared from the external or internal drive. Especially, if the folders show as empty but still consume space. Similarly, you can also use it if files were lost because of virus removal or file system corruption.
Method 4: Use Professional Data Recovery Software
Are you having trouble with data recovery via the recycle bin or the command prompt? Do you want a simple yet effective way to recover deleted files on Windows 11? Then you should try iToolab RecoverGo Windows Data Recovery!
The iToolab RecoverGo Windows Data Recovery is fully compatible with Windows 11 and older versions. It also supports all the known file types & has an easy-to-use interface.
The main features of iToolab RecoverGo are:
- Supports 1000+ file types, from essential Office docs to high-resolution media on Windows 11.
- Benefit from an industry-leading 99% success rate tailored for Windows 11 file systems.
- Recover your data in just three clicks—select, scan, and recover.
Testing Process
To test the iToolab RecoverGo Windows Data Recovery, we deleted different files on a Windows 11 PC. The recovery process was tested in different scenarios. This includes files deleted via shift+deleted, removed from the recycle bin, & so on. The software was installed on a separate drive to avoid data overwriting. We then scanned the affected drive using scan mode and checked recovery accuracy.
Tester’s Verdict
iToolab RecoverGo recovered all the files that were deleted during testing. It also retained the original names and the folder structure. The preview feature helped save time and allowed us to only recover relevant files.
Here’s a list of easy steps to recover deleted files in Windows 11 via iToolab RecoverGo:
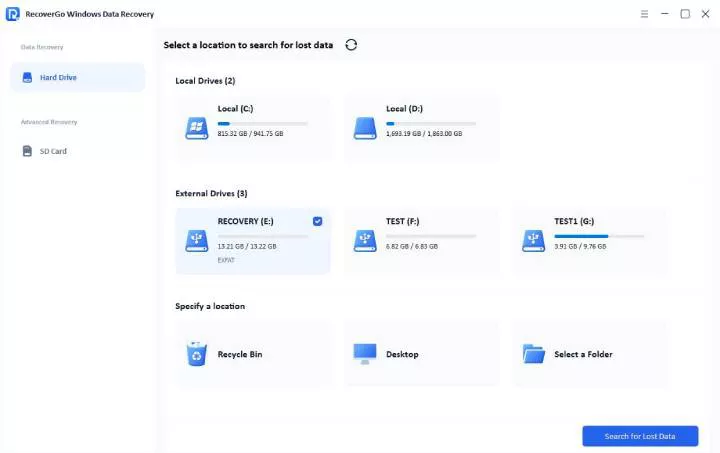
Step 1 Select the local drive/external drive where the deleted files were present. After that, click on “Search for Lost Data” (located at the bottom right corner).
Step 2 The scanning process will start and the tool will also show the remaining time.
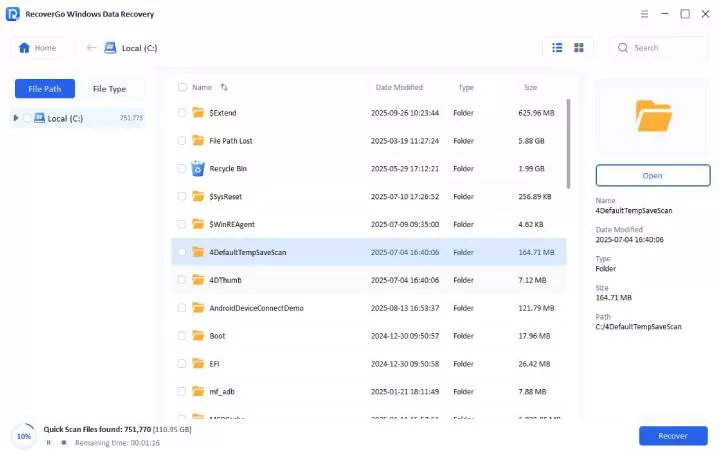
Step 3 After the scan is complete, you can choose to preview the file and then recover it by clicking on “Recover”.

User Experience
A small business owner lost project reports and spreadsheets on a Windows 11 PC. With no backup available, they used iToolab RecoverGo to deep scan the drive. The software quickly found all the lost documents. The user was able to use the preview feature to only restore the files they actually needed. The simple workflow made the recovery process very easy for the user.
How to Protect Your Windows 11 Files to Avoid Future Loss
No one wants to experience data loss at all. As a user of Windows 11, here’s how you can prevent data loss in the future:
OneDrive Backup
OneDrive is the built-in option in Windows 11 for backing up important files. The best part is that they offer 5 GB of free cloud storage, which is enough for a lot of users. So, make sure the OneDrive is set up on your Windows 11 PC and is configured to take regular backups.
File History
Another option to protect your data is to use the File History. It is a built-in feature of Windows 11 that can be used to automatically back up your files regularly.
Here’s how it works:
- Connect an external drive.
- Press Windows + S > type File History > select Restore your files with File History.
- Turn on File History.
- Tap on more options to configure the backup interval and which files to back up.
Regular Backups
Establish a habit of regular backups. There’s nothing better than making regular backups and saving them on external drives or any cloud service.
Conclusion
Data loss on Windows 11 can happen due to system errors, accidental deletions and so on. You can use various methods (File History, Recycle Bin and command prompt) to recover deleted files Windows 11.
However, the best solution for data recovery is iToolab RecoverGo Windows Data Recovery. It supports 1000+ file types and allows for file preview before recovery. It is also exceptionally fast at scanning and recovering all types of files within minutes.