

Encountering the error message “The Recycle Bin on C:\ is corrupted. Do you want to empty the Recycle Bin for this drive?” can be alarming. It can prevent access to deleted files or even prevent you from restoring the deleted files. Fortunately, this common Windows issue is fixable using several built-in tools and methods.
Part 1: Causes of “The Recycle Bin Is Corrupted” Error
Understanding the underlying causes of the “The Recycle Bin on C is corrupted” error can help you troubleshoot effectively and avoid future occurrences.
Corrupted $Recycle.Bin folder:
The Recycle Bin on each drive is stored in a hidden system folder called $Recycle.Bin. If this folder becomes damaged – due to accidental modification, third-party cleanup tools, or interrupted file deletion processes – it may become unreadable, triggering the error.
Improper shutdowns or power failures:
When a computer shuts down unexpectedly, such as during a power outage or forced shutdown, active processes and file operations can be interrupted. This abrupt stop can corrupt critical system directories, including the Recycle Bin’s storage structure.
File system errors or bad sectors:
If your drive’s NTFS file system has inconsistencies, or if the disk develops bad sectors in the area where the $Recycle.Bin folder is stored, Windows may struggle to read or write Recycle Bin data correctly, leading to corruption warnings.
Malware or virus infections:
Malicious programs can tamper with system files, hide or delete data, or intentionally damage directories like $Recycle.Bin. Some malware even hides in the Recycle Bin folder to evade detection, causing system instability.
Corrupted system files or failed Windows updates:
Critical system files control how Windows manages deleted items. If these files become damaged – either through corruption, failed updates, or incomplete installations – the Recycle Bin may fail to function properly and display the corrupted error.
Part 2: How to Fix “The Recycle Bin on C Is Corrupted” Error?
Luckily, “the Recycle Bin on C is corrupted” error on Windows 10/11 is fixable. Below are five effective methods to resolve this issue:
- Fix 1. Reset the Recycle Bin Using CMD
- Fix 2. Run a CHKDSK Scan
- Fix 3. Run SFC and DISM Scans
- Fix 4. Scan for Malware and Virus
- Fix 5. Perform a System Restore
Fix 1. Reset the Recycle Bin Using CMD
Resetting the Recycle Bin will delete all files and folders stored in it. If you have any important files that you want to restore from the Recycle Bin, please remember to back up the $Recycle.Bin. Folder.
- Open Command Prompt as an administrator.
- Run the command: rd /s /q C:\$Recycle.Bin (Replace C: with other drive letters as needed.)
- Restart your computer.

Fix 2. Run a CHKDSK Scan
File system errors or bad sectors can prevent the Recycle Bin from working correctly. Running the CHKDSK utility scans your drive for structural issues and automatically repairs them, restoring smooth file deletion and recovery functions.
- Open Command Prompt as an administrator.
- Type and run the command: chkdsk c: /f
- Reboot your computer after running the CHKDSK scan.

Note:
If you’re getting the Recycle Bin is corrupted error on D or E drive, just replace the letter “c” in the command.
Fix 3. Run SFC and DISM Scans
Corrupted or missing system files can interfere with the Recycle Bin’s operations. Windows includes built-in tools — System File Checker (SFC) and Deployment Imaging Service and Management Tool (DISM) — to scan for damage and replace problematic components.
- Open Command Prompt as an administrator.
- Run the command: sfc /scannow
- Restart the computer to see if the error still exists.

Fix 4. Scan for Malware and Virus
Some malware deliberately targets or corrupts system directories like the Recycle Bin. Performing a full scan with trusted antivirus software helps detect and remove threats, ensuring that your bin and other system features remain intact.
- Open Windows Security (via Settings – Update & Security – Windows Security).
- Navigate to Virus & threat protection.
- Choose Full scan and click Scan now.
- Remove detected threats and reboot.

Fix 5. Perform a System Restore
If the issue started recently, it could be tied to system changes, updates, or new software installations. System Restore lets you roll back Windows to a previous restore point where the Recycle Bin worked properly, without affecting your personal files.
- Press Win + R, type rstrui, and hit Enter.
- Choose a restore point from when the Recycle Bin worked correctly.
- Confirm the restore point and click Finish to continue.
- Your computer will restart automatically to apply the changes.

BONUS: How to Recover Deleted Files from Recycle Bin After Emptying?
When your Recycle Bin is emptied – intentionally or by accident – it doesn’t immediately erase the data. Instead, Windows simply marks that space as available for new files. This means there’s still a chance to recover lost files before they’re overwritten. Here are four reliable methods to help you restore your data, depending on your setup and what backups you have available:
Also Read: How to Delete Recycle Bin Files Permanently on Windows 10/11
- Way 1. Use Windows File Recovery
- Way 2. Use File History
- Way 3. Recover Deleted Files from Windows Backup
- Way 4. Use iToolab RecoverGo Windows Data Recovery
Way 1. Use Windows File Recovery
Windows File Recovery is a free command-line utility from Microsoft designed to help you recover files that have been permanently deleted and are no longer in the Recycle Bin. It supports multiple file systems (NTFS, FAT, exFAT, ReFS) and works across various storage devices such as internal drives, SSDs, USBs, and SD cards.
- Open the Microsoft Store, search for Windows File Recovery, and install the app.
- Search for “Windows File Recovery” in the Start menu, right-click it, and select Run as administrator.
-
A typical command syntax looks like this: winfr C: D: /regular /n \Users\YourName\Documents\
- C: is the source drive (where the files were originally located).
- D: is the target drive (where recovered files will be saved – always use a different drive to avoid overwriting).
- /regular is the mode to recover files. You need to use /extensive mode if you deleted the files a while ago or the disk is corrupted.
- /n <path> specifies the folder or file filters to target.
- Initiate the command, let the tool scan the drive, and save recovered files into your designated destination folder.

Way 2. Use File History
File History is a built-in backup feature introduced in Windows 8 and still available in Windows 10 and 11. When enabled, it periodically saves versions of files – especially those in standard user folders like Documents, Pictures, Music, and Desktop – to an external or network drive. This feature allows you to browse and restore previous versions even if files were deleted or lost.
- Open File Explorer and go to the folder where the deleted file or folder was originally stored.
- Right-click the folder name and choose Restore previous versions.
- If the folder was located at the root of a drive (e.g., C:\), right-click the drive itself and select Restore previous versions.
- In the Previous Versions tab, review the list of available backups for that folder.
- Select a version before the deletion occurred. For example, if the file was deleted today, pick a version from yesterday.
- To check the contents first, click Open in File History under the Open option.
- To restore the selected version, click Restore.
- To avoid overwriting existing files, choose Restore to… and select a different location.

Way 3. Recover Deleted Files from Windows Backup
The legacy Backup and Restore (Windows 7) feature still exists in Windows 10 and 11. If previously configured, it can recover entire folders – possibly including the Recycle Bin – using saved backups or system images.
- Go to Backup and Restore (Windows 7) in your system’s Control Panel.
- Click Restore my files.
- Use Browse for files or Browse for folders to locate the Recycle Bin or deleted files in your backup set.
- Restore to original location or select Restore to… to save files elsewhere.
- Confirm and execute the restore. After completion, check the files to ensure recovery is successful.

Note:
The feature is best suited if you’ve regularly created backups or system images that included the Recycle Bin folder.
Way 4. Use iToolab RecoverGo Windows Data Recovery
iToolab RecoverGo has advanced deep scanning technology, which can effortlessly recover deleted files from the Recycle Bin. Utilizing iToolab RecoverGo to recover files after emptying the Recycle Bin is an efficient solution.
Why choose iToolab RecoverGo?
- Straightforward user interface. Even a tech newbie can recover lost data after emptying the Recycle Bin in just three simple steps.
- Advanced scanning algorithms make RecoverGo deeply scan deleted data from the Recycle Bin.
- Whether you’ve accidentally deleted office documents, photos, or videos, RecoverGo supports the recovery of over 1000 file formats.
- High recovery rate, achieve a 99% success rate for recover files.
Steps to recover files from Recycle Bin using iToolab RecoverGo:
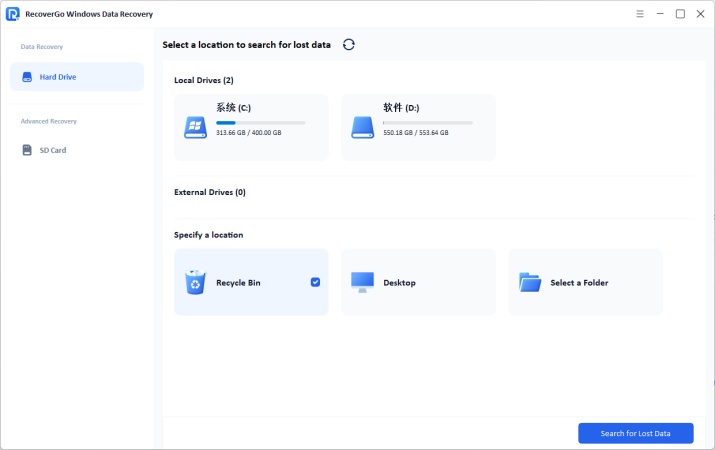
Step 1 Select the location
After launching the program, directly select the “Recycle Bin” icon, and click “Search for Lost Data”.
Step 2 Launch the scan
Launch the scan, the software will scan the Recycle Bin’s file area to quickly locate recently deleted items.
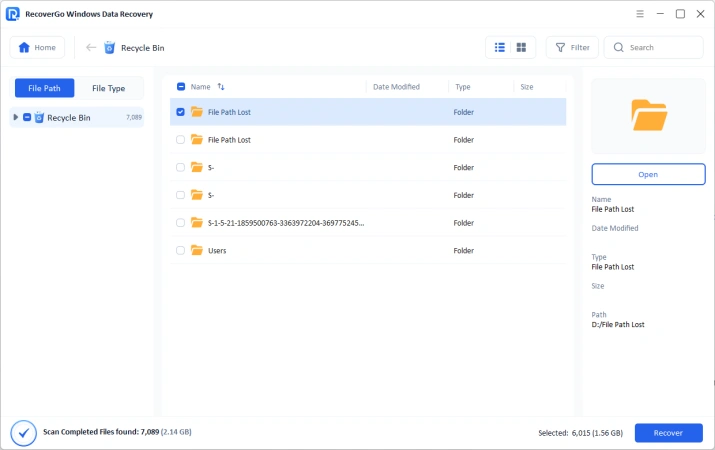
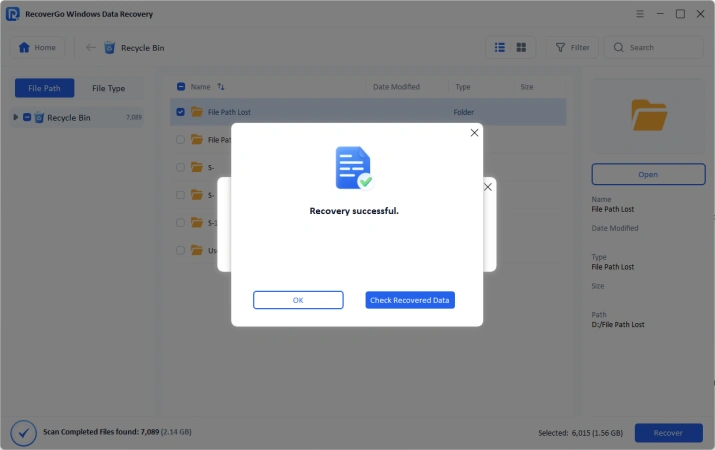
Step 3 Recover deleted files
After the file scan is completed, click the “Recover” button, then save them to a different partition.
Summary
“The Recycle Bin on C is corrupted” error on Windows 10/11 can result from file system errors, bad sectors, malware, corrupted system files, or failed updates. Understanding these causes helps you fix the issue methodically. Start by resetting the Recycle Bin via Command Prompt, then run CHKDSK, SFC, and DISM scans to repair system damage. If malware is suspected, perform a full antivirus scan, and if needed, use System Restore to revert Windows to a working state.
If you’ve emptied the Recycle Bin, recovery is still possible through Windows File Recovery, File History, or Windows Backup – provided backups were enabled. The most efficient way is to use data recovery software iToolab RecoverGo Windows Data Recovery.
Act quickly and avoid adding new data to improve recovery chances. Regular backups and preventive tools like File History can help you avoid future data loss. Click the button below to download iToolab RecoverGo quickly!