It is obvious that iPhones have better picture quality, and sending them on WhatsApp can result in distortion or blurriness. Whether you are presenting a portfolio to the professional world or to family and friends during a vacation, nobody wants to lose image quality.
This is an annoying issue that is easily resolved through the employment of proper and effective transfer procedures. Moreover, these methods will help bypass compression and ensure images retain their resolution. This article will provide the best way to send photos from iPhone to Android with comprehensive step-by-step guides.
4 Best Ways to Send Photos from iPhone to Android
The following are some of the best apps to transfer photos from iPhone to Android, which users can learn by performing as well:
1. Email
One of the methods that you can use to move your photos from an iPhone device to an Android is by using the Email app. Moreover, the purpose of this method is to achieve a quick, simple transfer method that is compatible across all platforms. Now, go through the following steps on how to transfer images from iPhone to Android:
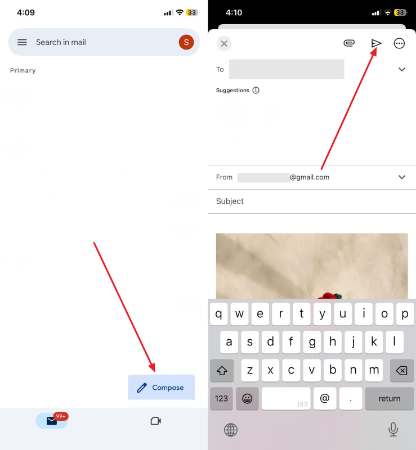
Step 1 Access the Email app on your iPhone, press the “Compress” button, and insert the desired photos by using the “Attachment” icon. Once the images are added, enter your email address in the “To” area, and tap “Send.”
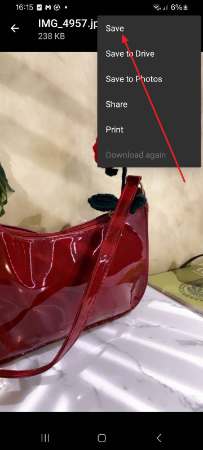
Step 2 Now, head to the same email account on your Android phone and find the sent image. After that, press the “Three Vertical Dots” icon and choose the “Save” button to download the image.
2. Google Drive
With this app, users get over 15GB of free storage linked to a Google account, thus enabling users to send pictures in bulk. Furthermore, Google Drive is seamlessly useful if you want to send organized large or small albums, making it the best app to transfer data from iPhone to Android. You can follow these steps and learn how you can move pictures through this app:
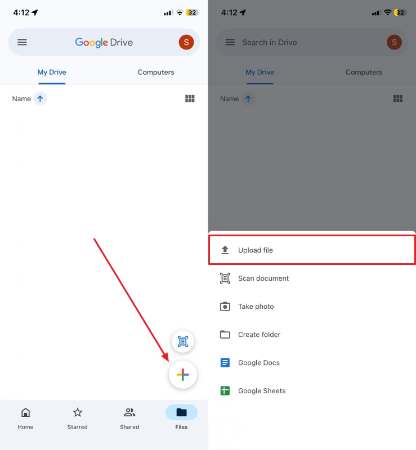
Step 1 Tap the “+” button at the interface of the Google Drive on your iPhone device. Next, select the “Upload File” option to access another bottom-up menu.
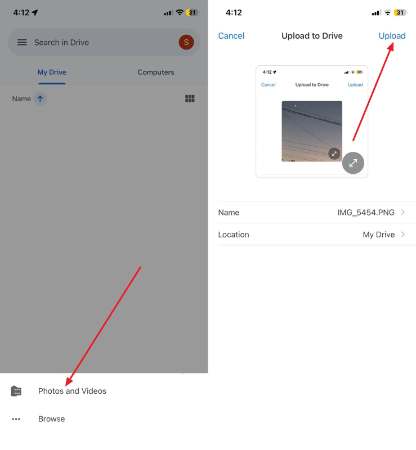
Step 2 From here, choose the “Photos and Video” option, upload the desired picture, preview it, and hit the “Upload” button at the top.
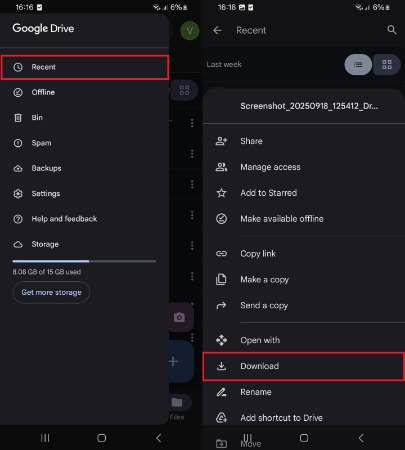
Step 3 Moving forward, go to the Android Google Drive, pick the “Recent” tab from the left-side panel to access the uploaded pictures. Next, right-click the “Three Dots” icon, and when a bottom-up menu opens, press “Download.”
3. iCloud
While iCloud is optimized for Apple devices, you can still share photos with Android users by generating shareable links or exporting photos. This is the best way to transfer an iPhone to Android, which is handy for photo backup and synchronization while providing some sharing options beyond it.
It means you can preserve the full quality of your images while sending them to someone outside iOS. The following steps will help you learn how to download photos using iCloud:
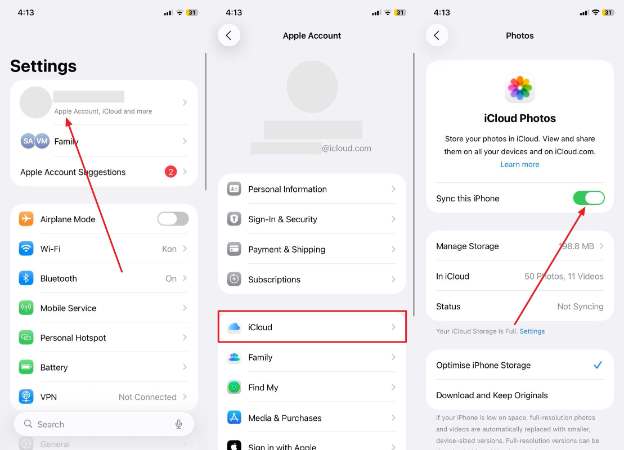
Step 1 On the “Settings” app on iPhone, tap the “Account” details, choose the “iCloud” option, and toggle on the “Sync this iPhone” option.
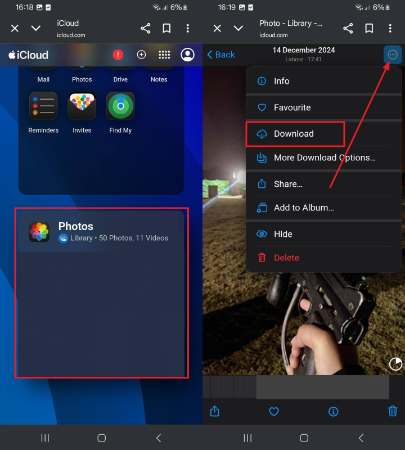
Step 2 Once the photos are synced, head to the iCloud website on your Android device and access the “Photos” app. Here, choose the required picture and tap the “Three Dots” icon to select the “Download” option.
Step 3 Moving forward, go to the Android Google Drive, pick the “Recent” tab from the left-side panel to access the uploaded pictures. Next, right-click the “Three Dots” icon, and when a bottom-up menu opens, press “Download.”

4. Samsung Smart Switch
Users can utilize this best app to transfer iPhone to Android, as it supports transferring photos, contacts, messages, and more directly between devices. The app ensures a smooth and controlled transfer process with minimal quality loss.
Moreover, it supports the latest iOS and Android devices and allows options for wireless transfer or with a USB cable. The process is simple and can be performed using the following steps:
Step 1 Install and open the app on both your devices, and press the “Transfer Wirelessly” option to proceed with the transfer.
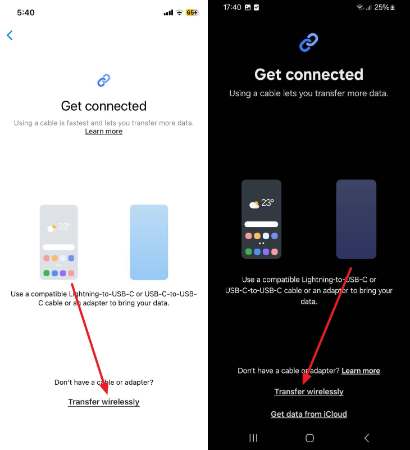
Step 2 After that, the iPhone will open a QR code scanner screen. On the Android device, choose the “Receive on This Phone” option, and pick the “iPhone/iPad” option on the “Select a Source” screen. When the QR code screen opens, scan it with the iPhone.
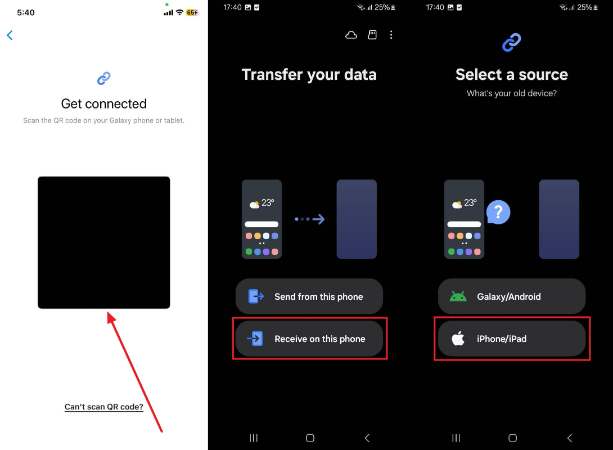
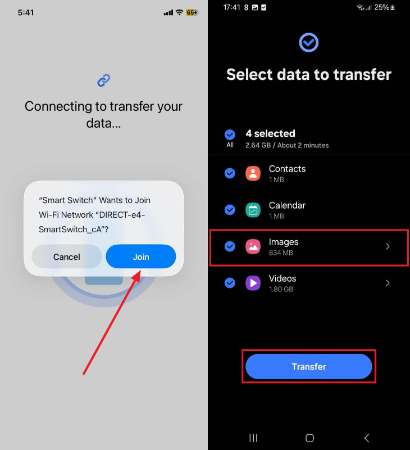
Step 3 Afterward, the iPhone will display the joining permission, from which you have to tap “Join” to connect the two devices. Now, choose “Photos” on the Android phone, and hit “Transfer” to begin the transfer from the iPhone.
Extra Tip: Best Way to Transfer Photos from Android to iPhone
The best app to share photos from Android to iPhone is iToolab WatsGo, which can move important photos, messages, and other media to the other device securely. It provides multiple transfer methods, from USB-C to Wi-Fi direct transfer, as well as avoiding the need for any factory reset.
This means users can transfer data without risking losing data. Even if you are in a hurry, this app ensures a data transfer speed of 35MB/s, so you don’t have to waste time. This app is compatible with a wide range of Android devices and iPhones without any brand restrictions.
In simple words, iToolab WatsGo is the solution when you wish to transfer your high-quality photos without any inconvenience. Therefore, you do not need to go through complex processes; all you need to do is download the application today and begin transferring photos with ease.
Simplified Tutorial to Transfer Photos from Android to iPhone
You can go through the easy steps given below to understand how this app makes it effective to move data:
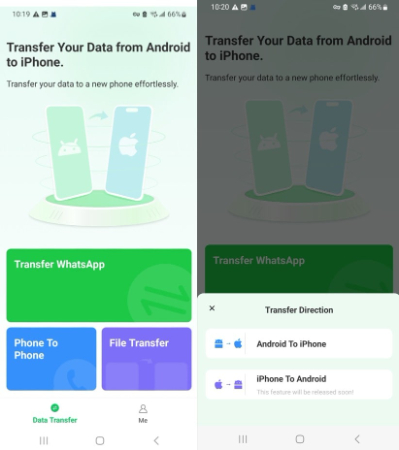
Step 1 Launch the App and Choose the Android to iPhone Option
On an Android phone, tap the “Phone to Phone” option from within the “Data Transfer” tab. Next, choose the “Android to iPhone” option from the “Transfer Direction” menu.
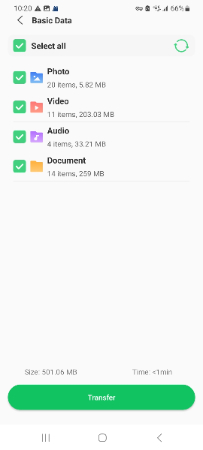
Step 2 Select Photos and Connect the Two Devices with Wi-Fi
After that, toggle on the required app from where you need to transfer photos, and pick the “Photos” option from the “Basic Data” screen. Once that’s done, hit the “Transfer” button to access the “Permission Reminder” options. When all permissions are allowed, tap “Next” to proceed.
Step 3 Access QR Code and Begin the Transfer Process
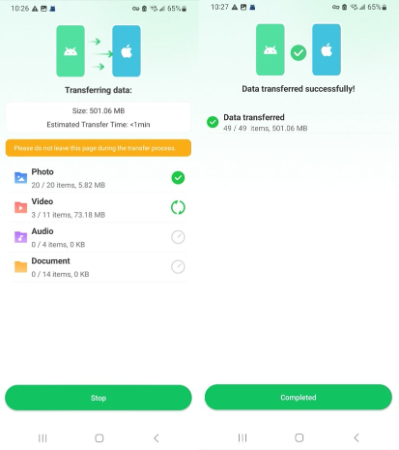
Next, download WatsGo via TestFlight on your iPhone and scan the QR code to initiate the transfer process. After the process is done, press the “Completed” button to halt it.
Conclusion
In the end, this article provided users with a wide range of the best ways to send photos from an iPhone to an Android. You learned how email, Samsung Smart Switch, and other apps helped you move essential pictures within mere minutes or seconds.
Despite that, the most efficient app without any complications in moving data is iToolab WatsGo. Therefore, if you want to learn more about it, explore it yourself today by installing it.

