Check the tutorial to see how PassWiper for Excel helps you recover Excel open password and remove restriction password.
Let’s see the video guide firstly.
How to Recover Excel Open Password
There are 3 attack modes to recover Excel open password: Dictionary Attack, Combination Attack, Brute Force Attack. Each attack mode is suitable for a different situation.
Use Dictionary Attack Mode
This mode is suitable for users who have a vague impression of the password information. For example, if you know some of the numbers, characters or the length of the password then this is the best choice for you.
Step 1. Download and install PassWiper for Excel on your computer, choose “Recover Excel Password”.

Step 2. Import your protected Excel file, then select the “Dictionary Attack” method and click “Recover” to move on.
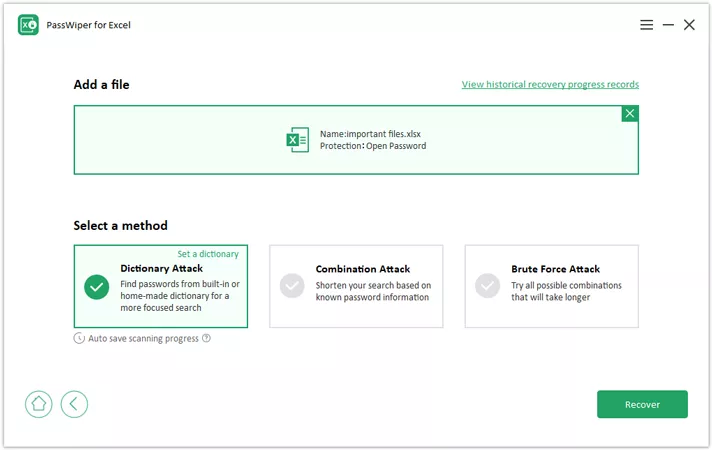
Note: If you want to make your own dictionary file, check the guide here to know more.
Step 3. The scanning time depends on the length and complexity of your password.

Note: If you want to stop the scanning process, PassWiper for Excel will auto save the process for you. You can continue scanning at the next time.


Step 4. Once the scan is complete, you can view your passwords and copy them.

Use Combination Attack Mode
This method is suitable for those users who know most of the password information, even the specify prefix or specify suffix. It will help you find your password quickly.
Step 1. After installing PassWiper for Excel, select “Combination Attack” then hit “Next”.

Step 2. Next, you should select the password information to move on. If you have no idea about the information just ignore the steps and click “Next” to move on.


Step 3. Once you filled your password information, you can see all the information in the summary window. Next, click “Start” to move on.

Step 4. The scanning process will take a while, if your password has been found then you will see the follow screen.

Use Brute Force Attack Mode
If you know nothing about your password, try this method to unprotect it. This method may take a long time to find your password. So, be patient.
Step 1. Select “Brute Force Attack” and click “Recover” to move on.

Step 2. PassWiper for Excel will start scanning your Excel file. You can check the recovery progress at any time.

Step 3. Once done, your will see the password on the screen.

How to Remove Excel Restriction Password
If you can access your Excel file but no rights to edit or add worksheet? Well, this function will help you remove the restriction password from Excel.
Step 1. Download and install PassWiper for Excel on your computer, and select “Remove Excel Password”.

Step 2. Import the Excel file with restriction password and then click “Remove” to go on.

Step 3. In a minute, your Excel restriction password will be removed. Now, you can edit your workbook without limitations.

Just open my phone plz
Hi Zizilehana, if you want to remove password from your Android or iOS device, you should try iToolab UnlockGo (Android) or iToolab UnlockGo.
password lost open my phone
Hi Paveal, do you mean that you want to unlock your phone?
Unlock Android Devices: UnlockGo (Android)
Unlock iOS Devices: UnlockGo (iPhone)
unlock Apple ID
Hi faizan, if you want to unlock Apple ID, then you can free download UnlockGo iOS Unlocker to have a try.
please I want to unlock my android device oscal flat 1c
Hi Robert, you can try our program UnlockGo Android.
please help me fro lock unlock
Hi Karan, iToolab UnlockGo Android Unlocker can help you unlock FRP lock on some popular Android brands. You can visit the official webpage to learn more information.
my Android phone password missing and unlock
Hi Abdul, you can try iToolab UnlockGo Android.