We all have that one snap we would rather keep to ourselves. It could be an embarrassing selfie, a funny screenshot, or a personal photo that we, for one reason or another, don’t want others to see.
Whatever the case, there are moments when we just want to lock photos on our iPhones to keep them from anyone’s prying eyes.
Now, for Android users, getting this level of privacy is simple through the phone settings (for some devices) or even downloading third-party apps. But what about iPhone users; is there a way to lock photos on an iPhone?
Well, that’s what this article is all about. Herein, we’ll equip you with some tricks on how to lock photos on iPhone, so read on.
Part 1: Can You Put A Lock on Photos App on iPhone?
While Apple has been at the forefront of keeping their users’ data safe, it really comes as a surprise that they have for years neglected a seemingly basic privacy feature like locking one’s photos and other essential files.
But that’s about to change, thanks to the iOS 18, which is currently only available in beta version until later this year.
The new version brings more peace of mind to the users by allowing them to lock apps they prefer to keep private and, for additional privacy, hide some of them in a locked Hidden apps feature, so no one can even know they’re installed on the phone – let alone see what they contain!
This feature cuts across all apps, including the photo app. This brings to an end the need to use other indirect, function-non-targeted methods to lock your photos on an iPhone.
But that’s for iOS 18, which is still awaiting official release. That means we may need to cling a little longer to the indirect alternative ways of providing security to the snaps we prefer to keep private.
Part 2: How to Lock Photos App on iPhone?
Whether using iOS 18 or an earlier version, there’s something you can do to protect your photos. Let’s see how to put a password for photos on iPhone.
- Way 1. Use Shortcuts to Lock Photos App
- Way 2. Use Screen Time to Lock Photos App
- Way 3. Use A Password to Lock Photos App
Way 1. Use Shortcuts to Lock Photos App
The first way to lock your photos on your iPhone is by using the Shortcuts to automate the lock feature when the Photos app is launched. This method is only available to those using iOS 16.4 or later and is easy to execute:
- Open the Shortcuts app on your iPhone.
- At the bottom panel, click on the Automation option.
- Tap on the Create Personal Automation.
- Scroll down and click on the App option.
- Check the Is Opened option and then select Choose.
- Pick your Photos app on the apps list and then click Done.
- Click Next and then Add Action.
- Type Lock Screen in the text field, switch off the Ask Before Running toggle and then press Don’t Ask to finish the action.
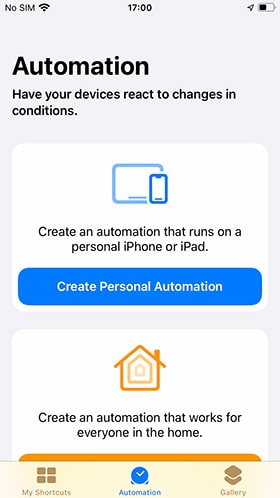
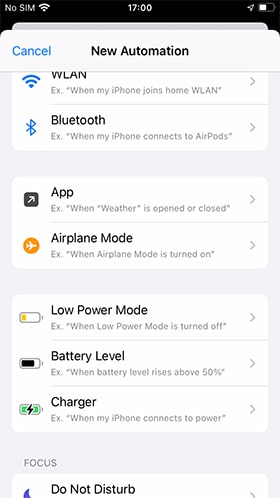
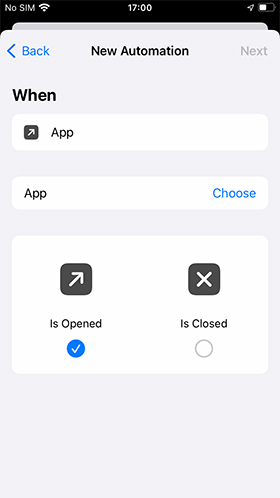
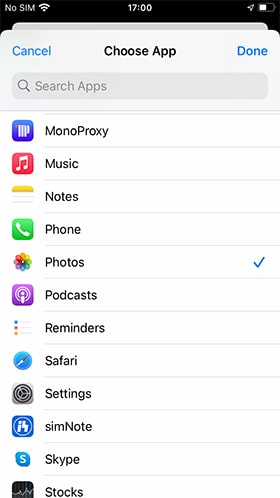
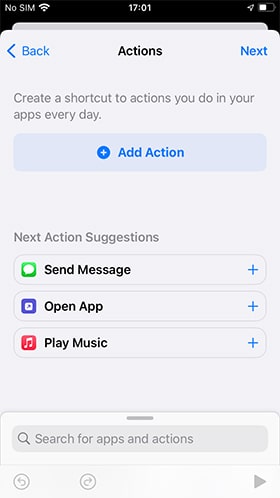
And that’s it! Your Photos app will now lock upon opening, and you’ll need to use your password to access it.
Way 2. Use Screen Time to Lock Photos App
The other indirect way you can inject some sense of privacy into your photos is by utilizing the Screen Time feature to lock your Photos app.
This feature allows you to set the amount of time you intend to spend on the apps you choose.
The sense of security comes from the fact that once you hit the set screen time limit, you’ll need to input your passcode to continue using the app.
Here’s how to lock Photos app on iPhone:
- On your iPhone, go to Settings.
- Scroll down and tap on Screen Time.
- Click on the Turn On Screen Time and then tap Continue on the pop-up.
- Select the This Is My iPhone or This Is My Child’s iPhone.
- Scroll down to find the Use Screen Time Passcode and set your passcode.
- Once done, go back and click on the App Limits option on the Screen Time menu and then enter your screen passcode to gain access.
- Click on Add Limit.
- Choose the category housing your Photos app, and then select the individual Photos app on the list.
- Select Next at the top-right corner of the page.
- Under Time, set the time limit to 1 minute.
- Tap Add on the upper right corner.
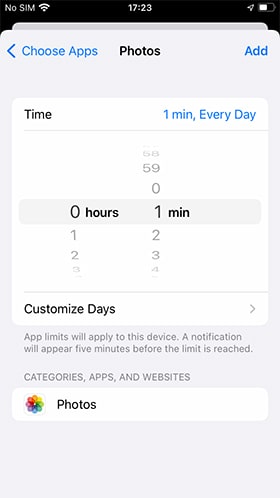
Once the set time limit has elapsed, you can only access the app by entering the Screen Time passcode, which is different from the lock screen passcode you use to unlock your phone.
That means if you forget the Screen Time passcode, you won’t be able to use the limited apps for more time until you reset it. And the way to do that? There are several of them, but you may want to try using the iToolab UnlockGo iPhone Passcode Remover.
iToolab UnlockGo is a well-engineered program that helps you solve a multitude of lock-related issues that you may encounter on your iPhone, iPad, or iPod Touch.
With the tool, you can:
- Remove Screen Time passcode without any data loss
- Within 3 simple steps, you can completely remove Screen Time passcode
- Unlock various iPhone screen passcode, like 4/6-digit passcode, Touch ID, Face ID
- Remove activation lock without previous owner or password
And the best part? It is highly compatible. In fact, it’s even designed to accommodate the incoming iOS 18 and is available in both Windows and Mac versions.
Enough of the introduction. Let’s now take a look at how you can remove your Screen Time passcode using UnlockGo.
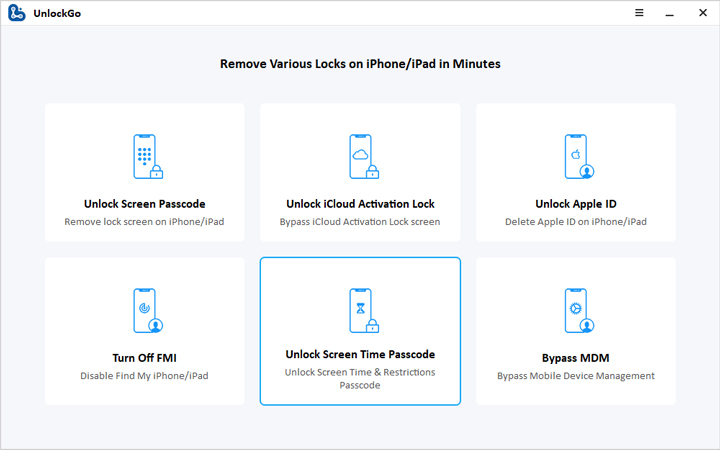
Step 1 Download and install iToolab UnlockGo on your computer. Connect your iPhone to the computer using a USB cable. Launch the tool, and then click on Unlock Screen Time Passcode from the home screen menu.
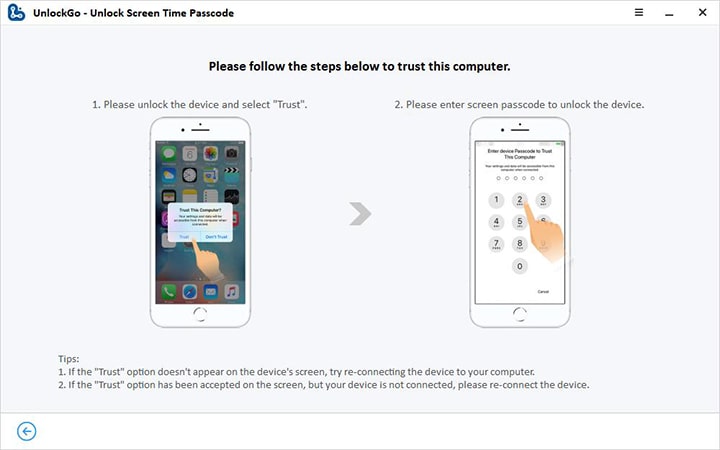
Step 2 Unlock your device and click the Trust button before inserting your lock screen passcode to verify device ownership.
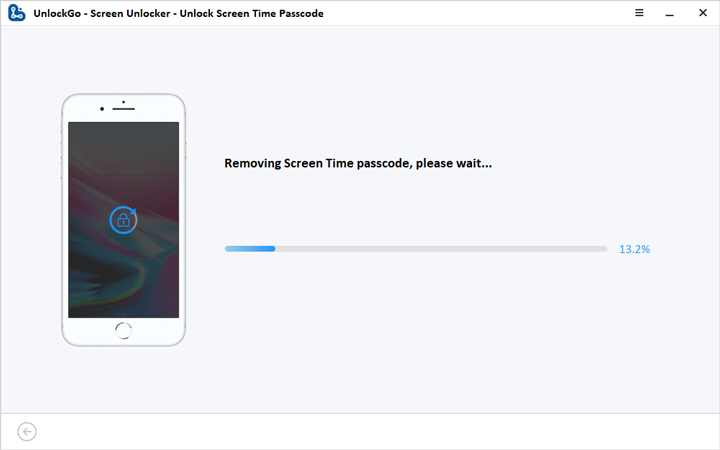
Step 3 The tool will begin the reset process. Wait until the process is complete. It only takes seconds, and you should see the successfully removed screen after everything is done.
Way 3. Use A Password to Lock Photos App
If using iOS 18 beta, utilize the new dedicated app lock feature to secure the Photos app.
Let’s see the procedure of how to lock photos on iPhone with Face ID or passcode:
- Long-press on the Photos App.
- Select Require Passcode/Face ID (or Touch ID).
- Tap Require Passcode/Face ID again.
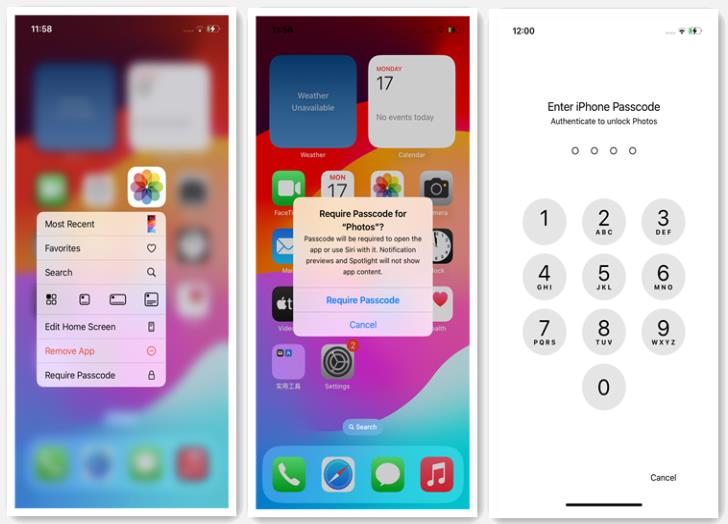
You will now be required to scan your face or use touch identification or enter the iPhoen passcode each time you want to open the Photos app.
Part 3: How to Lock A Single Photo on iPhone?
If you want to hide a single photo, move it to the Hidden Album. If you’re using iOS 14 and later, you can then turn off the Hidden album to keep the snaps completely concealed.
Here’s how to use this feature:
- Launch the Photos app.
- Choose the photo you want to hide.
- Tap the 3 dots at the top right and click on Hide.
- Confirm the decision to hide.
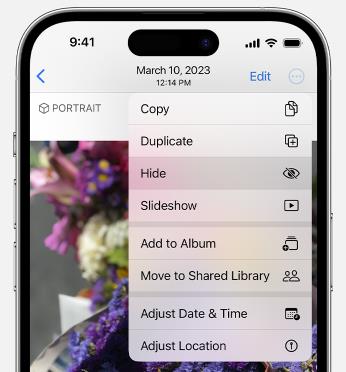
The photo will now be moved to the Hidden Album and won’t appear in your camera roll.
And there, you have it! You’ve successfully locked a single photo without needing any third-party apps or additional procedures.
Lock Photos on iPhone: Keep Your Privacy Safe
Your photos are a private collection of memories that you wouldn’t want just anyone stumbling upon. That’s why it’s essential to take the necessary measures to protect them.
Whether you’re using iOS 18 or any other version, these are some of the ways that you can use to lock your Photos app and ensure that only authorized persons have access.
And while at it, don’t forget to utilize tools like iToolab UnlockGo iPhone Passcode Remover in case you encounter any issues with your device’s Screen Time passcode. The tool is also handy when dealing with iCloud activation lock, Apple ID deletion challenges, and much more.
iToolab UnlockGo iPhone Passcode Remover
389,390,209 people have downloaded it


