
In this guide, we take a look at iCloud DNS Bypass as a way to unlock an iCloud locked iPhone or iPad. This method appears in many solutions and there are those who claim that it works to unlock the device. But it does have its advantages and disadvantages which we look at in the course of this article. Moreover, we’ll elaborate on how you can use iToolab UnlockGo to bypass iCloud lock without any problem.
Let’s get started.
Part 1. What Is iCloud DNS Bypass?
Your device will send an activation request to Apple servers whenever you set up the device, factory reset it, or restore the device. If Find My iPhone is enabled on the device, you will also see the iCloud Activation Lock Screen appear on the screen, asking you to enter your iCloud login details.
The problem comes in if you have forgotten your Apple ID password or you purchased a second-hand device that is iCloud locked. The iCloud DNS Bypass method is one of the ways to unlock the device and gain access to the features and data on it.
Domain Name System (DNS) converts readable names into IP addresses. This is why it is one of the ways you can unlock an iCloud locked device: it allows you to change the activation path by sending it from the Apple servers to the iCloud Bypass DNS server for authentication.
It may sound complicated, but the process can be quite easy and can be done from the device’s Wi-Fi settings. Even if the activation screen pops up and you are not able to access the device, you can use the setup screen to access the Wi-Fi setting and change the DNS address.
Part 2. How to Bypass iCloud with DNS?
The following is a step-by-step guide on how to use DNS method to unlock the device. But before we begin, it is important to make sure that there is a SIM card installed on the device as this method cannot be completed without a SIM card.
Step 1: On the Setup screen, choose your country and language.
Step 2: On the next page, you will see the Wi-Fi settings page. Tap on the “I” next to the Wi-Fi network that you would like to connect to.

If you don’t see the “I” symbol, press the Home Button > More Wi-Fi Setting” and look for it.
Step 3: Tap on “Forget this Network”.
Step 4: Tao on the “I” again and then enter the DNS server to bypass the iCloud Activation lock. The DNS server you enter will depend on your location. Here are the various IP addresses depending on the region:
- USA: 104.154.51.7
- South America: 35.199.88.219
- Europe: 104.155.28.90
- Asia: 104.155.220.58
- Australia and Oceania: 35.189.47.23
- Other continents: 78.100.17.60
Step 5: Tap on the “Back” option after entering the IP address and then select the Wi-Fi network you want to use and enter the password.
Step 6: Tap on the “Back” button again and you will be on the iCloud Bypass screen.
Step 7: Now just scroll down the page to go to the menu and set up your apps and features
Be Aware Before Bypassing Activation Lock with DNS:
- Unlock Not Guaranteed: There’s a chance the device might still be unable to activate after the attempt.
- DNS Bypass Crash Risk: This method can be unstable and crash during the process, potentially causing further issues.
- Limited iOS Compatibility: This method only works on older devices running iOS versions 8 to 10.
Part 3. iCloud DNS Bypass Not Working? Try UnlockGo – Best iCloud Removal
If you’re unable to bypass iCloud with DNS then don’t worry, we’ve something special for you. iToolab UnlockGo is a powerful unlocker that can bypass activation lock on iPhone/iPad/iPod touch without password. You don’t need to go through the complicated process of using DNS bypass.
Main Features of UnlockGo
- It can bypass iCloud on iPhone 5s-iPhone 17 with iOS 12-iOS 26.
- The unlocker enables you to bypass iCloud without jailbreak.
- It’s easy to use. You can bypass activation lock in 1 click.
- The unlocking process is fast, which only takes 5 minutes.
- Based on the advanced technology, it guarantees a high success rate up to 99%.
Did you enjoy this tip? Subscribe to iToolab YouTube Channel
Here are the steps to bypass iCloud on iOS 26 with UnlockGo:
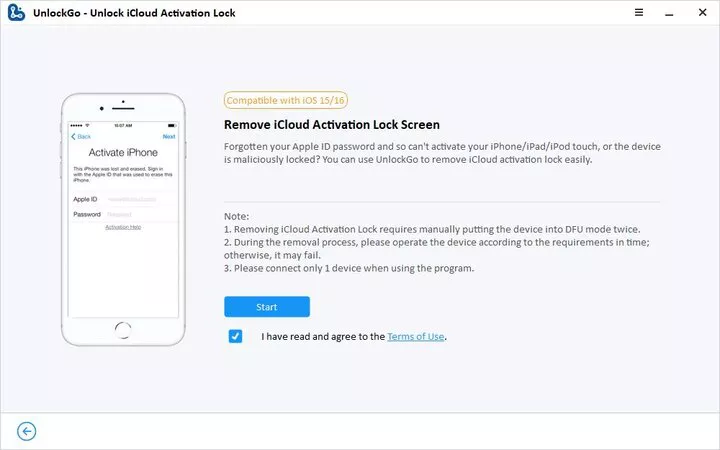
Step 1 Launch the UnlockGo and click “Unlock iCloud Activation Lock” on the main interface.

Step 2 Connect your locked iPhone/iPad to the computer with a USB cable. Then click on the “Start” button to continue.
Step 3 UnlockGo will start to bypass activation lock on your iOS device. Your device will restart automatically several times during the removal process. It’s normal.

Step 4 Several minutes later, the activation lock will be removed from your iPhone/iPad successfully. Then, you can follow the on-screen instructions to set it up.

Also Know: What is iCloud DNS Bypass Crash?
This section will be very helpful to you if you’re unable to use certain features and functions of your device.
- Click on the Menu > Applications option.
- Search the “Crash” using the search bar and click on it to restart your phone automatically.
- Now, wait for your device to restart and then select the “Language and country”.
- Head to Choose a Wi-Fi Network > Home Button > More Wi-Fi Settings.
- Tap on the “i” button located just next to the Wi-Fi and then head to Menu > HTTP Proxy.
- Remove the existing HTTP address and list of all emoji icons from the “Server” zone.
- Enter the “8888” in the “Port” zone.
- Head to Back > Next to move to the unlock screen. Press the home button to unlock your device.
- Tap on the language option to use all disabled functions of your device.


Summary
While a DNS bypass might seem like a quick solution for bypassing iCloud Activation Lock on older iPhones (iOS 8-10), it’s important to understand its limitations. This method offers only partial functionality, essentially mimicking an iPhone experience within a web browser.
For a more permanent and unrestricted solution, consider exploring tools like iToolab UnlockGo.
Pershendetje liam uroj te kesh mire. Une jam xhorxhina lico kam blere nje iphone 13 pro te dores te dyte te lutem mund te me ndihmosh per ta aktivizuar ? A ka ndonje menyre nga ky program? Pasi nuk e suporton pajisjen time. Faleminderit 🙂
Hello Xhorxhina, actually, there is no way to bypass iCloud activation lock on iPhone 13. It’s recommended that you contact the previous owner for help.
I just bought a computer that has an aviation log and I can’t figure out how to factory reset it. Can you help me with that?
Please
Hi Eric, our program doesn’t support to bypass Activation Lock on computer.
please can you help me unlock my iPhone xr please
Hi Azie, iToolab UnlockGo can’t bypass iCloud Activation Lock on iPhone XR right now.
Hola muy buen día escribo para saber city n prueba gratis ya que en la publicidad dice descarga gratis no sé si tenga con ello una prueba de 5 o 10 días el programa sin más por el momento me despido quedando atento de sus comentarios saludos
Hi jose, iToolab UnlockGo is not a free program. You can free download the program to check the compatibility. However, you need a license code to enjoy all functions.
Nisaidie yafadhali ime lokiwa
Hi Hashim, what can we do for you? Please describe your problem in detail.