
We all love iPhones due to their sleek design and outstanding performance, as well as their many valuable features. However, even the most reliable technology occasionally presents issues that disrupt our smooth experiences. For instance, many iPhone users have reported a mysterious issue where their apps disappear unknowingly.
This can be really frustrating, especially when you want to open your favorite app to enjoy social media or play a game. So, this article will let you explore the possible factors causing this “app disappeared from iPhone” issue and the solutions to resolve it. Make sure to read it to the end to get rid of this annoying situation.
Why Did an App Disappear from My iPhone?
As we said, we will first consider the reasons for the “app missing from iPhone” problem before heading to the solutions. Several factors can cause this issue, ranging from simple mistakes to system update glitches. So, take a look at these elements to have a better grasp of solutions for restoring the missing app:
- Accidental Deletion: The foremost thing to confirm is whether you have unintentionally deleted the app. It can happen if you or someone else using your iPhone accidentally removed the app while organizing the home screen.
- Restrictions Settings: For those who have enabled restrictions on their mobile, certain apps might be hidden or restricted from appearing on the home screen. This feature is usually used for parental controls to limit access to specific applications.
- Hidden Apps: Sometimes, apps can be hidden from the home screen without being deleted. This might occur if you move the app to a folder or another home screen, making it harder to find.
- iOS Beta Update: Another significant factor that could lead to the “app icon missing iPhone” problem is updating your iPhone iOS version to iOS 18 beta. In this regard, compatibility issues or glitches might occur after the update process.
Situation 1: App Icon Disappeared from iPhone But Still Installed
Those going through a situation where an app icon disappears from their phone’s home screen even though it is still installed can get help from this section.
Evidently, several factors could lead to it, like apps being moved to another folder or being manipulated by a software update glitch. But you don’t need to worry as you can efficiently resolve the “app disappeared from the home screen iPhone” issue and bring the missing app icon back to your home screen.
1. Find Your Apps in the App Library
As we know, App Library is a feature on iOS devices that organizes all your installed apps into categorized folders, making it easy to locate any app. So, the first approach to deal with the missing app situation is to find it in the App Library.
Once you discover it, you can bring it back to the home screen of your iPhone wherever you want. Here’s how you can use this feature to find the disappeared app:
Instructions: When you reach your iPhone home screen, keep swiping left until you reach the App Library page. Now, find the relevant app using the search bar at the top and enter the app name. Finally, tap and hold the icon, then drag it back where you want to place it.

2. Check App Folders
Another possibility is that you might have unintentionally moved that app into a folder, causing it to disappear from your home screen. Folders are usually made to place similar types of applications together so that you can locate and access them effortlessly.
However, any accidental placement can create trouble finding an app from the home page. Go through the instructions below to learn how you can recover an app from the folder:
Instructions: After accessing your device’s home screen, check each folder one by one to see if the app is hidden inside any of them. When you find the desired app, press its icon and hold it for a while to make it movable. Then, drag it out and place it back on the home page to your preferred location.

3. Unhide the Home Screen Page
The home screen of your iPhone isn’t based on just a single page but gives you the option to create multiple pages. Occasionally, there can be a circumstance that the missing app resides on a hidden home screen page, causing the “icon missing on iPhone” issue.
In this case, you must make that page visible or replace the app with your default home screen. Follow the instructions given here to perform this task:
Instructions: Start by pressing and holding the iPhone apps, and then tap the “Edit Home Screen” option which will lead you to the edit mode. Afterward, tap the dots for page slides at the bottom to preview all the home screen pages. Just make sure that the pages you want visible have a checkmark under them.

4. Use Spotlight Search
Apple’s Spotlight Search feature lets you quickly locate any app on your mobile, even if the icons have disappeared from the home screen. You can use it to type the name of the relevant app in its search bar, which can confirm whether the app is still installed.
In this way, you can bypass the need to navigate home screens and folders, making it a quick approach to finding the missing app. Have a look at the following instructions to learn Spotlight’s usage:
Instructions: Simply swipe down from the middle of your iPhone’s home screen, which will display a search bar. There, input the name of the missing app, which will appear in the search results if it is still installed. You can tap the app and open it directly, confirming its presence on your iPhone.

5. Reset Home Screen Layout
This technique addresses the issue of apps disappearing from the home screen on iPhone by restoring the default arrangement of all apps. In particular, it returns built-in apps to their original positions and organizes third-party apps alphabetically.
Thus, you can eliminate any custom-made folders or hidden app pages that are participating in this miserable situation. Apply the steps mentioned below to reset your home screen to its default state:
Step 1. Begin by launching “Settings” of your iOS smartphone and go to the “General” category. There, scroll down to reach the bottom of the screen and select the “Transfer or Reset iPhone” option.

Step 2. Next, tap the “Reset” option, which will bring a bottom-up menu with multiple options. Finally, choose the “Reset Home Screen Layout” option and provide your iPhone’s passcode to complete this operation.

Situation 2: All Apps Disappeared from Home Screen iPhone
In the previous section, our concern was finding the missing app installed on your mobile but not visible. However, those experiencing a situation where all apps disappear from your iPhone’s home screen can be pretty alarming. Still, you can resolve the “apps disappeared from iPhone” problem by implementing the techniques given below:
1. Restart iPhone
Whenever we get hit by a software-related glitch, the very first attempt to try is restarting your device. After restarting, your iPhone reloads the iOS and all associated system processes, which can resolve minor issues that may have caused apps to disappear. Those who are not aware of how they can restart their iPhone can follow the instructions below:
Instructions: Press the “Volume” and the “Side” button on your iPhone for a few moments. Once the shutdown slider appears on the screen, slide it to the right to turn your mobile off.

2. Reinstall the Missing Apps
After restarting the iPhone, if you still face the “app icon disappeared from iPhone” issue, you can go to reinstall the application. In this way, you can eliminate any potential corruption leading to the disappearance of the apps.
When you reinstall an app, it downloads fresh from the App Store, replacing any problematic files. Additionally, this approach can reestablish the app’s icon on the home screen, making it accessible again. Just make sure to install the latest version of that application from the official App Store.

3. Use iToolab FixGo to Repair iOS System Issues
As it appears to be a massive system glitch where you are unable to locate your applications on App Library or Spotlight Search at all, there’s a pressing need to repair the OS. In this matter, you can get help from iToolab FixGo which can repair almost any iOS version without losing a single bit of the data.
Moreover, this reliable third-party software even allows you to access recovery mode for free with a single click. Therefore, by going through the step-by-step guide of this system repairing method, you can easily restore your home screen apps:
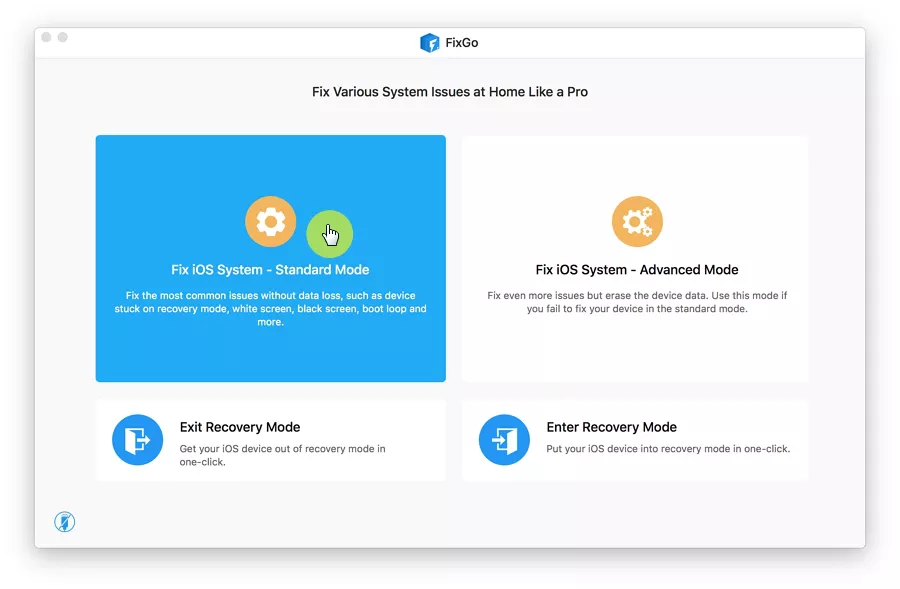
Step 1. Initiate the Repair Process by Connecting Your iPhone
First of all, download and install this third-party iOS system repair tool on your PC and open its application. You can now select “Fix iOS System – Standard Mode”. Afterward, use a lightning or USB-C cable for data transmission and click “Fix Now” after connecting your iPhone to your PC.
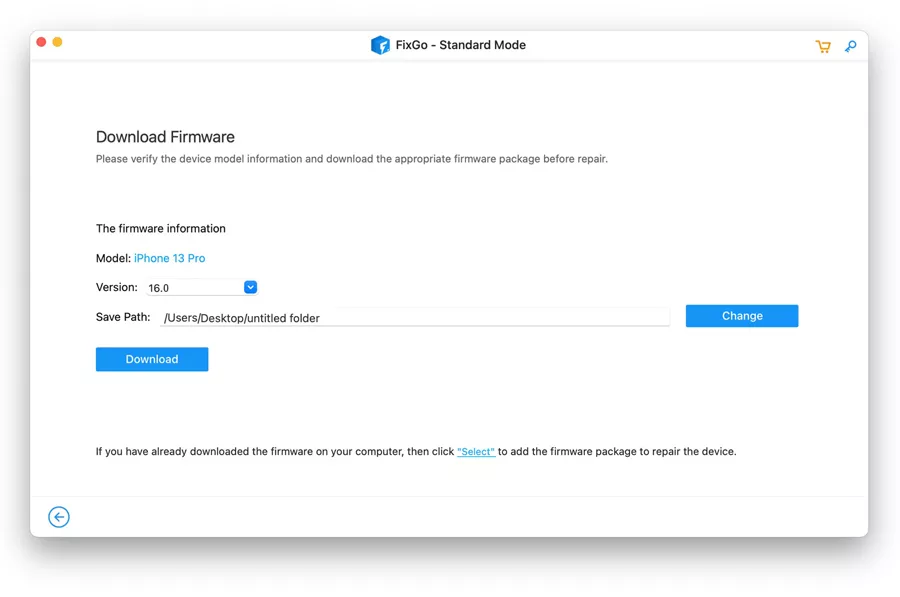
Step 2. Download the Firmware to Repair iOS
Following this, choose the iOS version of your mobile that you want to repair and adjust the download path where you want to save the file. Once done, tap on the blue “Download” button and wait for the process to complete.
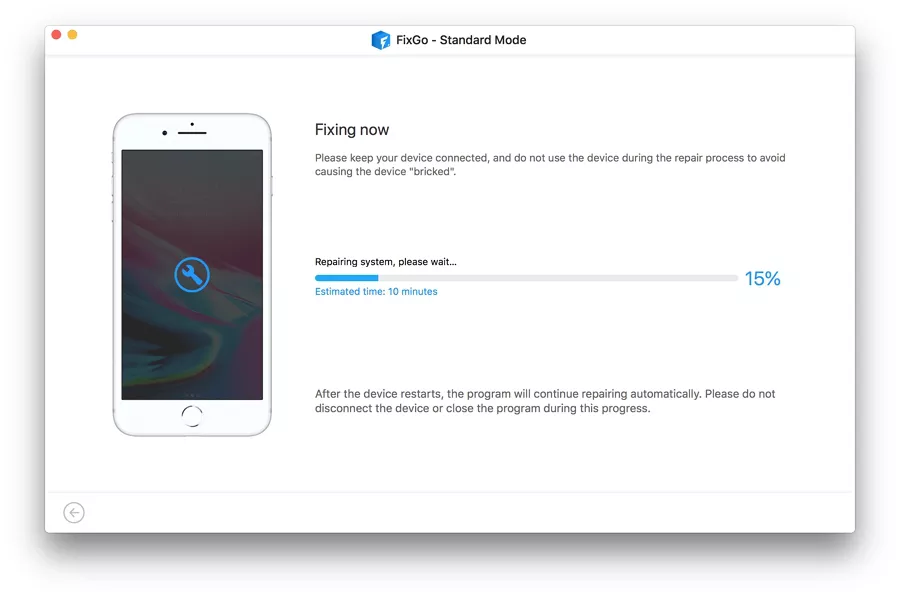
Step 3. Finalize the iOS Repair Operation
Firmware downloading will be completed within a few minutes, leaving you with the final step to start the repairing process. Simply press the “Repair Now” button, which will resolve the issue if it is caused by your iPhone’s operating system.
4. Downgrade iOS Version Using FixGo
Since Apple released the latest iOS 18 Beta update, everyone has tried to jump into that update to cherish newer features. However, it can cause some issues like the “app icon missing iPhone,” as it’s not yet configured to the stable state.
Thus, if the problem started after shifting to the new iOS version, downgrading to a previous version might help you resolve the issue. Download FixGo first and then walk through the step-by-step manual below to learn how to downgrade iOS via iToolab FixGo:
Step 1. Access the Fix iOS System – Standard Mode
Begin by launching the FixGo app on your computer and wait for it to load. Then, click the “Fix iOS System – Standard Mode” option that will take you to another page.
Step 2. Download Firmware for Previous iOS
Next, attach your iPhone to your computer using the Apple-certified cable and tap the “Fix Now” button. After that, click the “Version” drop-down menu and choose your previous version there. Once chosen, press the “Download” button and let the downloading bar reach the end.

Step 3. Start the iOS Downgrading Process
Once the firmware download process is completed, hit the “Repair Now” button which will begin the downgrading of your operating system. Once finished, you can restart your iPhone and see if the app missing issue gets resolved.
5. Factory Reset iPhone
Even after reverting to the older operating system of your iPhone, there’s a slight possibility that the issue might persist. When you have reached this position, the only fix left is to reset your iPhone to its factory state. But before that, don’t forget to back up your phone data, as this operation gives your phone a clean start. Go through the following steps to perform a successful factory reset:
Step 1. From the “Settings” app of your iPhone, go to the “General” settings. Afterward, swipe up and go below to access the “Transfer or Reset iPhone” option.
Step 2. On the next screen, tap “Erase All Content and Settings” and confirm it with the “Continue” button. Next, enter your iPhone’s lock screen passcode to begin with this reset task.

Those who have forgotten to back up their device’s data before applying this procedure and have lost it, we got your back. Using the perfect data recovery software, RecoverGo iOS, you can claim back all your precious data in no time.
Conclusion
In conclusion, besides several exciting features of the new iOS 18 update, you might be facing some troublesome issues like “apps disappeared from iPhone.” In this regard, we have tried to explain the possible reasons which might take part in this situation. Besides, the guide has helped you with some of the most appropriate fixes you can attempt to bring your missing apps back.
Other than that, you are now fully aware of robust third-party software, iToolab FixGo, which helps you with almost every iOS-related issue. Just give this app a try and get yourself relieved of the frustrating iPhone problems.
FixGo – Repair iOS system issues
389,390,209 people have downloaded it