
A common error that iOS users are likely to encounter is the Error 2009, which results from several things. One common cause of this error is using a USB cable that isn’t from Apple. In such a case, the solution is buying a new original cable. You can also unplug peripherals from your computer. However, there is still a chance that even after doing all these things, your iOS device may still have the Error 2009. If this is the case, then follow through with the options below to find a solution.
Usually it happens on the old devices such as iPhone 6/6 Plus/5. But, it may also happens on the newly device such as iPhone 12, iPhone 13. No matter what iPhone models, you can always find a solution here.
How to Fix iPhone Error 2009 or iTunes Error 2009
If one of your device connect to computer and iTunes report error 2009, then you can use normal ways below to fix the poroblem. If each your iPhone have same peroblem when connecting to computer, then you should fix iTunes error 2009 with a free tool – TunesPal.
1. Use FixGo to Fix iPhone Error 2009 in 3 Clicks
Error 2009 is mainly a result of problems associated with the software. It completely makes sense to suggest that the best solution to fixing an iOS device having an error 2009 is to use one of the best iOS system repair software. Here we recommend that you use iToolab FixGo. It is more efficient compared to other restore options such as iTunes. It doesn’t cause any data loss. It is worth noting that it functions o0n all iPhone and iPad devices.
The features of iToolab FixGo include:
- Doesn’t allow data loss when an iOS device isn’t functioning properly.
- It repairs more than 200 iOS system problems.
- With just a single, you can gain access into or exit the recovery mode.
- Compatible with all iOS systems including iPadOS 15, iOS 15 and iPhone 13.
To use FixGo to fix Error 2009, follow the following steps:
First, download FixGo on your computer, install it, and then launch to complete the following steps.
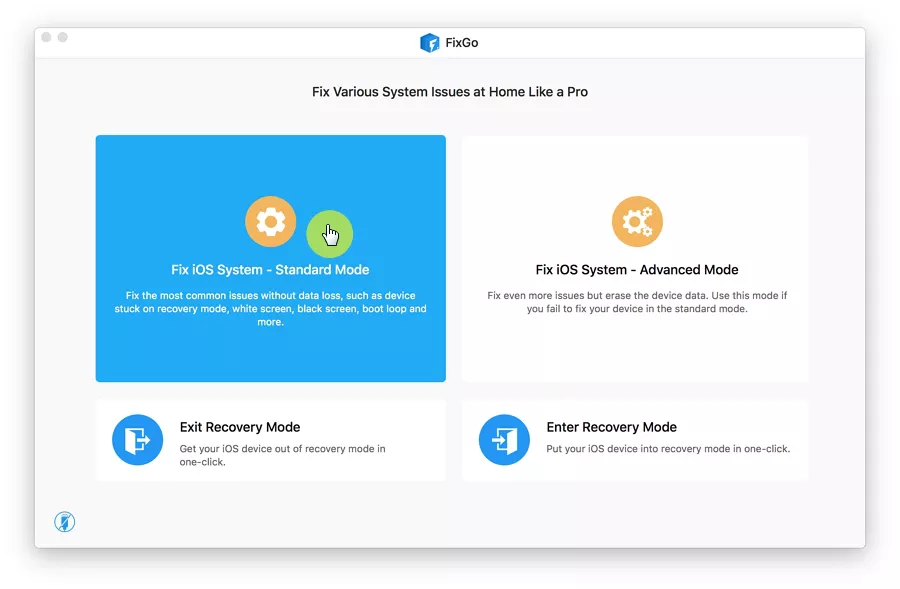
From the main window of the program, select the ‘Standard Mode’. Standard Mode enables you not to lose data. You can then connect your iOS device with a computer using a USB cable.
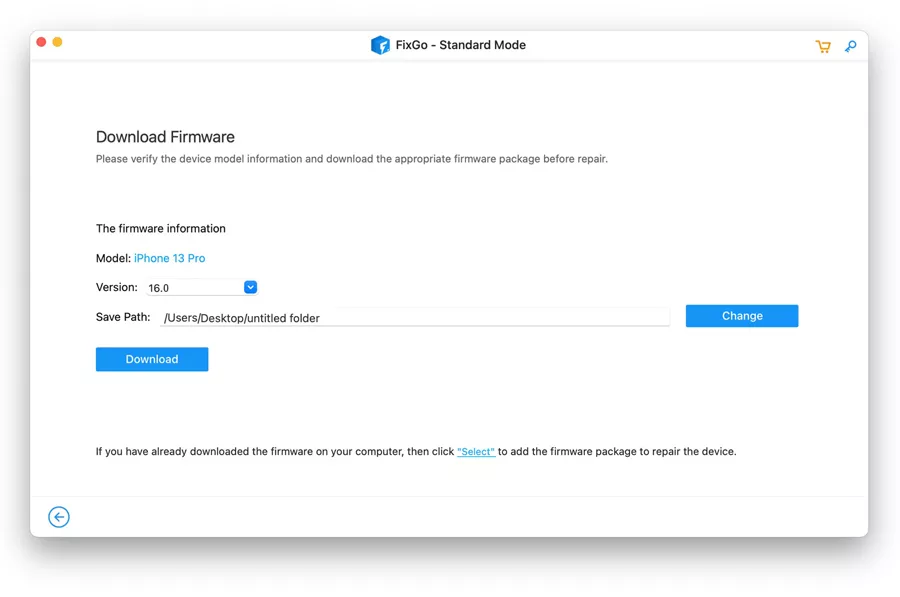
The only way FixGo is going to fix the problem is if you install the latest firmware. Click on the ‘Browse’ option to select your firmware path, and then click on the ‘download’ option.
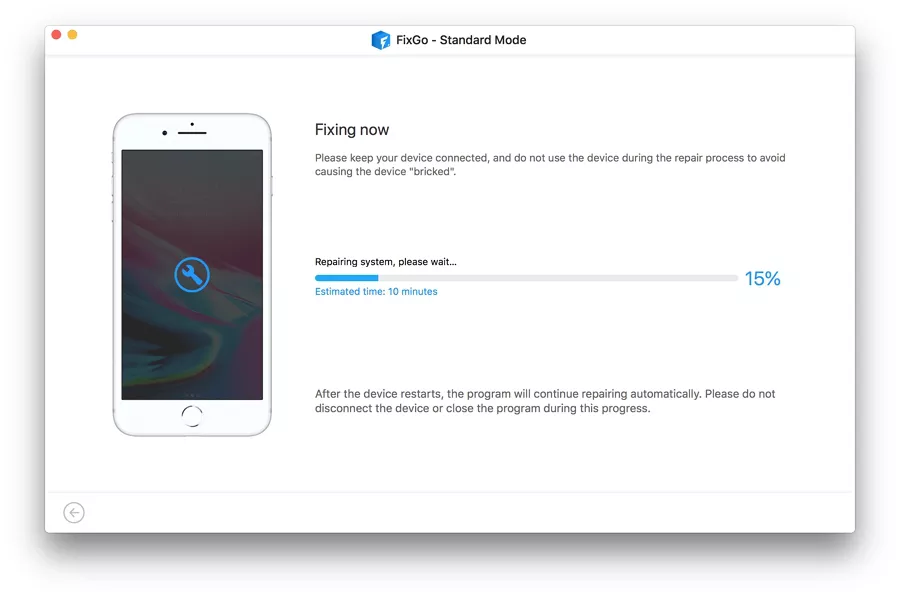
After the download is done, click ‘Repair Now’ to start fixing your iPad or iPhone. Leave the connection in place until the process is done. The device will restart in normal mode.
2. Restart Your Computer and iOS Device
If you have any error or issue with your device, restarting the computer is the most basic troubleshooting method that you can ever use. For instance, it is the first thing that comes to mind any device loses a network connection or becomes unresponsive.
Most iOS related issues can be repaired with restarting, with error 2009 being no exception. If you ever encounter this error on your device after restarting the computer, try to restart the device to see if the error is gone.

3. Update iTunes and Reinstall iTunes
To update iTunes, you must first check whether there is an available update. To do this, follow the steps below:
Update iTunes
- From your computer, open iTunes.
- Check through the top screen menu and click ‘Help’.
- Scroll through the options and select ‘Check for Updates’.
- If an update is available, go through guides to update it successfully. If there is no update, reinstall iTunes by following through the steps below.

Reinstall iTunes
To reinstall iTunes, you must first uninstall the existing one from your computer and then download and install the latest version. After installing, try the restore or update process again to see whether the issue has been corrected. If this process doesn’t help, proceed to the next solution.
4. Disable the iTunes HelperIf you are still reading through, chances are the error isn’t fixed yet. There is still hope with disabling the iTunes helper.
To disable iTunes helper on your device, follow the steps below effectively:
Step 1. From the top-left corner of your screen, click on the ‘Apple logo’ and then choose ‘System Preferences’. This will open the system settings panel on your computer.

Step 2. After opening the settings panel, click the ‘Users & Groups’ option. This will open for you a panel where you can modify groups and user settings on the computer.

Step 3. On the screen that follows, click on your username. You can then proceed to click on the ‘Login Items’ from the right panel. You will see all options that launch when your computer reboots.
Step 4. Click on iTunesHelper from the available items and then select the minus sign. This will remove iTunesHelper from the list.

5. Update Your Computer
An outdated OS of your computer can cause Error 2009 on your device. To prove that this isn’t the cause, check the available MacOS X or Windows update and download it. You can proceed to start the update or restore process. If the Error 2009 isn’t fixed yet, consider the next solution.

6. Pause Anti-Virus Protection
There is a high chance that you have an anti-virus on your computer to guarantee security. To solve the error, you can follow the steps below to pause the anti-virus protection:
- Go to the anti-virus on your computer is updated.
- Go to setup or settings menu to find an option named “Pause Antivirus protection”.
- Turn on the option and try again to restore your iPhone using iTunes or Finder .

7. Restore the iPhone
Restoring your iPhone or iPad can help solve many errors on the device. However, it will cause data loss. You should therefore ensure that all critical data are backed up. You can then proceed to restore your device using the steps below:
- Using an original USB cable, connect your iOS device to your computer.
- Click on the launchpad and search for iTunes. Launch the application.
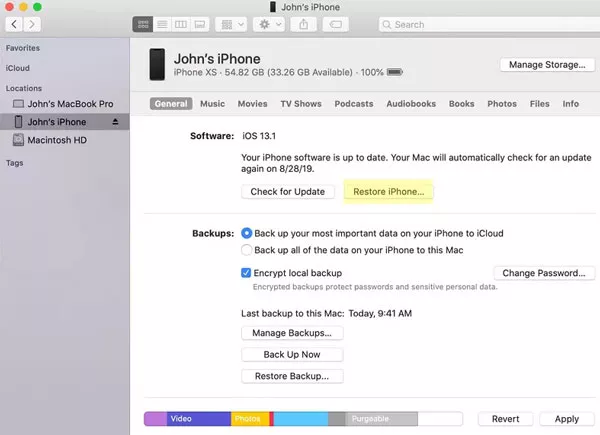
- After launching iTunes, you can click on the device icon at the top to see your iPad or iPhone’s summary.
- You will notice an option that says ‘Restore iPhone’. Click the option to restore your device and fix the error.
This should be able to fix the error 2009 on your device.
Conclusion
Fixing Error 2009 can be very easy if you follow through with the steps that we have highlighted correctly and effectively. All the steps are simple and straightforward and can be achieved using manageable resources. If one option doesn’t work, try the next one. You might be lucky to find all of them working for you. However, if none solves the error, you can contact Apple support or visit your nearby Apple shop for help. We hope that you find the solution you are looking for.