
If you have been using iOS devices for a while now, then you have heard of recovery mode at some point. It is usually a way to resolve some of the issues on your iPad that may interfere with the normal functions of your iPad.
In this article, we take a look at exactly what iPad recovery mode is, how to put your device in recovery mode, and how to exit recovery mode. We will also show you what to do if the recovery mode fails to resolve the issues with your iPad.
What Is iPad Recovery Mode?
Recovery mode is a failsafe method that allows iPad owners to recover their devices if they become unresponsive for one reason or another. Recovery mode boots your iPad in iBoot (bootloader mode), thereby allowing for the flashing of the new iPadOS on your iPad.
The bootloader can only respond to a limited number of commands and since it doesn’t load the iPadOS, it doesn’t carry many of the restrictions of the iPadOS.
You can put your device in recovery mode under the following circumstances:
- When iTunes fails to recognize your iPad or it says that your iPad is in recovery mode
- When the iPad is stuck on the Apple Logo without a progress bar
- When you see the “connect to iTunes” screen on your iPad
- If your iPad is locked or disabled and you want to reset it
- your iPad is in USB restricted mode
- your iPad experiences problems installing an iOS update
- You are recovering your iPad from a jailbreak and you want to install the OS in a clean slate environment
How to Put iPad in Recovery Mode And Get out of Recovery Mode?
To put your iPad in recovery mode, follow these simple steps:
Step 1: Make sure that your computer and iTunes are up to date. Then open iTunes on MacOS Mojave 10.14 or earlier and PC or open Finder on MacOS Catalina 10.15.
Step 2: Connect your iPad to the computer and keep it connected, while you put your iPad in recovery mode.
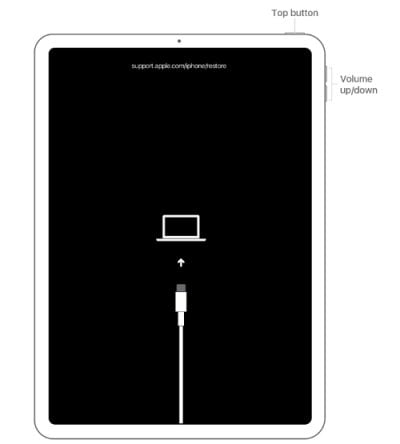
For iPads with Face ID: Press and quickly release the Volume Up button. Do the same with the Volume Down button. Then press and hold the Top button until your iPad begins to restart. Keep holding the Top button until your iPad goes into recovery mode.
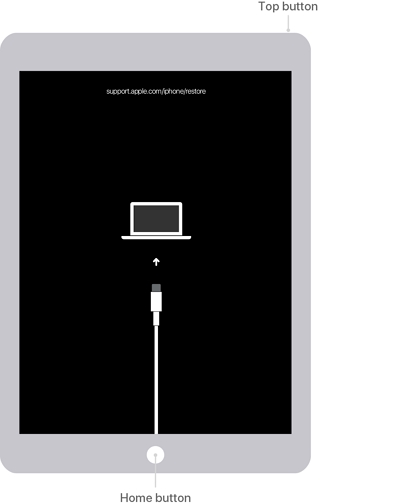
For iPads with Home Button: Press and hold the Home and the Top (Side) buttons at the same time. Continue to hold the buttons until the recovery mode screen appears.
Step 3: In the message that appears in iTunes or Finder, click “Restore” to allow iTunes or Finder to reinstall the software without erasing the data on your iPad.

How to Get iPad out of Recovery Mode?
There are two ways to get your iPad out of recovery mode. Here’s how each one works:
Exit Recovery Mode without Restore
- Press the Sleep/Wake and the Home buttons together (or just the Power button for iPads without a home button)
- Keep holding the buttons until the iPad turns off completely.
- Then press and hold the power button until your iPad restarts normally.
Exit Recovery Mode with Restore
- Turn on the iPad and connect it to the computer.
- If iTunes doesn’t recognize your iPad, disconnect it and then hold down the “Home” button while reconnecting it.
- Click “Restore” and iTunes will erase all the data on your iPad before restoring it from a recent backup. When device restarts, it should be in normal mode.
What to Do If Recovery Mode Doesn’t Work?
If recovery mode doesn’t work to fix the problem, we recommend using iToolab FixGo. This iOS repair tool is designed to help you fix 200+ of the most common iOS problems without causing data loss. Here’s how to use FixGo to fix these common problems:
Step 1 Download and install the program on to your computer and launch it.
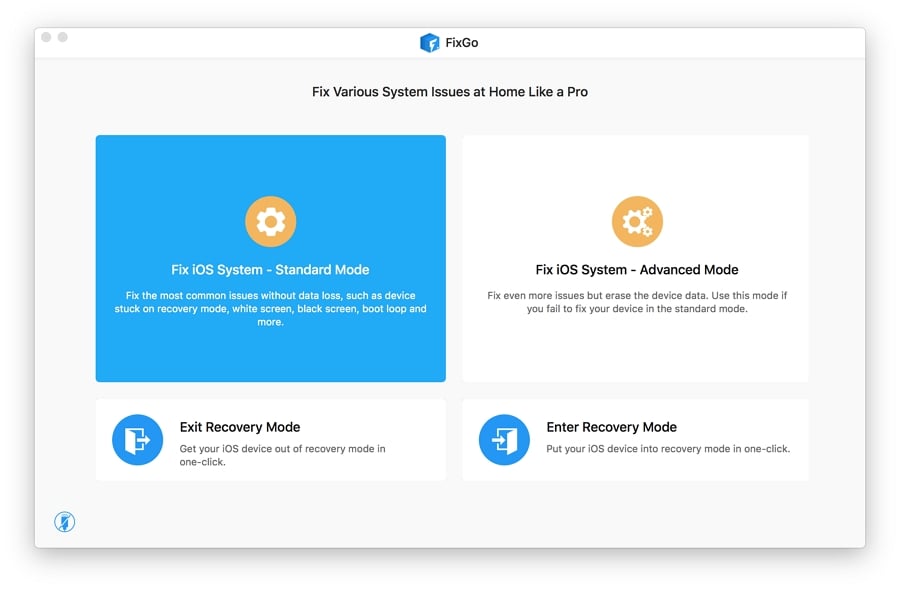
Step 2 In the main window, click on “Standard Mode” to select it and then connect the iPad to the computer using USB cables. Once the program detects your iPad, click on “Fix Now” to begin.
Step 3 You will need to download the latest firmware for your iPad in order to repair it. Just click “Download” in the next window to begin the firmware download.
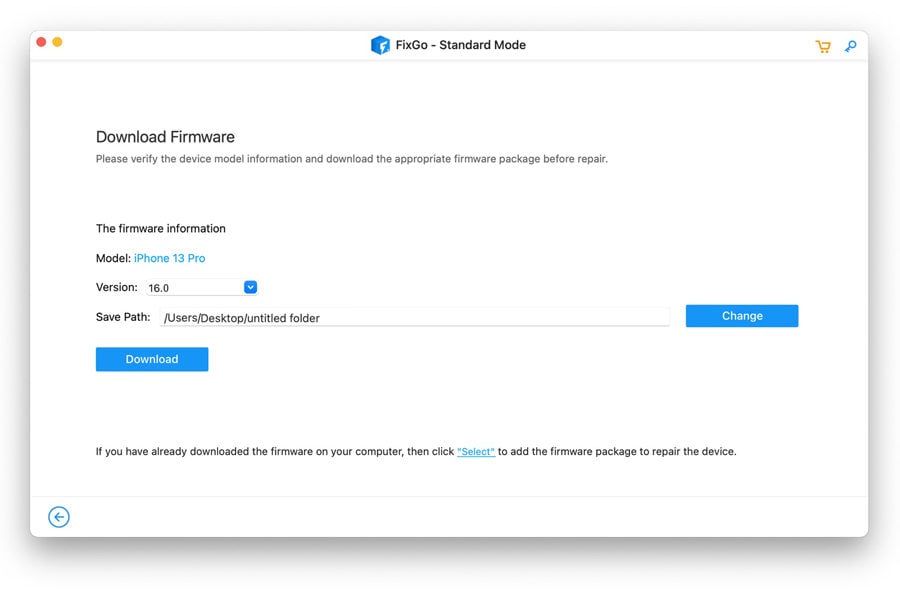
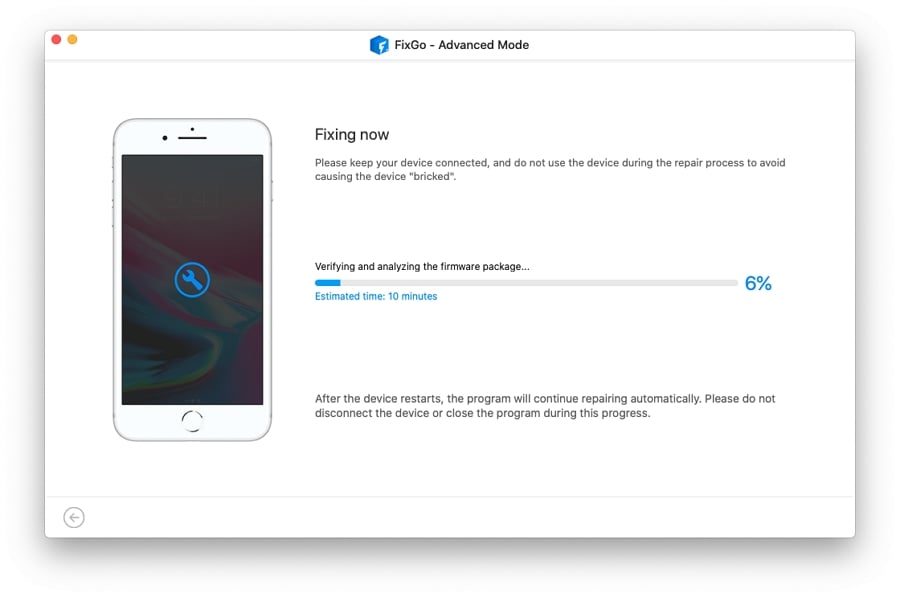
Step 4 Wait for the firmware package to be downloaded and when the download is complete, click “Repair Now” to allow the program to begin fixing your iPad. FixGo will notify you when the process is complete.
Also Read: 5 Proven Ways to Fix iPad Stuck in Recovery Mode
Is Recovery Mode for an iPad the Same as DFU Mode?
You may also have heard of DFU mode and although some people may use DFU and recovery mode interchangeably, the two modes are vastly different from one another. DFU (Device Firmware Update) is a much deeper restore solution that should only be used if recovery mode doesn’t work. The process for putting an iPad in DFU mode is also vastly different. Here’s how to put an iPad in DFU Mode:
Step 1: Use your iPad’s lightning cable to connect the iPad to a computer running iTunes (PC and macOS Mojave 10.14) or Finder (Mac OS Catalina 10.15). Open iTunes or Finder if they don’t automatically open.
Step 2: Then follow these steps to put your iPad in DFU mode:
- iPads with Face ID: Press and Quickly release the Volume Up button and then press and quickly release the Volume down button. Then press the “Power button” for about 3 seconds. While holding the Power button, press and hold the Volume Down button. Keep holding both buttons for at least 10 seconds. Release the “Power” button, but keep holding the Volume button for another 5 seconds.
- iPads with a Home Button: Press and hold the Top button for at least 3 seconds and while still holding the Top button, press and hold the home button. Hold both buttons for at least 10 seconds and then release the Top button, but continue to hold the Home button for another 5 seconds.
Step 3: When the screen turns black and a message appears in iTunes or Finder, your iPad is in DFU mode.
Conclusion
To sum up, we just had a detailed look on iPad recovery mode. Now you should know how to put your iPad into recovery mode. And iToolab FixGo is highly recommneded among the above methods, as it also helps to fix many iPad issues, like iPad stuck issues, iPad won’t turn on, iPad update issues and more. We also provide some useful solutions that can be used to fix iPad is stuck in recovery mode. You can force restart your device, use iToolab FixGo, or restore the device using iTunes.
iToolab FixGo
Fix 200+ iOS/iPadOS/tvOS Issues at Home Like a Pro
- Free to Enter/Exit iPhone Recovery Mode.
- Fix iPhone/iPad/Apple TV system problems and no data loss.
- Downgrade iOS to any supported versions.
- Support all iOS devices and the latest versions.


