We live in a digital era where protecting our personal data is difficult yet crucial.
Are you also concerned about your asset’s security and privacy?
The solution to this problem is hiding apps you don’t want to show others on your iPhone.
With the update of iOS 18, iPhone users can protect their privacy using the iPhone hide apps feature.
This article will explore how to hide apps after iOS 18 update in detail.
What is the Purpose of Hiding Apps on iPhone
Currently, hardly anyone does not use a smartphone. As smartphone use increases, the need to protect personal information also increases.
Whether you want to hide your banking application or simply want to keep away some apps from prying eyes, hiding apps is crucial.
The major purpose behind hiding apps on iPhone includes:
- Hiding an application on an iPhone protects your device from unauthorized access and security breaches.
- If you want your home screen to be neatly organized, this app’s hide feature enables you to declutter it.
- You can quickly find your favorite and useful applications on your iPhone without spending a single second in locating them.
How to Hide Apps in iOS 18
With the new iOS 18 hiding apps feature, it is now easy to hide apps on your iPhone.
This iOS 18 hiding feature works on third-party applications, meaning you can not hide built-in applications such as Clocks, Calculators, Maps, Stocks, and, most importantly, Photos.
If you are the one wondering how to hide apps on the iPhone with iOS 18, follow this simple step-by-step guide:
Step 1: Long Tap the App Icon
From your crowded iPhone home screen, locate the app you want to hide and long tap on it.
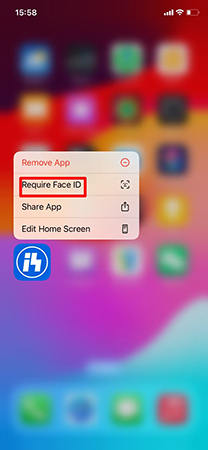
Step 2: Tap Require Face ID
When you tap on the selected application, you will have 4 options. Tap on Require Face ID.
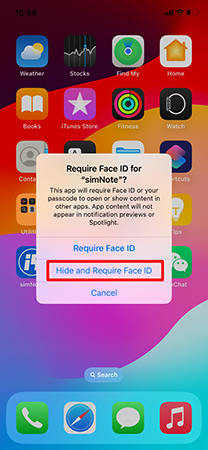
Step 3: Select Hide And Require Face ID
Now select Hide and Require Face ID to hide the application.
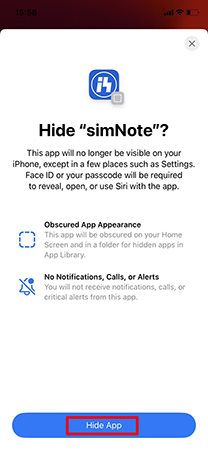
Step 4: Tap Hide App
You will now see a message appear on the screen about what will happen to your application and how it will no longer be available on your home screen. Select Hide App to complete the hiding process.
How to Unhide Apps in iOS 18
You have hidden some of your important applications on your iPhone, but now you no longer need to hide them, and you are looking for ways to unhide them.
Here is what you need to do now:
Step 1: Find the Hidden Folder
Scroll your iPhone home screen to the right until you reach the App Library. Now scroll down to it and find the Hidden Folder.
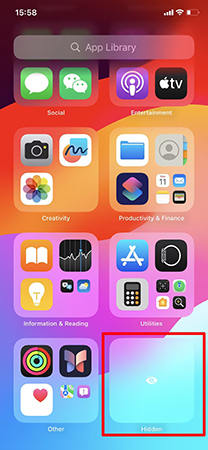
Step 2: Use Your Face ID
Tap on the Hidden Folder to access the hidden files. Your iPhone will ask for your Face ID to confirm it’s you.

Step 3: Long Press the App
You will now have access to all the hidden applications. Locate the one you want to unhide and long-press on it.
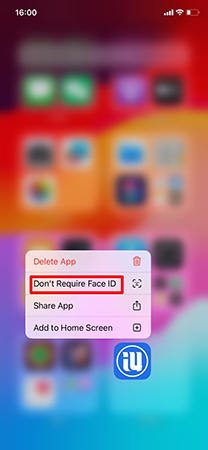
Step 4: Don’t Require Face ID
When you long-tap on the selected application, choose Don’t Require Face ID, and your application will again appear on your iPhone’s home screen.
FAQs About Hiding Apps of iOS System
1. How Can I Permanently Delete Apps from the App Store?
Unused applications are like a burden on your iPhone. They not only take up space but also impact its performance and speed.
Thus, if you have any unused or old applications on your iPhone that you need any longer, we recommend you get rid of them immediately.
Follow the steps written below to delete such apps permanently from the App Store:
- Open the Apple Store on your iPhone.
- At the top right corner of the screen, tap on the Account icon.
- Scroll through the list of applications to find the ones you do not need or use anymore.
- Swipe left the selected application, and you will see a Delete option.
- Tap Delete, and the application will be permanently deleted. Now, you have extra space to download your favorite application.
2. How to Locate Hidden Apps on iPhone 14?
Since you know how to hide apps in phones with iOS 18, how to find them and make them appear on the home screen again?
To do so, you need to follow the steps below:
- Firstly, you must locate the hidden applications on your iPhone 14 by going to your iPhone home screen and opening the Apple Store.
- At the top right corner of your store, tap on the Account icon.
- Now, tap on your Apple ID and name.
- Once on your account screen, scroll down and locate Hidden Purchases.
- You will see a list of hidden applications along with the Unhide option with each. Select Unhide for the application you want, and your application will appear on your iPhone 14 home screen immediately.
More Private And Secure Life
Despite having a strong system to protect privacy, iPhone users were still concerned about security breaches.
But the new iOS 18 iPhone update has so much to offer for iPhone users!
Along with other attractive and useful features, iOS 18 has introduced a hide app feature. This enables you to hide your important applications in just a few simple steps. If you want to unhide them, again follow the easy steps, and your application will be unhidden in no time.
Not only will this protect your privacy, but also enable you to protect your confidential application from unauthorized access. Undoubtedly, iOS 18 will mark a new era of revolution for iPhones!

