

Apple has introduced a new security feature aimed at enhancing the protection of iPhones against theft. This feature is known as Stolen Device Protection which mandates Face ID or Touch ID authentication.
The rationale behind Apple’s implementation of this security line is to prevent thieves from quickly obtaining a biometric scan and escaping with the iPhone because criminals, employ tactics like shoulder-surfing, and aim to seize both your device and passcode. With this access, they can compromise your Apple ID, steal sensitive information, and make a profit selling the device.
However, if this feature is activated, they would need to provide the delayed biometric input to reset the device. I know you have a lot to ask as this feature is new to you, so let me break down it for you with some tips to protect your device’s personal data in case of loss or theft.
So keep reading…
Part 1: What Is Stolen Device Protection for iPhone?
Apple’s beta notes explain “Stolen Device Protection” as, an added security layer in case of iPhone theft and passcode exposure.
So Apple explains the feature as:
- Requiring Face/Touch ID for password access
- A security delay for critical settings changes
- Exemption for familiar locations like home and work
Stolen Device Protection aims to block unauthorized access, data erasure, or device reset for resale. If a thief attempts significant changes, a one-hour delay proceeds, requiring successful login afterward. Hence, this delay is crucial, especially when leveraging Find My to track the device’s location.
Part 2: How to Turn on Stolen Device Protection on iPhone?
I have visited lots of Apple communities where users ask:
“Should I turn on stolen device protection”
The answer is YES absolutely! But to activate Stolen Device Protection, ensure you use two-factor authentication for your Apple ID and set up on your iPhone:
-A device passcode,
-Face ID or Touch ID,
-Find My, and Significant Locations
Additionally, you should update your device to iOS 17.3 and follow these steps:
1. Open Settings and tap on Face ID & Passcode.
2. Enter your device passcode.
3. Toggle Stolen Device Protection on.
Note: If attempting to disable in an unfamiliar location, a security delay occurs. Remember to deactivate Stolen Device Protection before selling, giving away, or trading your iPhone.
Part 3: What to Do Immediately if Your iPhone is Stolen?
If your iPhone is stolen and you feel that there is nothing you can do to save your sensitive information, then relax! Because this section will give the best possible ways to protect your personal iPhone safely, we will discuss multiple steps here, so make sure you attempt all one by one.
- 3.1 Locate Your iPhone and Mark as Lost
- 3.2 Change Your Apple ID Password
- 3.3 Report to Local Police Department
- 3.4 Remotely Erase Your iPhone
- 3.5 File a Claim for iPhone Replacement
- 3.6 Contact the Carrier to Disable Your Account
- 3.7 Remove Your iPhone from Trusted Device
3.1 Locate Your iPhone and Mark as Lost
Lost Mode lets you lock your iPhone so that others can’t access your personal information. You can create a message for the device so the next owner will know it’s a lost device when the thief tries to resell the device. However, you must have turned on Find My iPhone before it’s lost.
Note that Lost Mode activation also deactivates cards and passes used with Apple Pay.
To initiate Lost Mode or lock a device:
1. Navigate to Find Devices on iCloud.com and pick the device from the All Devices list on the left.
2. If a device is already selected, choose All Devices to go back to the list and select a different device.
3. Click on Mark As Lost.
4. Follow the onscreen instructions to complete the process, ensuring the security measures are in place for your lost device.

3.2 Change Your Apple ID Password
Your Apple ID serves as the gateway to Apple’s interconnected services like the App Store, iCloud, iMessage, FaceTime, and Apple Music. It’s essential for setting up any Apple device. If you suspect a compromise or just for added security, changing your Apple ID password is crucial.
Here’s a simple guide to change your Apple ID password on web:
1. Visit appleid.apple.com and sign in.
2. In the Sign-In and Security section, click on Password.
3. Enter your current password, then set a new one.
4. Confirm the new password.
5. Click on Change Password to complete the process.

3.3 Report to Local Police Department
If your iPhone is stolen, it’s crucial to report the incident to your local police department promptly. Filing a report ensures that law enforcement is aware of the theft, increasing the chances of recovering your device.
Provide the police with details such as the time and location of the incident, along with any relevant information about the stolen iPhone, like its model, color, and unique features.
This proactive step not only assists in the investigation but also contributes to curbing theft and unauthorized use.
3.4 Remotely Erase Your iPhone
If you’ve lost access to your iPhone due to theft or robbery, and your only fear is your personal data falling into the wrong hands, you can remotely erase your device using these steps.
1. Go to Find Devices on iCloud.com and choose your device from the All Devices list on the left.
2. If you’ve previously selected a device, simply click All Devices to return to the list and pick a new device.
3. Click on Erase iPhone.
4. Follow the onscreen instructions to initiate the remote erase process.

3.5 File a Claim for iPhone Replacement
AppleCare+ with Theft and Loss for iPhone provides theft and loss coverage, allowing two incidents every 12 months, each subject to deductible, with potential taxes.
To be eligible for a claim, Find My must be active when the device is lost or stolen and throughout the claims process.
If your iPhone, covered by AppleCare+ with Theft and Loss, is lost or stolen, initiate a replacement claim by signing in with your Apple ID.
This process ensures a swift and efficient replacement for your iPhone in case of unfortunate events. It guarantees a seamless experience, providing reassurance and ongoing support for your device.
3.6 Contact the Carrier to Disable Your Account
If your iPhone is missing, act swiftly by contacting your wireless carrier to disable the associated account, preventing unauthorized use. Check your carrier plan for lost or stolen device terms; if covered, file a claim for potential insurance coverage.
Reporting promptly and understanding your carrier’s options can help mitigate financial losses and expedite the replacement process.
3.7 Remove Your iPhone from Trusted Device
Removing your iPhone from Trusted Devices becomes necessary when you want to enhance security or if the device is no longer in your ownership.
This process ensures that the stolen device can no longer display verification codes, and its access to iCloud and other Apple services is immediately blocked. This is a crucial step in protecting your Apple ID and sensitive information, especially if the device has been lost, stolen, or is no longer under your control.
1.Pick up another trusted device.
2. Go to Settings > [your name].
3. Find the list of devices associated with your Apple ID at the bottom of the screen.
4. Tap the specific device you want to remove.
5. Press “Remove from Account” to complete the process.

Part 4: How to Unlock an iPhone with Password Protection When You Forgot the Password?
If your device is lost or stolen it’s good to take the steps I mentioned above but if when you forget your iPhone password, attempting various combinations can lead to device lockdown.
In such cases, iToolab UnlockGo iPhone Screen Unlocker proves invaluable. This tool simplifies the unlocking process, by removing all kinds of iPhone passcodes, screen locks, Face ID, or Touch ID ensuring you regain access without extensive technical knowledge.
So if you find yourself locked out of your iOS device due to any of these reasons, here’s a simple guide to regain access to your iPhone.
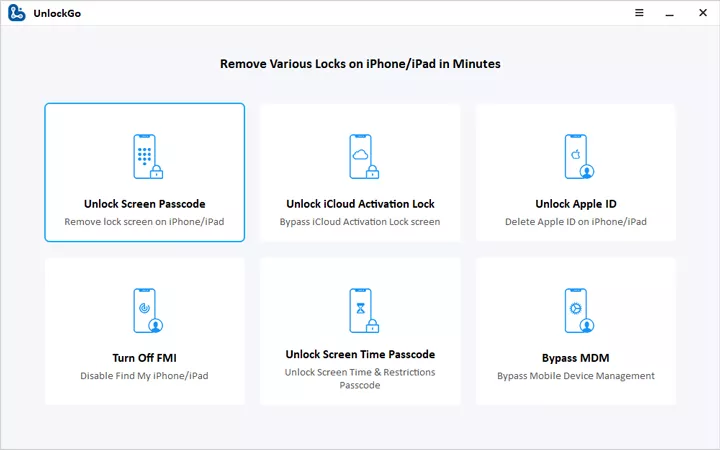
Step 1 Run UnlockGo iPhone Screen Unlocker and select “Unlock Screen Passcode” on the main interface. Ensure your device is connected to your computer. The program should automatically detect it.
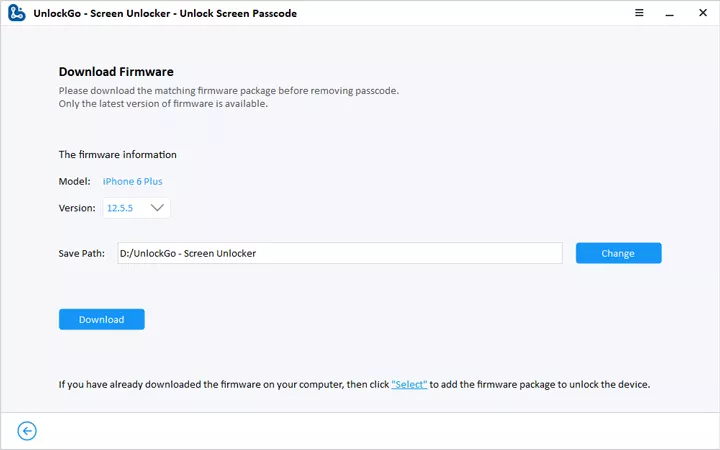
Step 2 Download the latest firmware package by choosing a save path and clicking “Download” or selecting “Select” if you already have the firmware. The download may take time due to the file’s size, so a stable internet connection is recommended.
Step 3 Once the firmware is downloaded, initiate the unlocking process by selecting “Unlock Now”. Keep your device connected during this process, which may take several minutes.
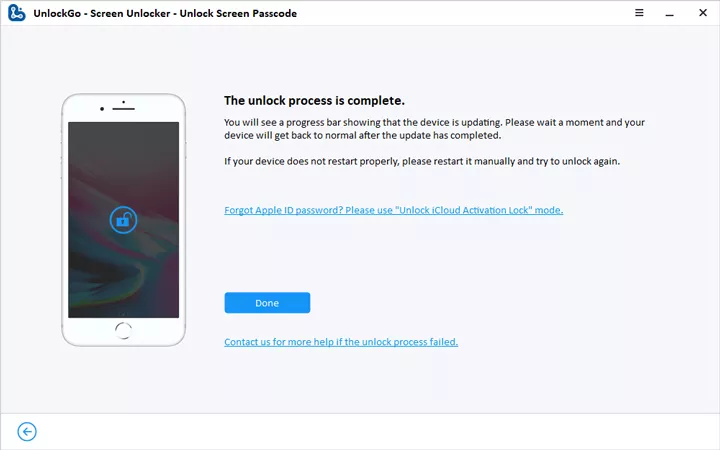
After successful passcode removal, set up a new password, Touch ID, and Face ID settings. Restore your data from a previous iTunes/iCloud backup to complete the process.
No Stolen iPhone Any More
Let’s sum up what value you got! In this guide, we covered key aspects of iPhone security, highlighting the importance of quick action in case of theft, loss, or forgotten passcodes.
We discussed the Stolen Device Protection feature from Apple, encouraging users to activate it for added security against unauthorized access. We also discussed the significance of reporting stolen iPhones to local authorities and utilizing AppleCare+ with Theft and Loss coverage.
For those locked out by password protection, we provided straightforward steps using the iToolab UnlockGo iPhone Screen Unlocker, offering an easy solution.
By taking proactive steps your iPhones and personal data will be better protected.