To avoid frustration and downtime, users need to identify the reason for not being able to send pictures on WhatsApp. Knowing the root cause helps users take the proper steps to fix the problem efficiently. By understanding the exact issue, users can prevent wasting time on unnecessary fixes and address the underlying problem directly to ensure smoother communication on the platform.
This article aims to guide users through the common reasons why WhatsApp is not sending photos and provide workable solutions to these issues. It aims to help users troubleshoot the problem quickly, ensuring they can continue using WhatsApp to share pictures and other media effortlessly. Understanding the reasons behind such disruptions can also help users prevent similar issues in the future.
Part 1. Why Am I Not Able to Send Photos on WhatsApp?
As we look at the fixes to this topic, let us understand why is WhatsApp not letting me send photos. You might not be able to send pictures on the app for several reasons. One of the most common causes is a poor and unstable internet connection.
Whether you use Wi-Fi or mobile data, if the connection is weak, the communication app will struggle to upload and send images to its servers. If your device is running low on storage space, WhatsApp might be unable to properly process and send media files.
The developers frequently update this application to fix bugs and improve performance, so using an old version might result in functionality issues, such as being unable to send images. Moreover, device permissions may sometimes restrict it from accessing your photo gallery. Checking all these factors can help identify why photos not sending on WhatsApp.
Part 2. How to Fix WhatsApp Not Sending Photos Issue?
Moving forward, to fix the issue of WhatsApp not sending photos, there are several steps you can take. Some solutions apply to Android and iOS devices, while others may be platform specific. Let’s walk through the different ways you can resolve this issue and get your app functioning smoothly again.
1. Check Your Internet Connection
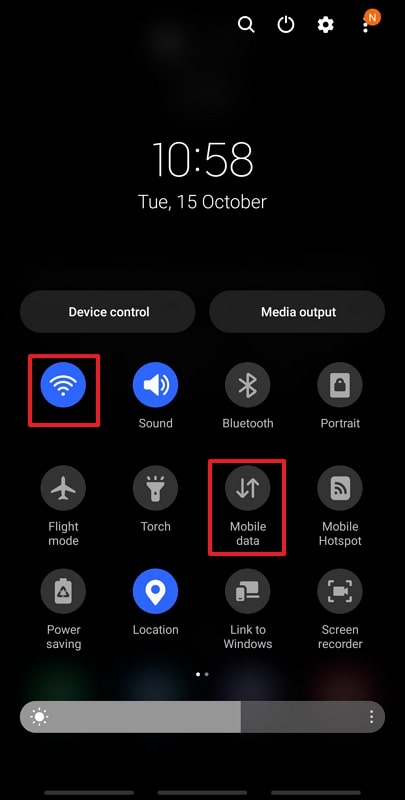
For Android
Instructions. Pull down the top “Notification Panel” of your Android device and check the “Wi-Fi” and the “Mobile data” connection.
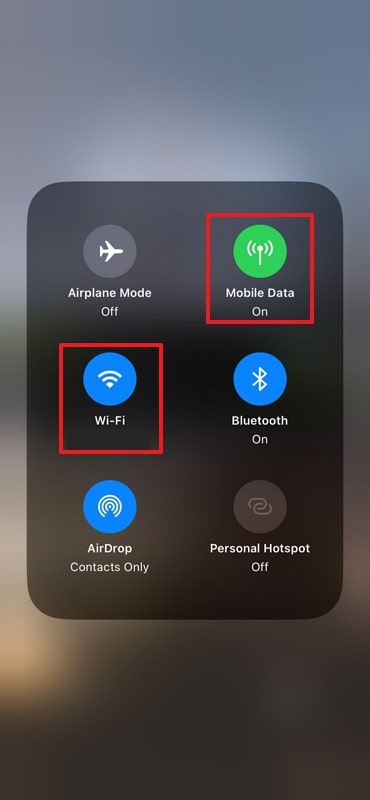
For iOS
Instructions. On your iOS device, pull the “Control Center” panel and get access to the “Wi-Fi” and “Mobile Data” to ensure you are connected to a strong network connection.
2. Reboot Your Phone
For Android
Instructions. Press and hold the Power button on your and tap on the “Restart” option to reboot the phone and start sending images through the app without any complications.
For iOS
Instructions. As you hold the “Power” button and the “Volume” button simultaneously on the iPhone device, a screen appears where you can “Slide to Power Off” the device. You can then restart the device to get it rebooted and fix the WhatsApp issues.
3. Restart WhatsApp
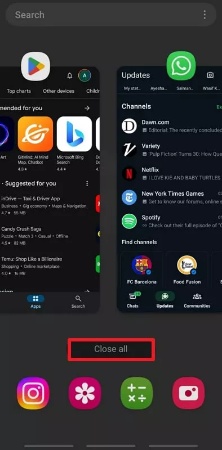
For Android
Instructions. Here, from the bottom of the screen pull up to get a view of the opened background applications, tap on “Close all” to close WhatsApp. Now, you can re-open this instant messaging app and the issue should be solved.
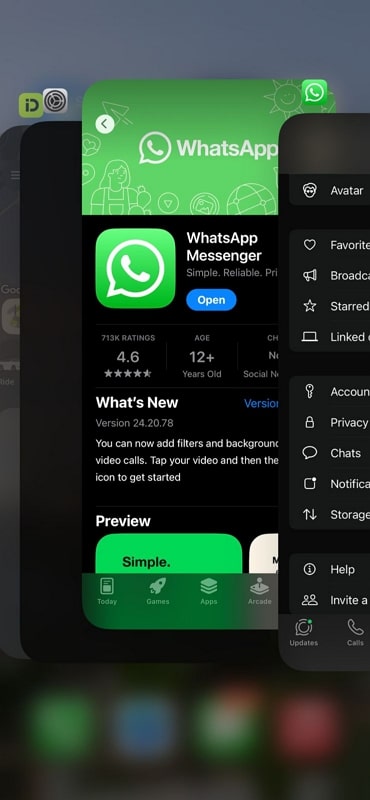
For iOS
Instructions. If you are an iOS user, open WhatsApp and pull up the screen from the bottom to open recent apps. After that, swipe it up to close it from the background and then reopen the application.
4. Clear WhatsApp Cache (Android Only)
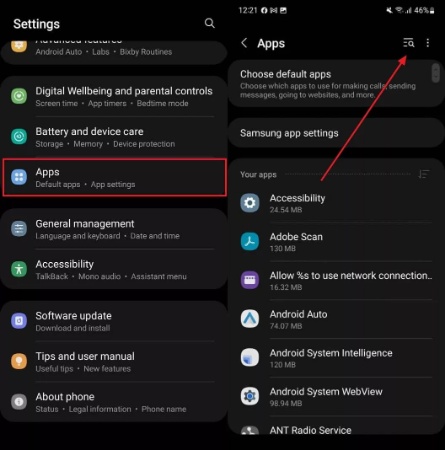
Step 1 To begin clearing the WhatsApp application cache, go to “Settings” on your Android device and scroll down to navigate to the “Apps” section. Then, hit the “Search” icon and look for “WhatsApp” to move to its settings.
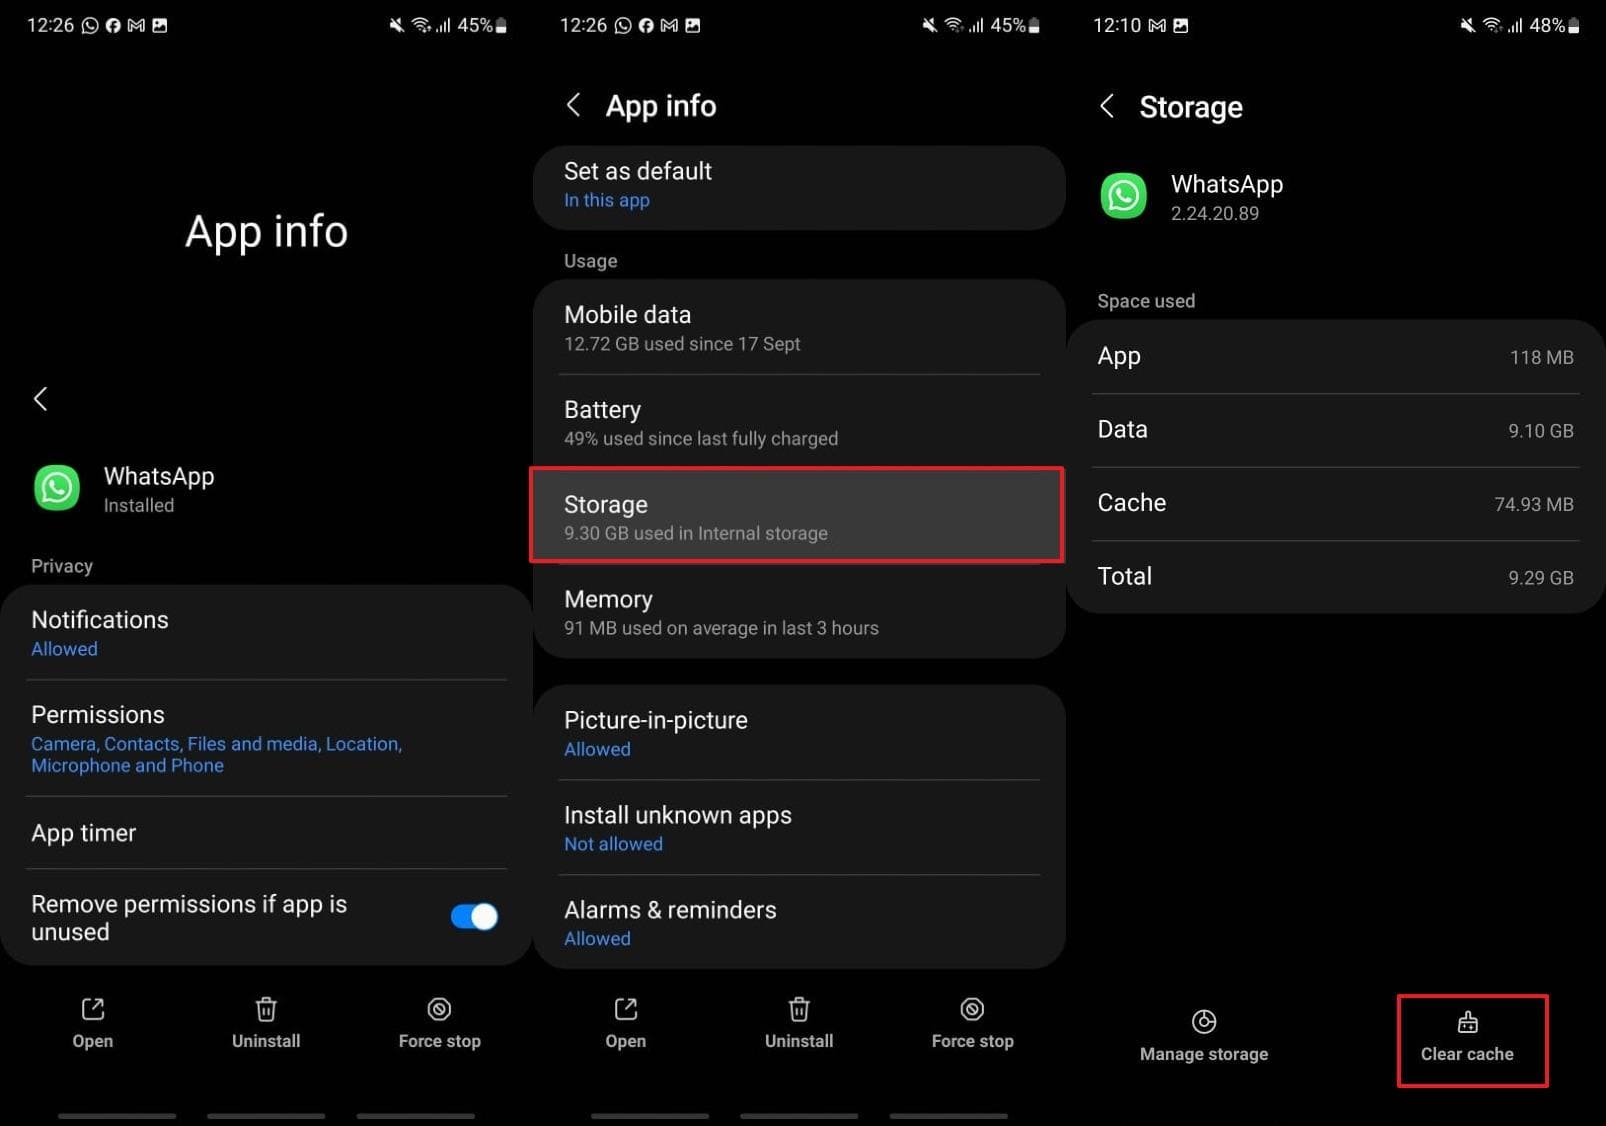
Step 2 Once you are at the “App info” screen on your device, scroll down the list and pick the “Storage” option.
Step 3 Lastly, at the “Storage” details of your selected application, hit the “Clear cache” button at the bottom of the screen. This will remove any unwanted and temporary files that might be creating the issue.
Before you dive into applying this fix, make sure that all your data is backed up on the application to avoid any loss of data. So, keep reading this article as we discuss an effective tool that helps you quickly back up the data before you clear the cache.
5. Update WhatsApp to the Latest Version
For Android
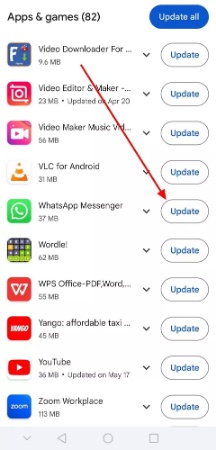
Step 1 Get access to the Play Store on your Android device and press on the “Profile” icon from the top right corner of the screen.

Step 2 Tap on “Manage Apps and Devices” to get a list of all the apps you have downloaded. In the “Updates” tab, navigate to the WhatsApp app and ensure it is updated to the latest version by pressing the “Update” button.
For iOS
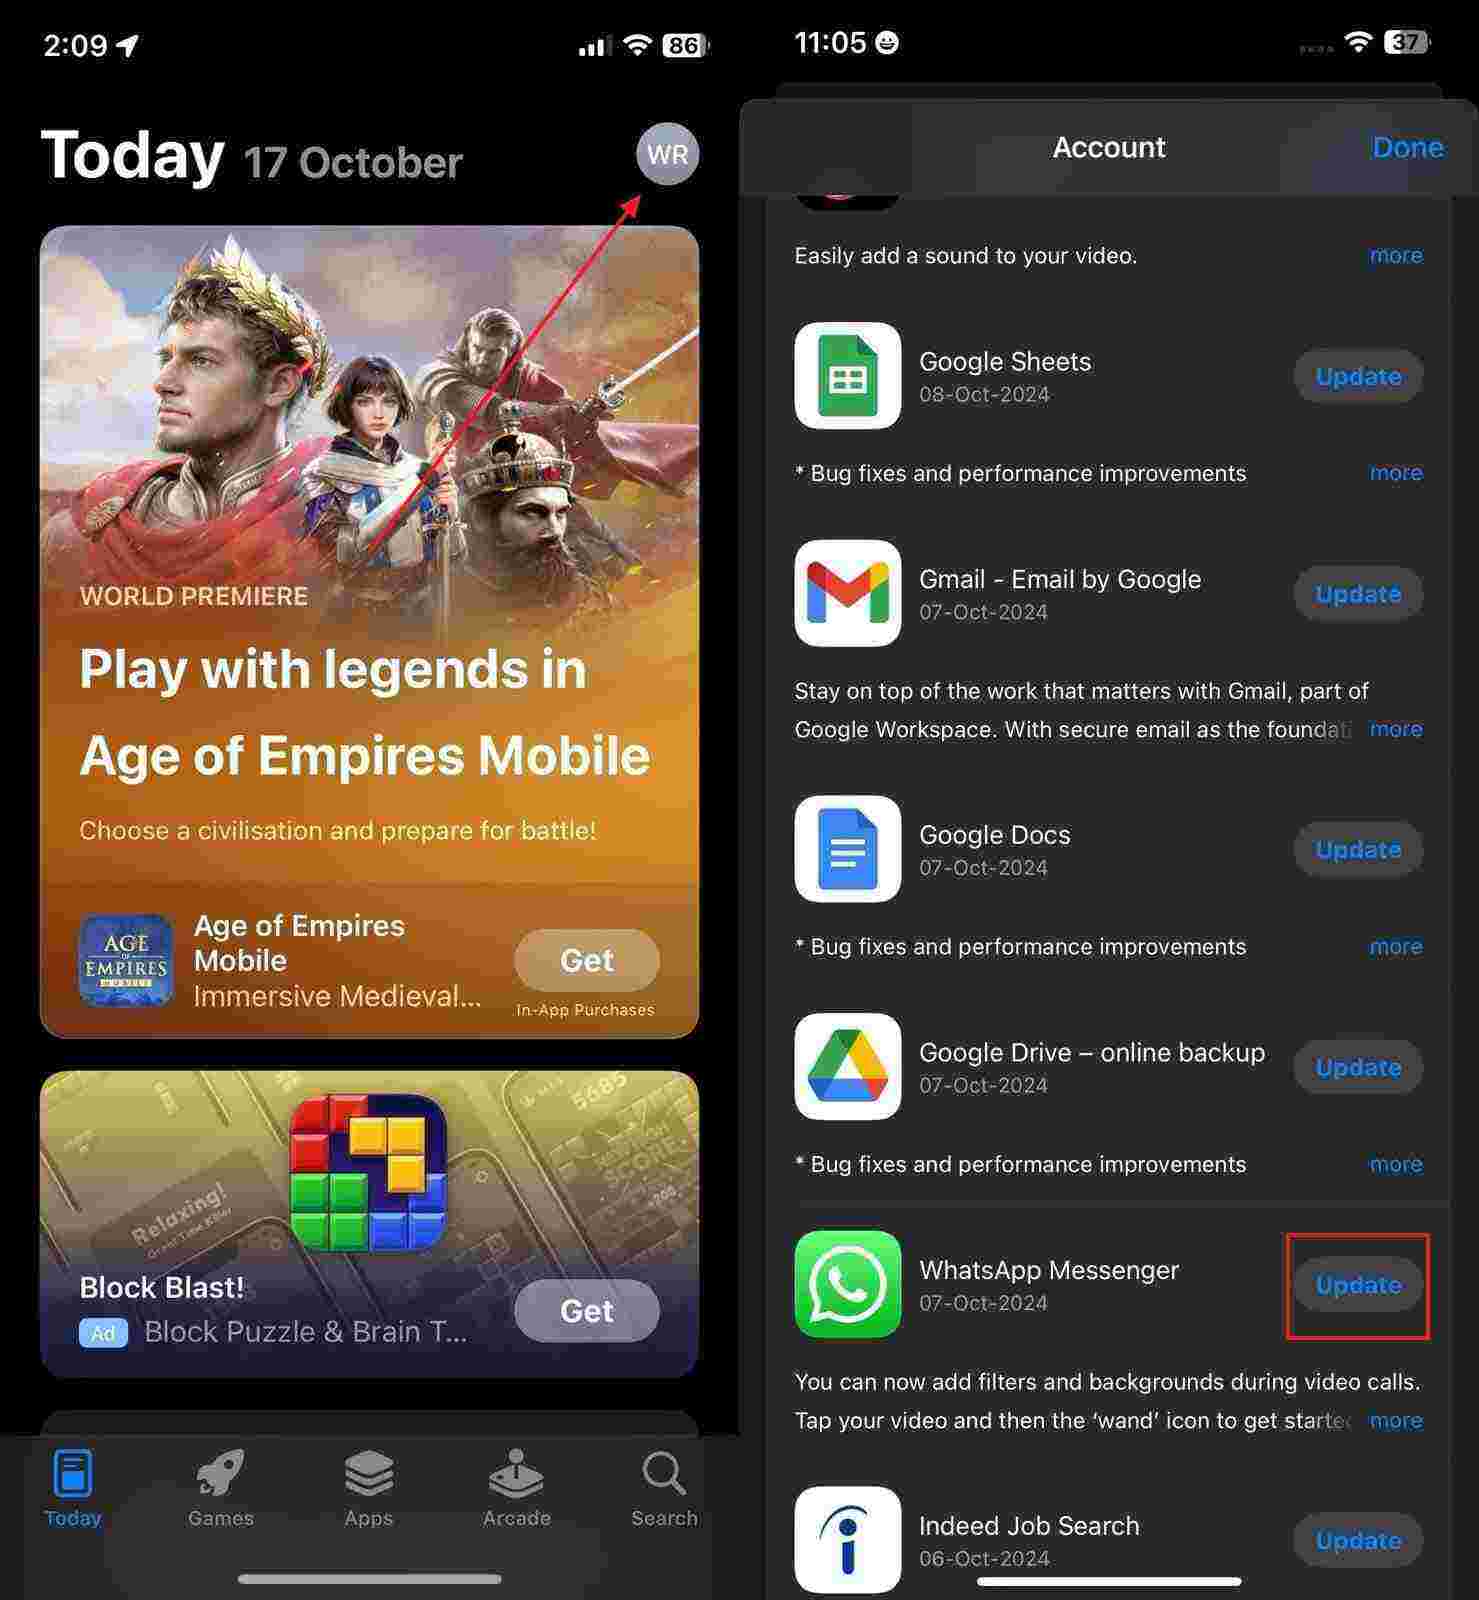
As you open the App Store on your iOS device, go to your “Profile” from the top right of the screen. Then, scroll down to “Updates” and hit the “Update” button next to your app.
6. Allow WhatsApp Access to Photos Permission
For Android
Step 1 From your home screen, locate the messaging app and tap and hold on until a few options pop up. From these options, press the “Info” icon to go to the app details.
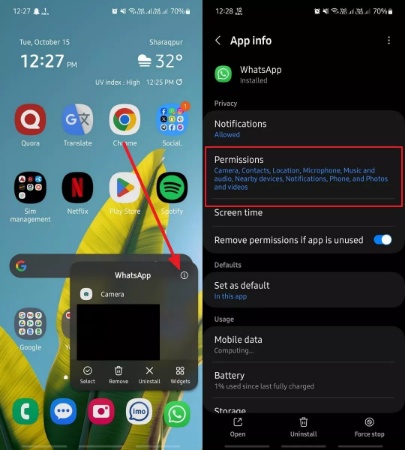
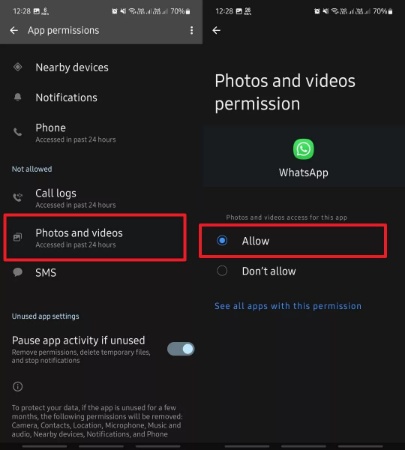
Step 2 On the new screen, find the “Permissions” option and tap on it to access all its settings. After that, scroll down to look for the “Photos and videos” permission, and after opening it, select the “Allow” option.
For iOS
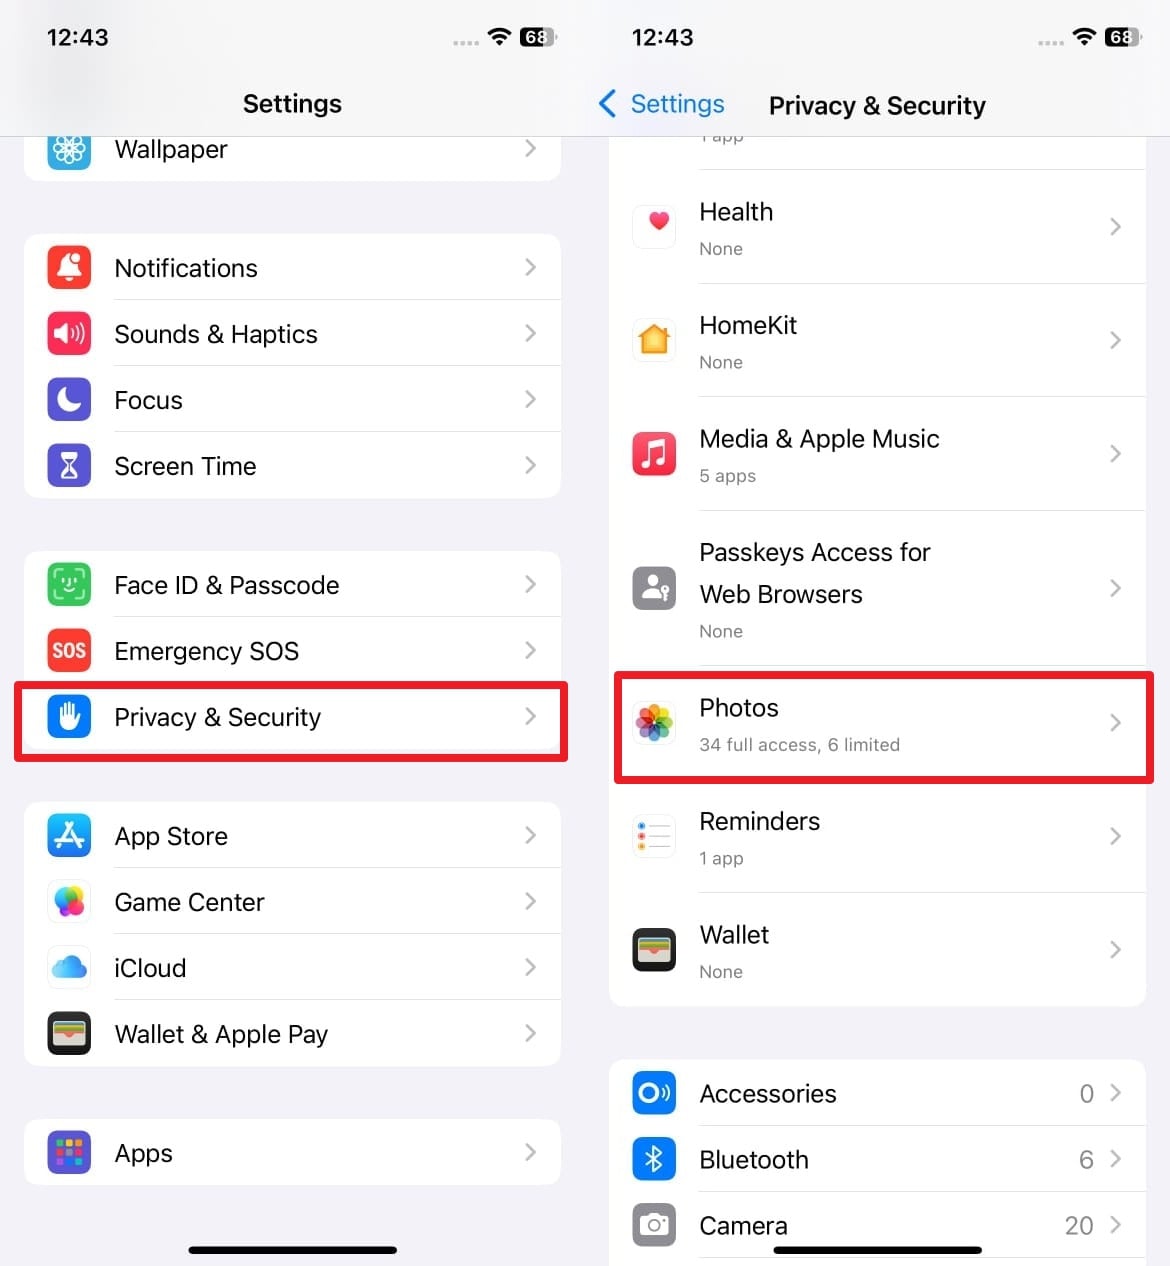
Step 1 Start by going to the device’s Settings and from there, locate the “Privacy & Security” option. From here, you will need to scroll down to find the “Photos” app icon.
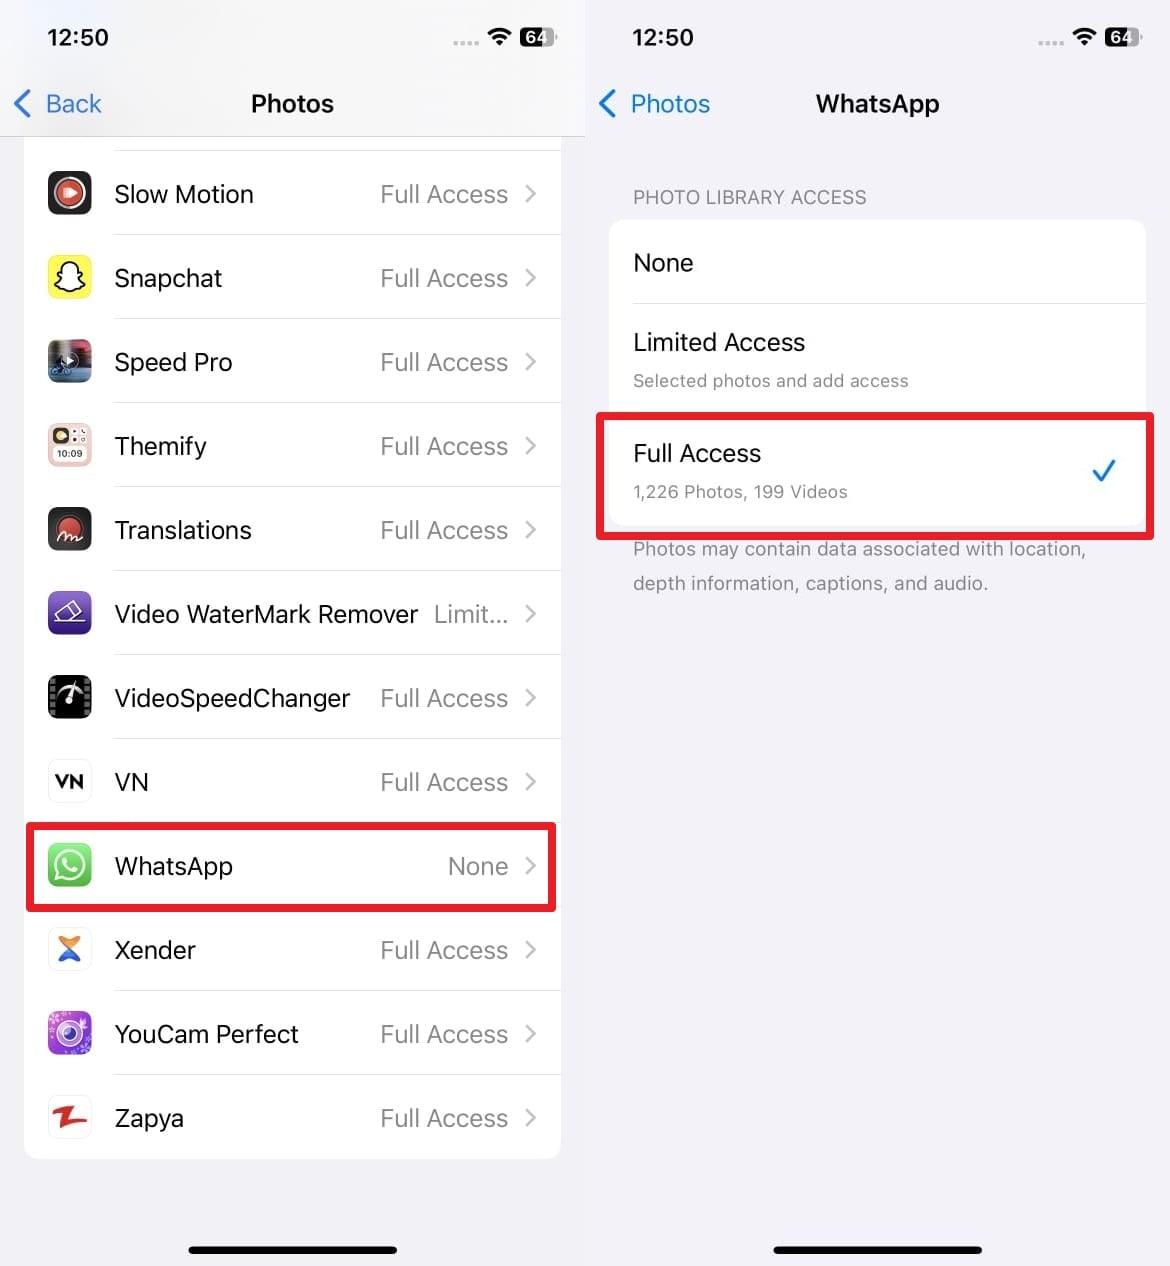
Step 2 On the new screen, scroll down to find the WhatsApp app and tap on it to open the permissions options. From the available options, select the “Full Access” option, and you’re good to go.
7. Reset Network Settings
For Android
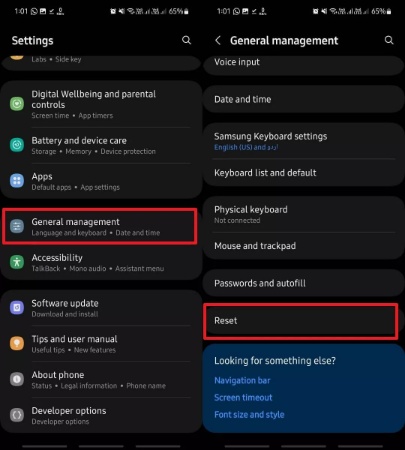
Step 1 To reset your network settings, navigate to the main settings of your Android device. From here, scroll down to find the “General management” option. After tapping on this option and scrolling down a bit, you will see the “Reset” option.
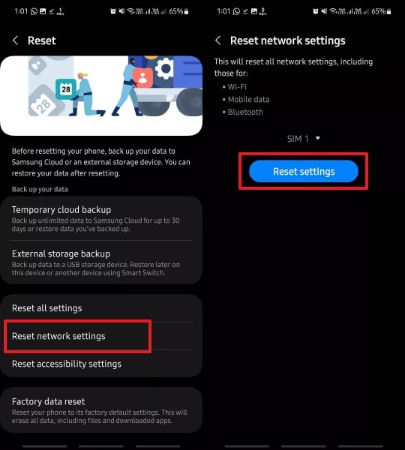
Step 2 From the following screen, find the option to “Reset network settings” and tap on it. There, you will find the “Reset settings” button that you need to hit to reset your network settings.
For iOS
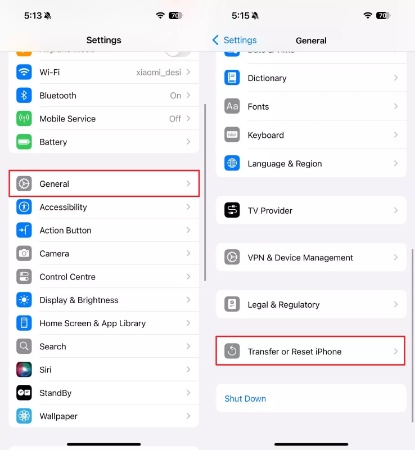
Step 1 Like on Android, start by going to your mobile’s Settings and find the “General” option. In there, you need to scroll down to the bottom to find the “Transfer or Reset iPhone” button and tap on it.
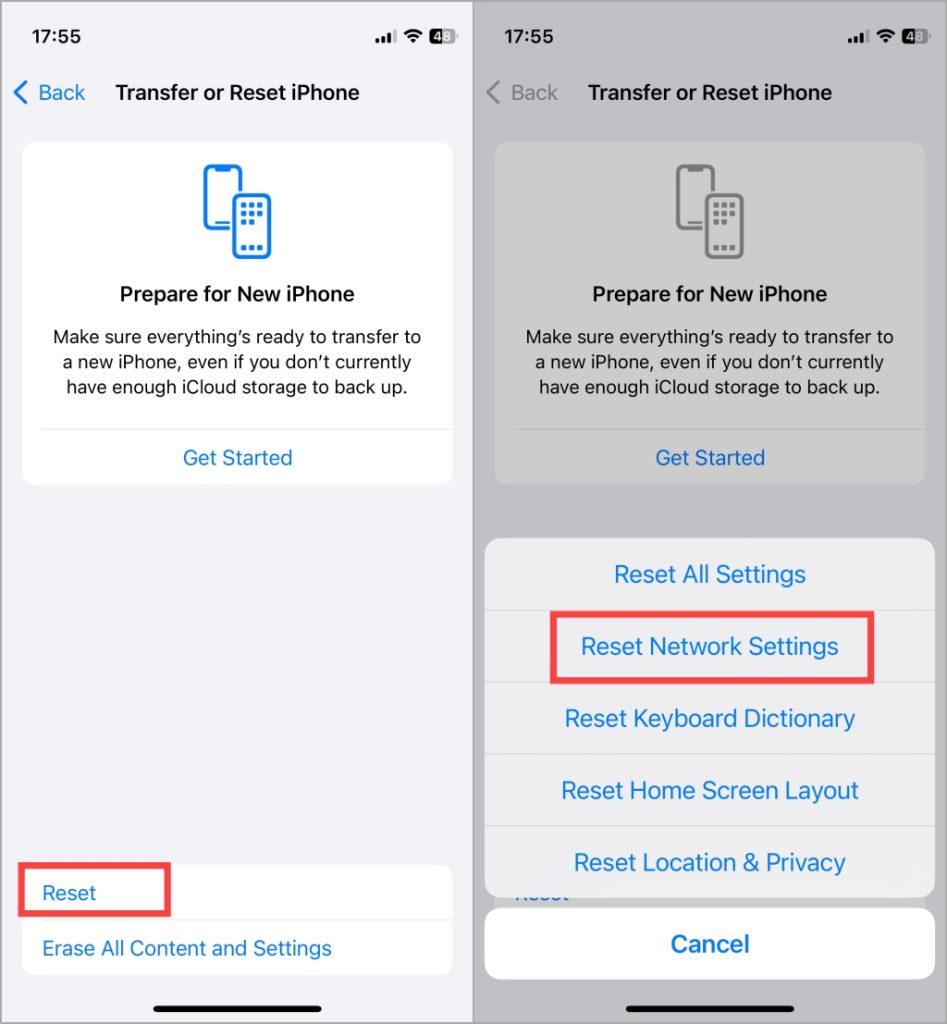
Step 2 On your new screen, look at the bottom side and press the “Reset” button. A bottom-up menu will appear with multiple resetting options for different purposes. Complete the process by tapping on the “Reset Network Settings” and retry sending photos on WhatsApp after giving the required confirmations.
Part 3. Backup WhatsApp Data: Essential Step Before Clearing the Cache
In one of the methods above, we spoke of clearing the cache to solve the issue of WhatsApp not sending photos. Before taking this step, we highly recommend backing up your data through a reliable source. While the official app only allows 15 GB of backup, tools like iToolab WatsGo provide a better and quicker alternative to save up bigger chunks of data.
In addition to allowing an unrestricted back up, the tool also supports multiple data types and can easily manage over 40,000 messages and other media. You can use it to back up your data locally or directly transfer it to other devices. Moreover, it can recover your WhatsApp backup from Google Drive to use it on your Android or iOS smartphone while switching the phones.
Key Features
- Cross-Platform WhatsApp Transfer: You can quickly migrate your data between Android and iOS devices with just one click. Similarly, business accounts can be transferred without losing anything important.
- Local Backup Option: Instead of relying on internet connection and cloud services, this advanced tool simply lets you locally save WhatsApp data on your computer to restore it whenever you want.
- Safely Switch from GBWhatsApp: Users can safely use this tool to efficiently transfer their data from GBWhatsApp to the regular version of WhatsApp without losing even a single text message.
Therefore, if you also want to save your important WhatsApp data before clearing the cache, download this robust tool on your Windows PC or MacBook today.
Simple Step-by-Step Guide to Backup Data Using iToolab WatsGo
Since we know all the useful things about this tool, it’s time we learn about the steps to back up your important WhatsApp data using it. You can follow the steps listed below to save your data using iToolab WatsGo:
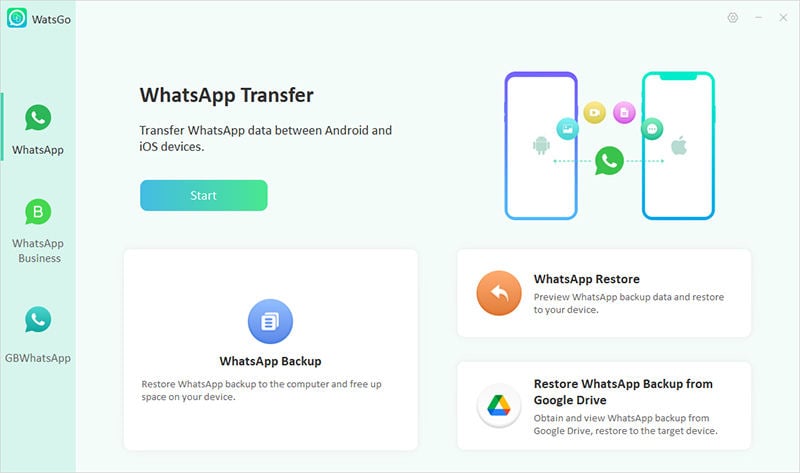
Step 1 Run this Software and Connect It to Your Device
Start by downloading the software on your PC/Mac and launch it after the installation is completed. From the main screen, click on “WhatsApp Backup” option and open it in a new window. Following that, connect smartphone to your computer using an appropriate cable.
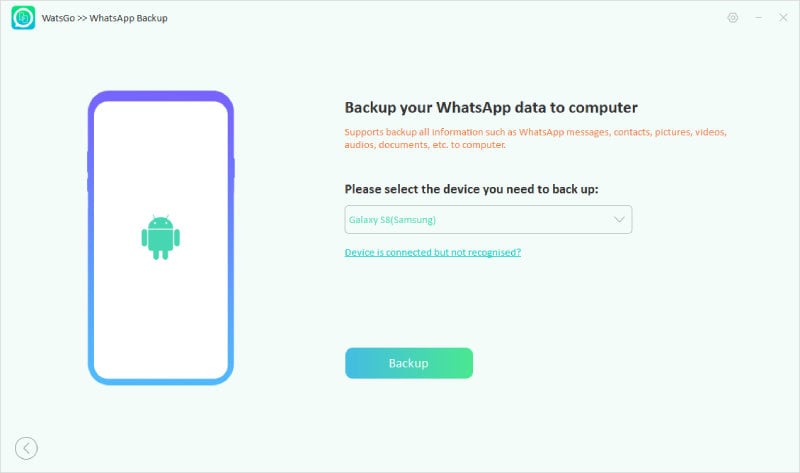
Step 2 Select Your Mobile and Start the WhatsApp Backup
Once your device is connected, select it from the “Please Select the Device you want to Back up” drop-down menu and then proceed with the “Backup” button. Finally, the tool will start saving all your data, including every type of media.
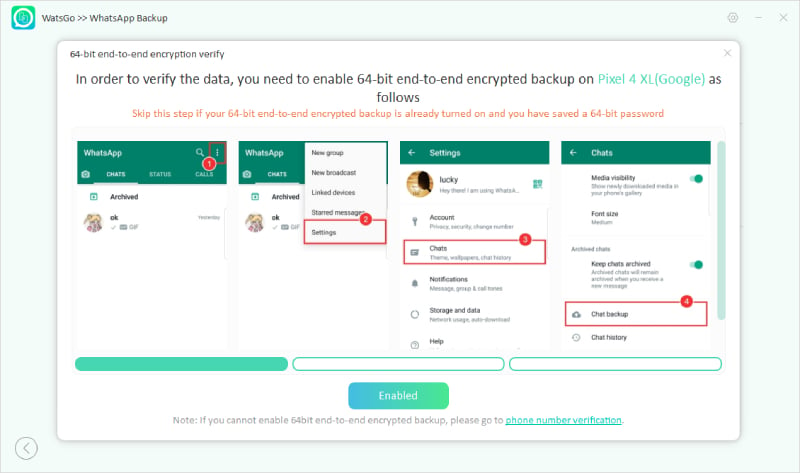
Step 3 Backup Your WhatsApp Data
iPhone users can start backing up now. Android users may have to follow this additional step of turning on end-to-end encryption for more security. You can use the steps showcased in the image to do so on your WhatsApp.
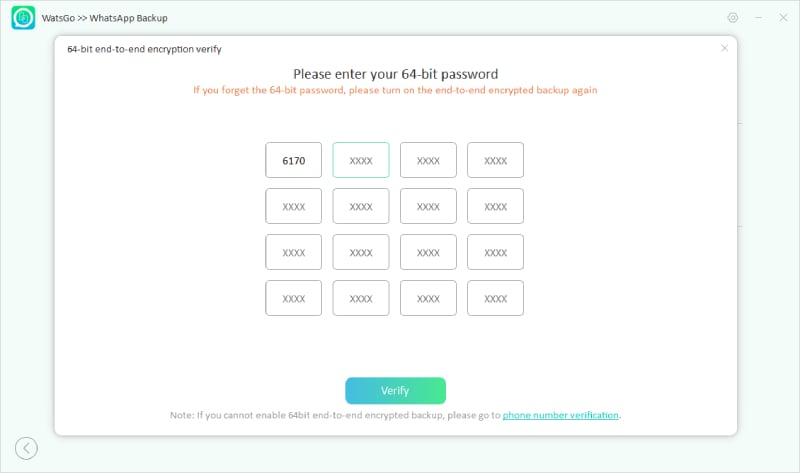
After turning on the encryption, go back to the tool and provide the 64-bit password that you got from WhatsApp, along with your exact phone number. This will start the backup process and ensure it remains safe.
Part 4. FAQs About WhatsApp Photos
1. How do I allow WhatsApp to send photos?
You can allow the app to send photos by giving it the necessary permissions. To do so, tap and hold on to the app icon and then select the “Info” icon from the pop-up menu that appears. From the new window, go to the “Permissions” tab and allow the “Photos and Videos” permission after locating it from the options.
2. Why are WhatsApp photos showing slow when upgrading to iOS 18?
Many users have reported this situation on Reddit, but there has been no official solution so far. The only way to get rid of this problem is to downgrade your iOS using the iToolab FixGo toolbox. This tool safely downgrades your Apple device without jailbreaking.
Conclusion
In short, there could be multiple reasons to WhatsApp not sending photos and each one can be solved by following simple steps. You can troubleshoot this problem by following the highly detailed steps in this guide. However, don’t forget to back up your data using a reliable tool like iToolab WatsGo to make sure you don’t lose it while solving this problem.
iToolab WatsGo – Safely back up your WhatsApp data
389,390,209 people have downloaded it


