
The main issue or problem many Windows users reported on social forums is that their PC with in every 4 to 6 months asking them to change their password, or otherwise the windows will lock down.
For this purpose, the Windows account password needs to change regularly. But it can be hectic for many users as changing the password and remembering the new password every couple of days isn’t easy for someone with a busy schedule. The solution to this issue is setting a net user password never expires. It could be done in multiple ways that are being discussed here.
Part 1. Net User Set Password to Never Expire for Windows
Net user set password to never expire can be done using more than one solution. You can set the local account password to never expire or create a new account with a .bat file. These methods are discussed in detail below.
- 1. Set Local Account Password to Never Expire
- 2. Create a New Account & Password Never Expires through .bat file
- 3. Configure User Account Password Never Expires on Windows Server
- 4. Add Local Admin and Set Password to Never Expire
Way 1. Set Local Account Password to Never Expire
The first solution is to set the local account password to never expire from the Windows command prompt or through the local user accounts tab. It would turn off the automatic expiration of the windows password. This method works for every windows system. Steps include:
1. From CMD:
- Open Admin Command prompt.
- Run the command:
- In ‘username’, write the account username to whom you need to change the password.
WMIC USERACCOUNT WHERE Name=’username’ SET PasswordExpires=FALSE.

2. From the local user accounts tab:
Open the user accounts console and does the following steps:
- Execute the command ‘lusrmgr.msc’ from Run.
- A list will be displayed on the left side. Click users from here.
- Double-click on the user’s account that needs an update.
- Select the option that says Password never expires and then click Ok to turn off automatic password expiration.


These steps will turn off the automatic password expiration.
Way 2. Create a New Account & Password Never Expires through .bat file
Another solution to stop the automatic expiration of the Windows password is through .bat file which uses the net user password never expires command line by executing it properly.
Through the .bat file, the user can create a new account and password that will never expire. When creating a batch file, this line of code must be added with it to turn off the automatic password expiration:
WMIC USERACCOUNT WHERE “Name=’%1′” SET PasswordExpires=FALSE
This line of code with the batch file can turn off the password expiration.

Way 3. Configure User Account Password Never Expires on Windows Server
Another solution for net user command password never expires to configure user accounts password on Windows Server. Here are the steps for executing it:
- Run the command prompt.
- Confirm the existing configuration through command net user <username>.
- Look for the line that says Password expires.
- Set the password never to expire. This will be done through the command:
- Lastly, verification of configuration is needed using the command net user username. The Password expires line should have “Never“.

“vmic useraccount where “Name=’username’” set PasswordExpires=FALSE”.

Way 4. Add Local Admin and Set Password to Never Expire
Another method for the net user to add a password never expires is to make a local user account with the password having no expiry. This local user account is created via a command line.
“net user %username%/expires:never” or “wmic useraccount WHERE “Name=’%username%'”setPasswordExpires=false”

Part 2. Alternative Ways for Net User Password Never Expires Not Working
Above mentioned solutions are time-consuming as well, as some of them may not work when you are using them. Then the ultimate solution to look for is using UnlockGo – Windows Password Recovery. This tool can easily reset the Windows expired password without logging in or can remove it too. This results in having no login password anymore.
- 1. Set Windows Password Never Expires Using a Boot Disk
- 2. Set Windows Password Never Expires Using Powershell
- 3. Set Windows Password Never Expires Through Group Policy
- 4. Add Local Admin and Set Password to Never Expire
Way 1. Set Windows Password Never Expires Using a Boot Disk
UnlockGo is one of the best and easiest tool to make Windows Password Recovery. UnlockGo is the ultimate one-stop shop for you if you are willing to reset your password. This tool has some of the most advanced features to recover passwords for locked Windows accounts. It can easily reset admin passwords without logging in within some time.
Steps for using UnlockGo:
Using UnlockGo is much easier as compared to other tools and software. You can use UnlockGo by following these steps:
UnlockGo (Windows) – Windows Password Reset Tool
389,390,209 people have downloaded it

- Get another PC and install UnlockGo – Windows Password Recoveryto create a windows password reset disk by burning a blank and bootable USB/CD/DVD.
- Then you can follow on-screen instructions to enter bios menu, after entering, you can set bootable USB/CD/DVD by selecting boot tab and boot device priority. Finally, press F10 to save and exit.
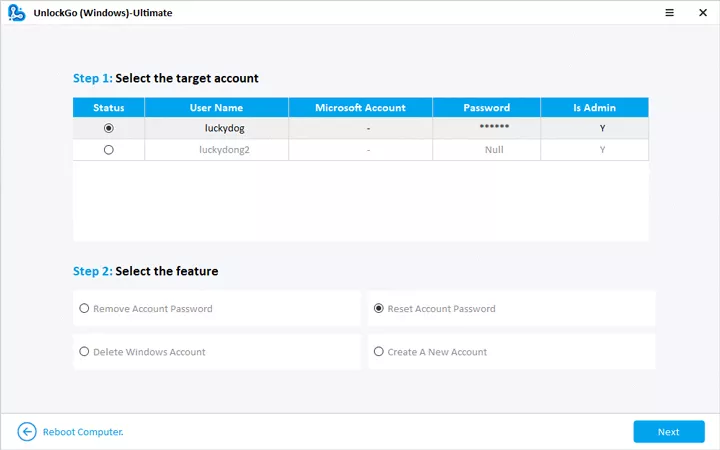
- Your windows device will reboot and you will be allowed to choose windows system and target account to reset or remove password.


Way 2. Set Windows Password Never Expires Using Powershell
Another solution is to use Powershell to stop automatic expiration. Using Powershell, a user can change the automatic expiration in several steps.
- Open Powershell by pressing the Windows key + X + A. The Powershell has all the administrative privileges.
- Run the command written below:
“Set-LocalUser -Name “itechticsuser” -PasswordNeverExpires 1”
Instead of itechticsuser, use your desired username. Password will never be expired for the specific user after using Powershell.

Way 3. Set Windows Password Never Expires Through Group Policy
You can change your password via Group Policy in several easy steps.
- Enable password expiration by opening the Local Users and Group option by repeatedly pressing the Windows Key + R. it will open the Run command box.
- Type lusrmgr.msc > Press Enter.
- Select Users > Select Properties.
- Uncheck Password never expires > Select Ok.
- Now, open the ‘local security policy editor’ by repeatedly pressing the Windows key + R and then typing “secpol.msc” in the Run command box.
- Now select Security Settings > Account Policy > Password Policy.
- Select Maximum Password Age and change it from 42 to the preferred period you desire for password expiration.


Bonus Tip: Remove Windows Password Expiration Period
To remove the password expiration period, open the Admin Command prompt and type net accounts /maxpwage:unlimited,. This command will set passwords for all the user accounts never to expire.

Words at End
Many Windows users face automatic password expiration, and to solve this issue, multiple solutions are available. Still, UnlockGo is the perfect tool for net user passwords never to expire. It works with simple and easy steps in all Windows versions and helps the users when all the alternatives fail.