Guest accounts on Windows allow others to use your PC without altering its settings. However, there might be times when you would want to remove a guest account from your PC.
And in this guide, we will look at how to remove a guest account from your PC step-by-step.
Part 1. How to Create Guest Account on Windows
As mentioned above, guest accounts on your Windows PC allow a third-person, possibly a friend or a family member, to access your PC if they need. However, they cannot modify its settings. Now, you will learn different ways of creating a guest account so that you can allow your loved ones to access your PC.
Way 1. Create Guest Account without Password & Login
The most effective and convenient way to create a guest account without administrator access or login screen password is using UnlockGo – Windows Password Recovery. UnlockGo (Windows) is a premium software unlocker tool which allows you to create a guest account without setting a password or logging into your PC.
What to do If I Want to Create a Guest Account and Have Forgotten my Password?
You may want to create a guest account on your PC, but suddenly, its password vanishes from your mind. But don’t worry because UnlockGo (Windows) is there for your rescue in a situation like this. Simply follow the steps below to remove the password from your PC and create a guest account with UnlockGo (Windows).
Step 1 On another accessible PC, first download and install UnlockGo (Windows) and insert a bootable USB/CD/DVD into it.
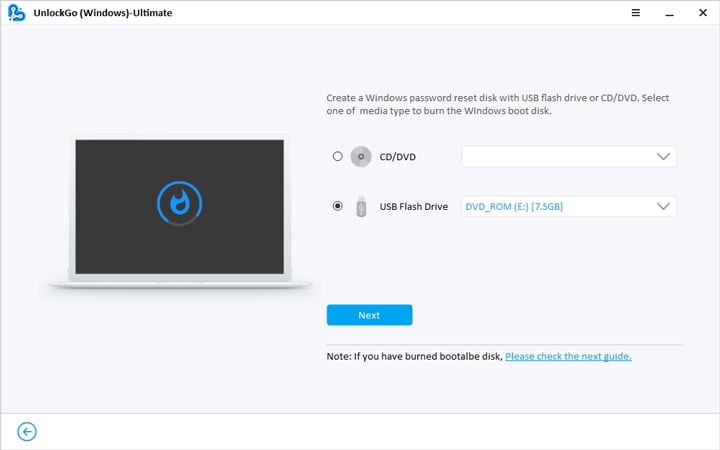
Step 2 Following the on-screen instructions after burning the USB/CD/DVD as a windows password reset disk, and then enter the BIOS menu.
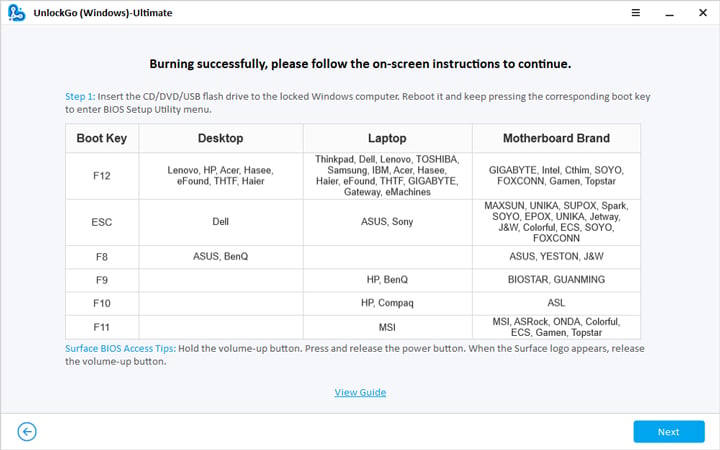
Step 3 Now, using arrow key to select boot tab and boot device priority to set bootable USB/CD/DVD, then press F10 to save and exit.
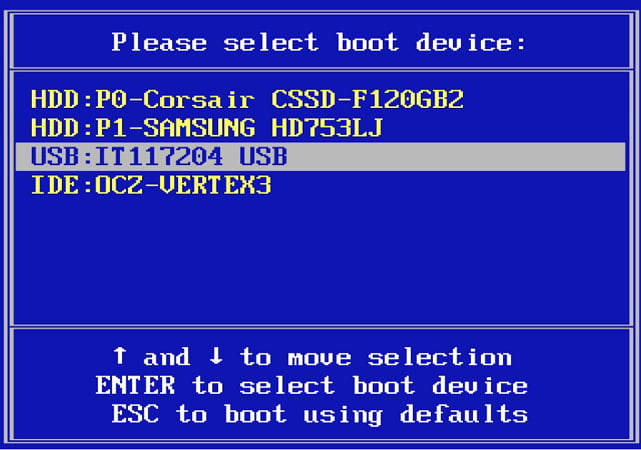
Step 4 Your locked PC will reboot by itself and then ask for windows system and then select the target account to reset/remove windows password as per your requirement.
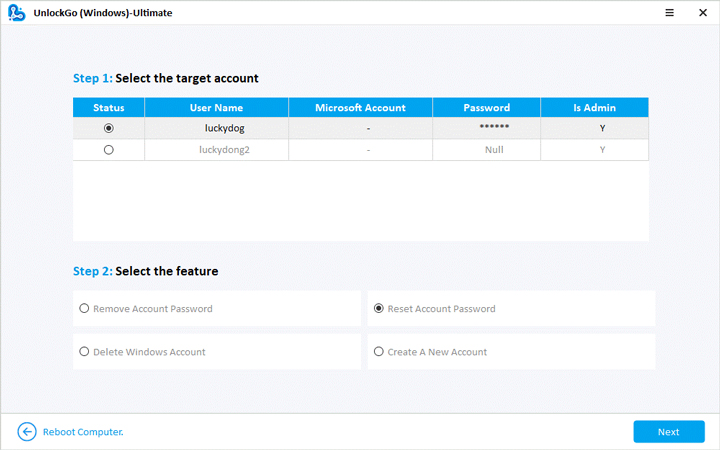
Voila! Once you are done resetting/removing your Windows login or admin password, creating a guest account will be a piece of cake by only following ways!
Way 2. Create Guest Account from the Windows 10 Account
If you have a Windows 10 PC, you can create a Standard User account that does not require any email address or password, just like a regular guest account. To create this standard user account, you will have to follow these steps:
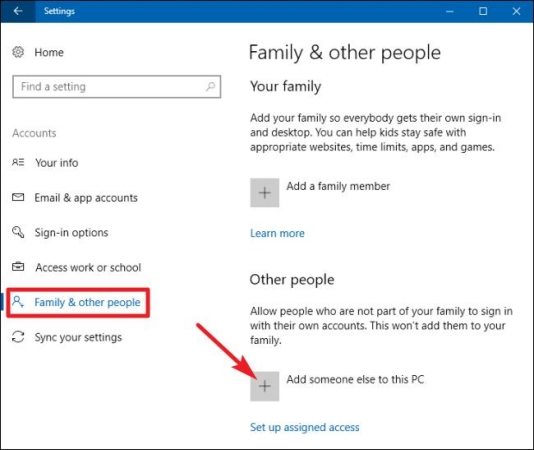
Step 1: Go to Settings > Accounts > Family and Other Users.
Step 2: Click on Add Someone else to this PC.
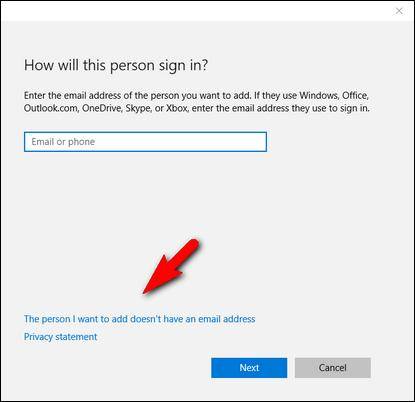
Step 3: Now, click The person I want to add doesn’t have an email address.
Step 4: Now, click on Add a user without a Microsoft account.
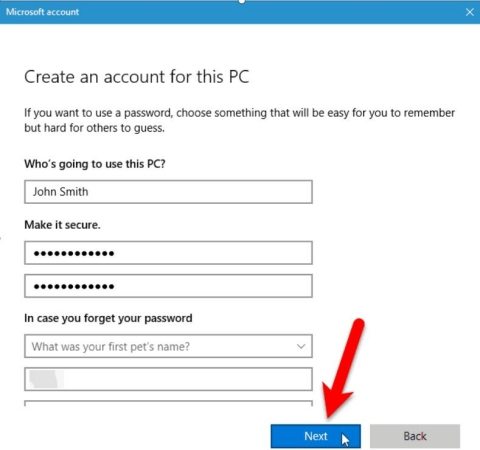
If you want to add your desired name to this account, you can do so after completing the above steps. Make sure to leave the password field as it is before clicking Next.
Way 3. Create Guest Account Command Prompt
Although Windows 10 does not permit creating a guest account, you can still use the command prompt to manipulate your PC into creating one. However, you cannot create an account named Guest on your Windows 10 PC even with a command prompt. Therefore, you must choose any other alternate name if you want to create this account.
The steps of doing this procedure are as under:
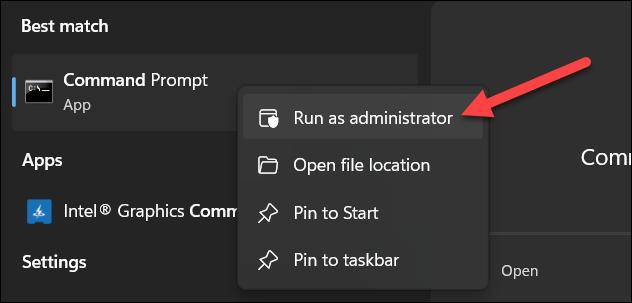
Step 1: In your administrative account, click on Start and find Command Prompt.
Step 2: When it appears, right-click on it and click Run as Administrator. In the upcoming popup window, you will have to click Yes.
Step 3: Now, the Command Prompt will come on your PC’s screen as a large black box with some pre-written codes. There, type net user (add username) /add /active: yes. In this code, replace brackets with your desired username for your guest account.
Note: You can also use net user (add username) /add /active: No, to deactivate the account.
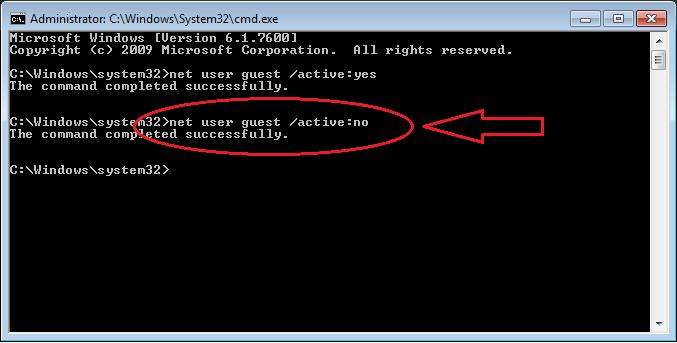
Step 4: In this step, you will need to assign a password to your newly created guest account. However, since you will be giving others access to your PC, there won’t be any need for a password. Therefore, to skip assigning passwords, enter net user (username) * and press Enter twice.
Step 5: Your next step requires you to add your newly created account to the Guests list while removing it from the Users list. To execute this operation, type net localgroup users (username) / delete.
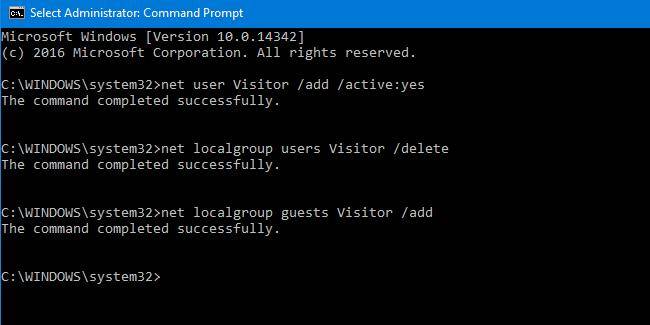
Step 6: Add this account to the Guests list by typing net localgroup guests (username) / add. Press Enter to confirm.
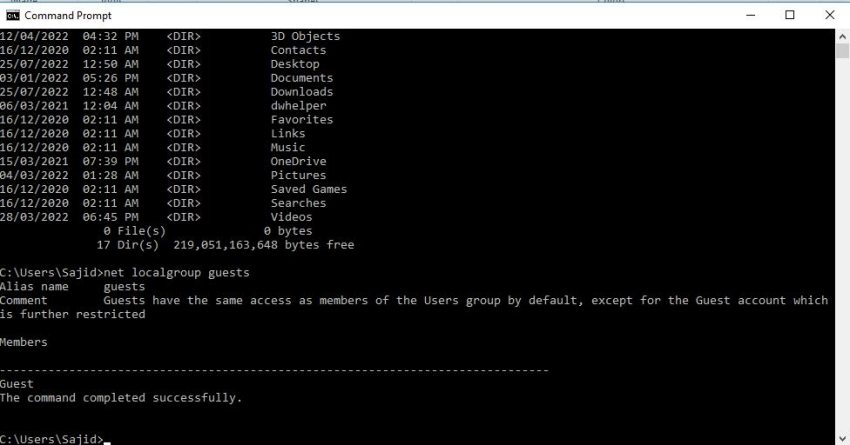
Now, close the Command Prompt as your new guest account has been created.
Part 2. How to Remove the Guest Account on My Computer
This part of the guide is related to the information concerning deletion of a guest account from your PC. As we know from the start, UnlockGo for windows also has the feature of deleting windows account, and it can help you delete guest account in the same process. Let’s see another ways below. The procedure for doing so is simple and can consist of the following steps:
Step 1: Go to the Start menu and look for Registry Editor.
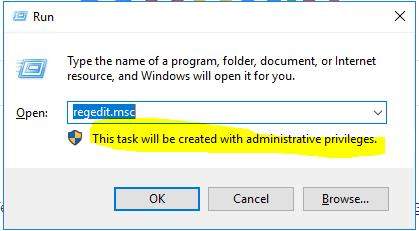
Step 2: In the Editor, write down HKEY_LOCAL_MACHINE\SAM\SAM in the address bar and press Enter.
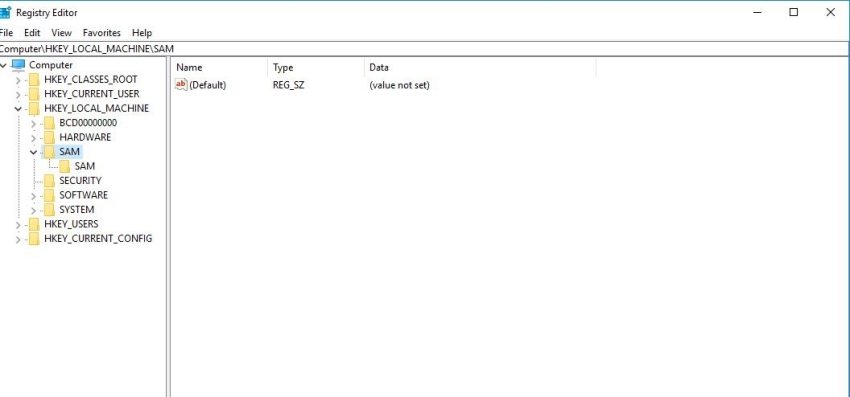
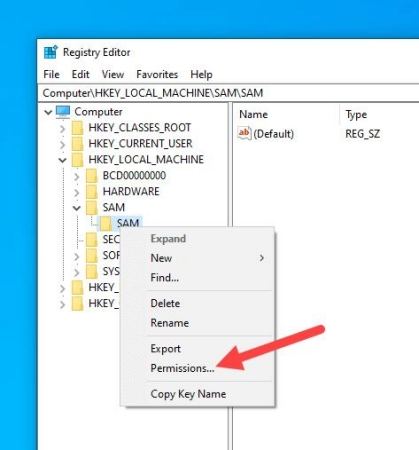
Step 3: The SAM folder is already a protected system registry key. To access it, you will need permission, which you can take by right-clicking the SAM folder and selecting the Permissions option.
Step 4: In the permissions window, select Administrator.
Step 5: Now, check the box of Full Control under Permissions for Administrator. Click OK to confirm your changes.
Step 6: Go to the View tab in the main window and click the Refresh option. You can also press F5 to commence this operation.
Step 7: Now, enter HKEY_LOCAL_MACHINE\SAM\SAM\Domains\Account\Users\Names\Guest. After entering this command, you will be taken to the Guest folder.
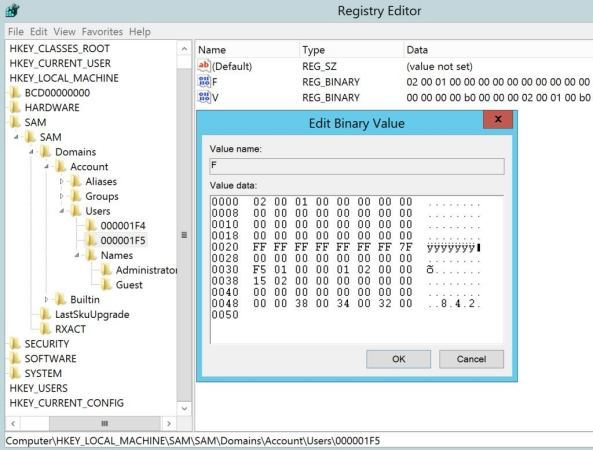
Step 8: On the left panel. Select the Guest folder and right-click on it to select the Delete option. Click Yes to confirm.
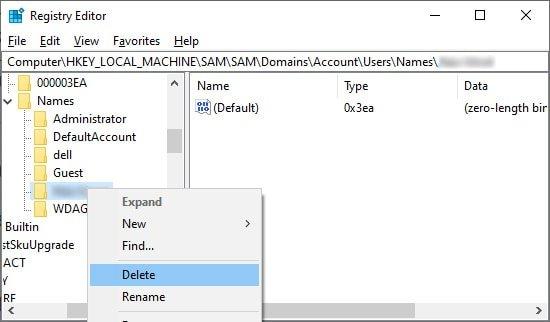
The Guest folder will now be deleted from the Registry. As a side note, if you think this process will take too long, you can use UnlockGo – Windows Password Recovery as described in Way 1.
Bonus Tips for Guest Account Password
Often, someone can create a guest account on your PC and protect it using a password. Indeed, you do not want anyone else to set passwords on your computer, and this is why you can imply some techniques to bypass this password.
- How to Change Guest Account Password Windows 10
The best way to change passwords for your guest account is to use UnlockGo – Windows Password Recovery. The steps of using the glorious UnlockGo have already been described in Way 1 above.
- How to Get Administrator Password Windows 10 from Guest Account
Although you can get help from UnlockGo – Windows Password Recovery to bypass the administrator password, another way to do this is by resetting the admin password from the guest account. The steps to do so are as follows:
Step 1: Visit X:/home windows/system32.
Step 2: Copy and paste cmd.exe on your PC and rename it to sethc.exe.
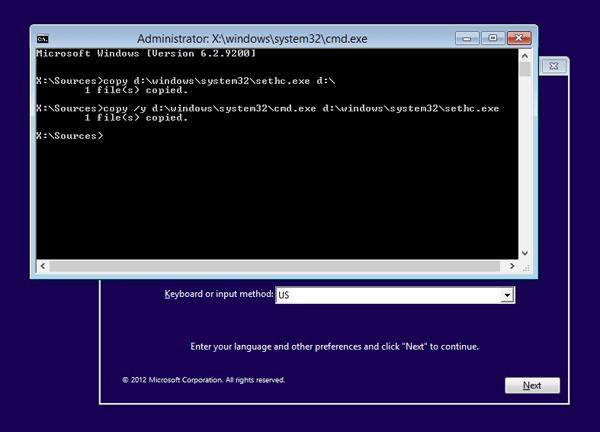
Step 3: Now, copy sethc.exe to gadget 32. If windows ask to overwrite the report, click Sure to proceed.
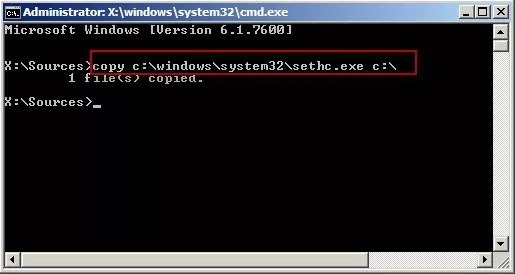
Step 4: Log off from your guest account, and on the users’ window, press Shift five times.
Step 5: Now, administrator privileges will open where you will see “net user ADMINISTRATOR password.” In place of inverted commas, you can put the password of your choice. Press Enter to proceed.
Step 6: This will lead you to see a message saying, “The Command finished successfully.”
Now, you can log in to your administrator account with your newly chosen password.
Final Verdict
This guide taught you about creating a guest account on your PC and how to delete it. However, if you think these ways are too complicated, you can use the most powerful and one-stop solution in the form of UnlockGo – Windows Password Recovery.
UnlockGo (Windows)
Create Guest Account without Password & Login
- It only takes a single click to create a Windows password disk.
- You can reset and remove passwords from all types of Windows system.
- It can achieve password reset in 4 steps without losing data.


