FaceTime is a system application integrated into all Apple digital gadgets including iPhone to aid video and audio calls amongst its end-users. This app is well designed, free to use, and has a simple user interface.
The app is well-known among iPhone users because of the quality services it provides. But in recent times, there has been an issue with the app as it often displays poor connection errors during usage.
Do you experience a similar issue and would like to resolve it? If yes, look no further. The solution you seek is right here.
Part 1. What Does Poor Connection on FaceTime Mean?
Poor connection on FaceTime is the error alert that pops up on your device to show that there is a problem with the internet connection. This problem could be from your end, the other user’s end, or both of you. Also, it could be from Apple’s server.
Part 2. How to Fix Poor Connection on FaceTime?
Fix the poor connection error your experience on FaceTime using the solutions provided below:
- 1. Check Your Network
- 2. Check FaceTime Settings
- 3. Check iPhone Restrictions
- 4. Check Date and Time Settings
- 5. Check Apple System Status
- 6. Force Quit FaceTime App to Stop and Relaunch It
- 7. Force Restart Your Device
- 8. Reset DNS
- 9. Reset Network Settings
- 10. Fix FaceTime Poor Connection with iToolab FixGo ASAP
Way 1. Check Your Network
Since internet connection is one of the basic requirements needed for you to use the FaceTime application on your iPhone, confirming that you are connected to the internet, whether WiFi or cellular data, is crucial.
You can do that by following the instructions below:
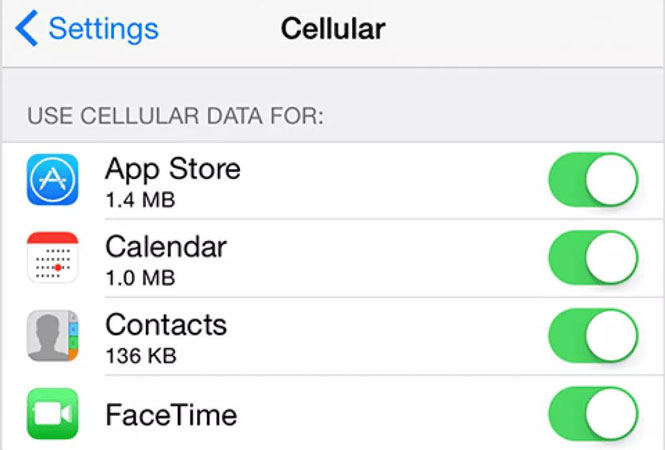
- Open the Settings menu, and select Cellular Data on the next page.
- Next, underneath the section where you have the Use Cellular Data for, locate the FaceTime tab.
- Ensure the icon beside FaceTime is toggled right just as in the image below.
Way 2. Check FaceTime Settings
Checking FaceTime settings is another great way to fix the poor connection error you encounter while using the app. The reason is that certain features underneath the FaceTime app must be enabled for it to function properly.
Check and adjust your FaceTime settings following the guide below:
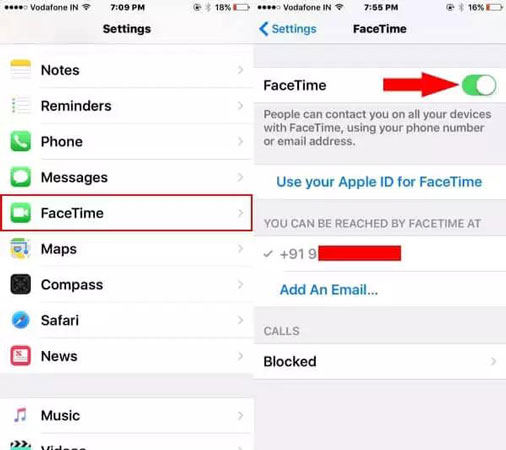
- Launch the Settings tab.
- Scroll down and select FaceTime.
- Next, ensure that your Apple ID and contact number is correct, if not, try to adjust them.
Way 3. Check iPhone Restrictions
Do you have the restriction feature enabled for some apps on your iPhone? If yes, kindly confirm that FaceTime isn’t one of them because the restriction feature is designed to disable an app from functioning.
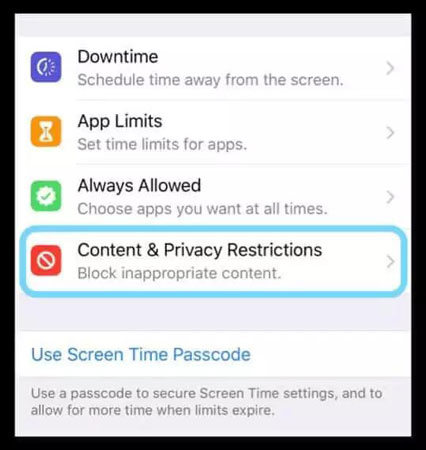
To do that, open the Settings menu on your iPhone, locate the Screen Time feature and then click on it. A new page will immediately pop up on your screen. Select Content & Restriction Privacy from the list of options that comes up. Next, click on the Allowed App tab to confirm whether or not FaceTime is amongst the restricted apps.
Way 4. Check Date and Time Settings
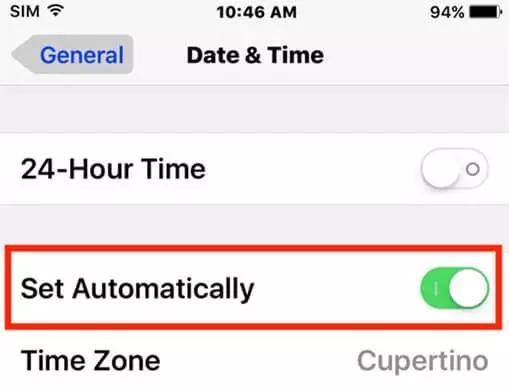
Incorrect date and time often affect the functionality of an iPhone. So checking your date and time to ensure they are correct is another helpful solution. However, if you find it stressful checking your device date and time always, you should enable the Set Automatic feature.
For you to do that, go to Settings > General > Date & Time. On the next page, toggle the Set Automatically icon right to enable the automatic update of your iPhone date and time.
Way 5. Check Apple System Status
Recall that we mentioned that a breakdown in Apple’s server often affects FaceTime functionality. You can’t fix this problem but a check on the Apple system status would prevent you from worrying.
Kindly follow the guide below to check Apple’s system status:
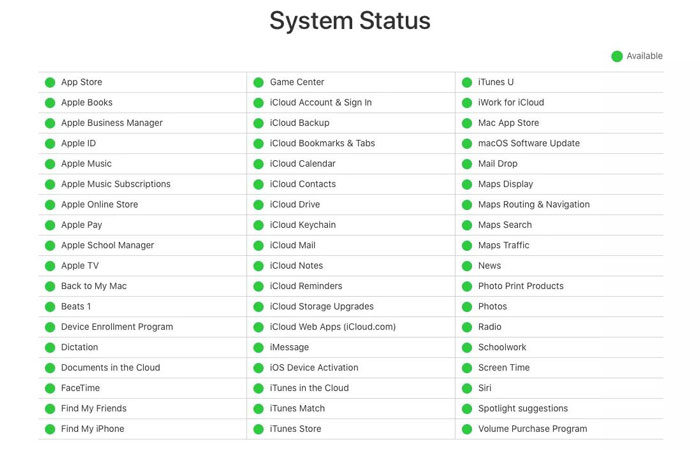
- Launch your preferred browser on your iPhone, Mac, or any Apple digital gadget, then search Apple System Status Page.
- A list showing all the services connected to Apple’s server will pop up. Kindly scroll to where you have FaceTime there is no problem with it.
Note: The green Available sign signal there is no problem with the server.
Way 6. Force Quit FaceTime App to Stop and Relaunch It
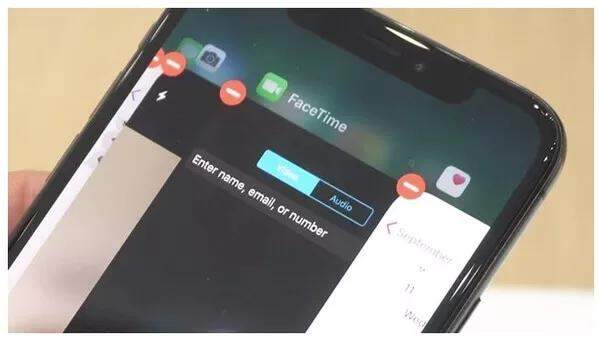
Force quitting and relaunching FaceTime is another profound solution to fix the poor connection error you are facing when using the application. It involves closing the app and then opening it again.
This technique is easy to employ. However, the steps involved are quite different depending on the type of iPhone you are using. Find below the detailed guide to force quit and relaunch FaceTime on your iPhone:
iPhone X and Newer Versions
From below, kindly swipe up your screen and a list of apps running on your device will come up. Find the FaceTime app and swipe it up to force quit. After a while, you relaunch the FaceTime app.
iPhone 8/7/6 and SE
Double-tap the Home button and the list of apps you’ve launched on your device will pop up. Locate FaceTime and then swipe it up to close it. Wait some minutes to relaunch the app.
Way 7. Force Restart Your Device
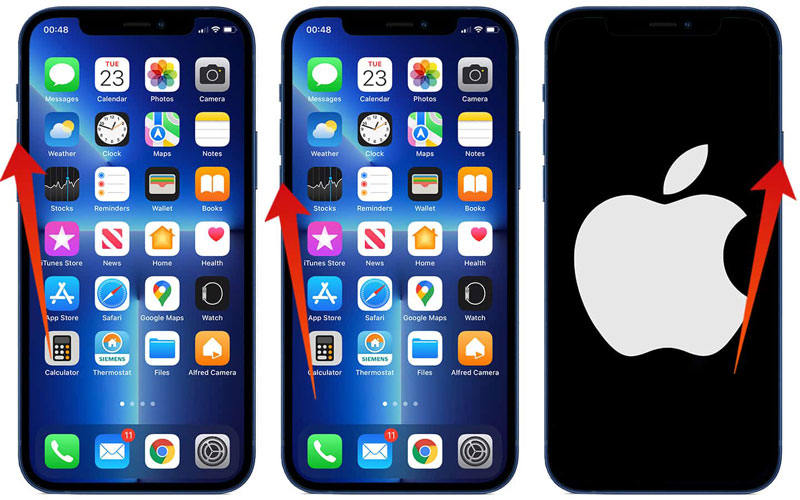
Force restarting your iPhone refreshes the system and fixes glitching on your device. This cost-free technique can be employed following the tutorial guide below:
iPhone X and Newer Versions
- Simultaneously hold down the Volume Up, and Lock buttons.
- Next, drag the Swipe to power off icon right to turn off the device.
iPhone 8/7/6 and SE
- Press the Lock button down till you get the notifications.
- Slide to power off.
- Emergency SOS.
- Cancel.
- Slide the Slide to power off icon right to turn your device off.
Way 8. Reset DNS
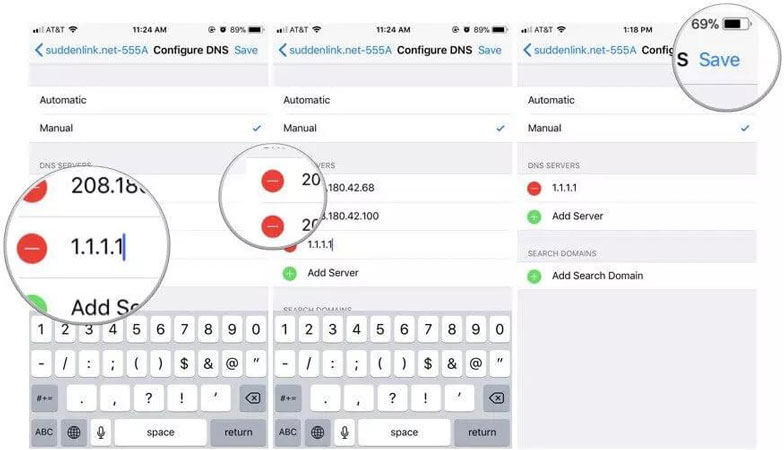
If WiFi is your source of data connection while using the FaceTime app and you get a poor connection error, resetting DNS is a great solution to employ. Change your DNS settings following the stepwise guide given below:
- Go to Settings > WLAN.
- Next, click on the i sign beside the WiFi you are connected to.
- Now select Configure DNS, then switch from Automatic to Manual.
- Delete the current DNS server, and switch it to 1.1.1.1 or 8.8.8.8.
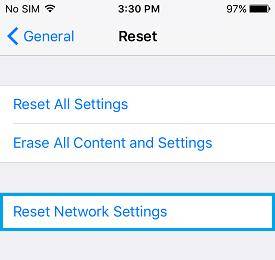
Way 9. Reset Network Settings
Reset your network settings to refresh your data network following the tutorial guide below:
- Launch the Settings menu.
- Tap on General on the next page that pops up.
- Scroll down to where you have Reset, click on it.
- On the next page, tap on Reset Network Settings, and then validate the action to complete the process.
Way 10. Fix FaceTime Poor Connection with iToolab FixGo ASAP
Lastly, we have the use of iToolab FixGo, the #1 system recovery software for iOS and iPadOS. With this software, you can fix the poor connection error you are experiencing on FaceTime. The software is easy to operate, lightweight, and compatible with both Windows and Mac OS.
Tutorial Guide to Fix FaceTime Poor Connection with iToolab FixGo
From your Windows or Mac OS computer, visit the official website for iToolab FixGo to download and install a compatible version of the software. Once a that’s done, launch the software then follow the stepwise guide below:
iToolab FixGo
Fix 200+ iOS/iPadOS/tvOS Issues in Easy 3 Steps
- Quickly Fix Facetime Poor Connection Caused by iOS Issues.
- It’s 100% working with friendly interface.
- 3 easy steps can solve your troubles.
Step 1: On launching the software, a notification requesting you to select a mode of repair will pop up. Choose Standard Mode, connect your iPhone to the computer using a lightning cord, and the interface below will immediately pop up on your screen:
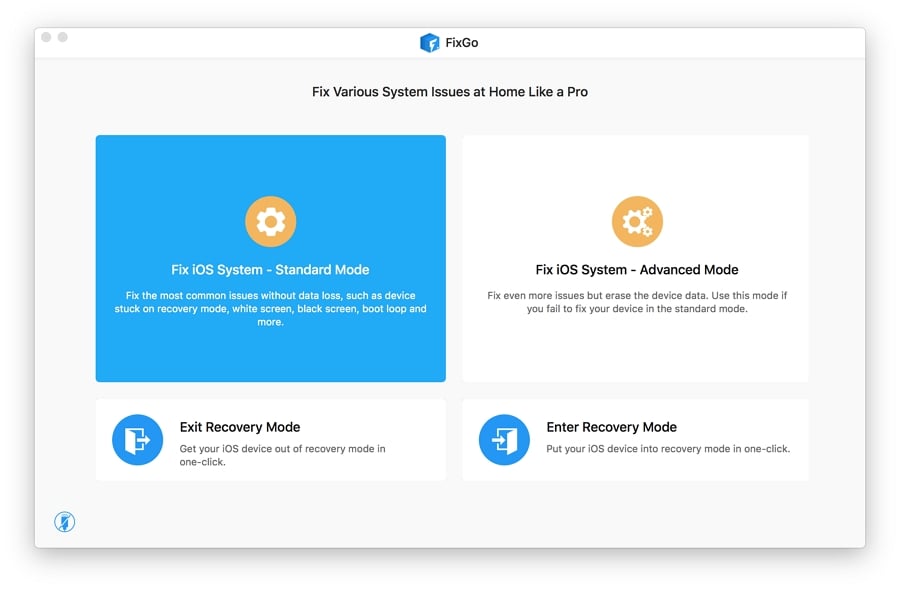
Tap on Fix Now to proceed.
Step 2: Next, iToolab FixGo will provide compatible firmware that you can use to repair your iPhone. Kindly download this firmware by clicking on the Download tab. Here is an image for a better understanding:
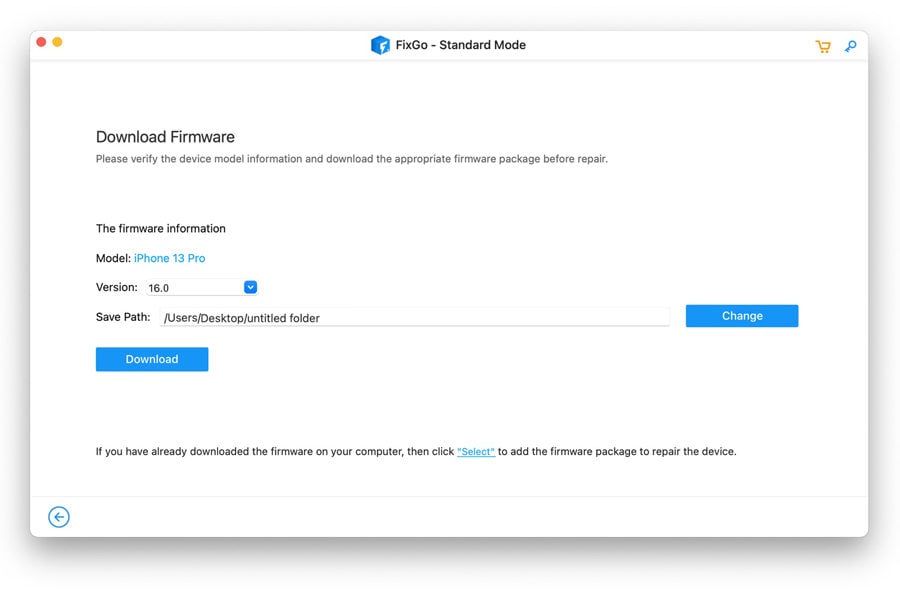
Step 3: Wait a while for the download to complete then you hit the Repair Now tab.
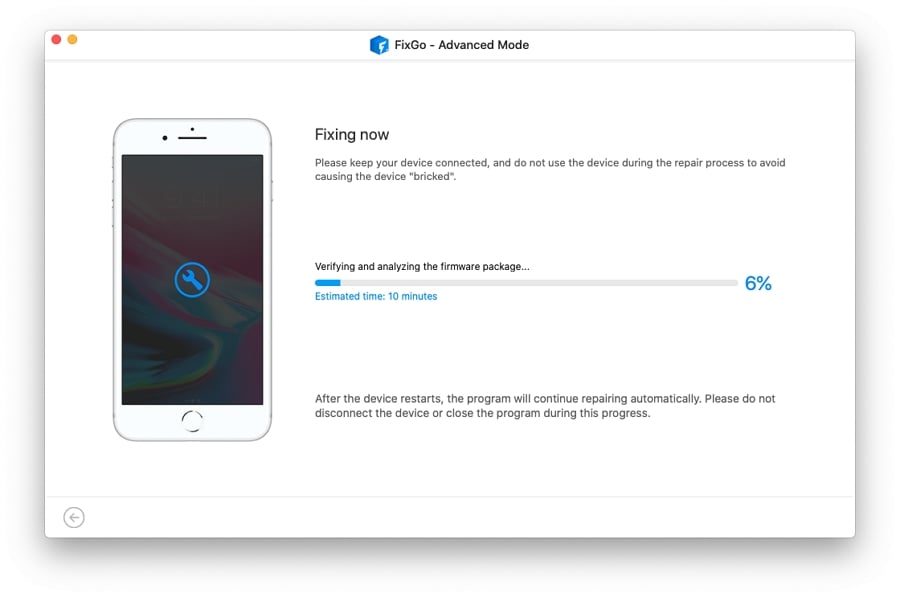
Next, the iToolab FixGo system recovery software will initiate the repair. Be patient for recovery to complete, and your iPhone will automatically reboot itself.
Conclusion
Now you have a detailed guide to fixing poor connection errors on FaceTime, kindly employ the solutions underneath to fix the problem you are experiencing. And if you encounter this problem after updating the device to iOS 16, you are highly suggested to use iToolab FixGo, which can fix all kinds of issues caused by the iOS 16 update. If you have any suggestions or doubts regarding this article, please leave that in the comment below.


