
Erasing an iPhone is often a necessity, be it for selling, giving away, or simply starting afresh. However, you might run into the most annoying obstacle of them all: the infamous “Verification Failed” error when trying to erase your device. This issue can be quite confusing, most of the time you have just correctly typed your Apple ID credentials.
In this article, we will be looking into what causes the “Erase iPhone Verification Failed” issue, solutions to fix it, and alternative ways to erase your iPhone without Apple ID verification.

What Does It Mean When Your Apple ID Says Verification Failed?
When your Apple ID indicates “Verification Failed”, it most probably means that your device was unable to connect to the Apple servers to authenticate your credentials. This can be attributed to several factors, like network problems, wrong login details, or Apple’s servers being down.
To put it simply, your iPhone’s inability to confirm your permission for the action (in this case, the erasure of the device) is the reason for the verification failure error message.
Why Verification Failed When Trying to Erase an iPhone?
The “Verification Failed” error is the result of many factors. The knowledge of these reasons makes the troubleshooting process easier for you.
Incorrect Apple ID Password: You are probably entering the wrong password if you have recently changed your Apple ID password or you haven’t logged in for a long time. Your credentials need to be checked very thoroughly.
Incorrect Verification Code: Two-factor authentication requires the sending of a code to one of your devices or a phone number. If this code is entered erroneously, the verification will not be successful.
Poor Network Connection: A weak or unstable internet connection can stop your iPhone from contacting Apple servers, which will result in a failed verification.
Apple System Status Issue: Sometimes, Apple’s servers might be down due to some maintenance work, thus, stopping the verification from going through. Look at the system status before starting to troubleshoot when the problem is on Apple’s end.
How to Fix Erase iPhone Verification Failed Issue?
Now that we know what might be causing the issue, let’s explore some methods to fix it.
- Fix 1: Check Apple ID Credentials/Change Apple ID Password
- Fix 2: Connect the iPhone to A Strong Network
- Fix 3: Reset Network Settings
- Fix 4: Check Apple System Status
- Fix 5: Force Restart iPhone
Fix 1: Check Apple ID Credentials/Change Apple ID Password
In case of this error, one of the first things you must do is to check that you are entering the correct Apple ID and password. If you are having trouble with your password, you can follow these steps to change it:
- Go to Settings on your iPhone.
- Tap on [Your Name] at the top.
- Select Password & Security.
- Tap Change Password and follow the prompts to reset your password.
Be sure to apply the new password when attempting to erase your iPhone.

Fix 2: Connect the iPhone to A Strong Network
A flowing and stable Internet connection is the key to the successful Apple ID verification process. First, make sure you are connected to a strong Wi-Fi network before you try to erase your iPhone for the second time. In the case of a weak connection, make sure you are near the router or change to a different network.
Fix 3: Reset Network Settings
Renewing the network settings can help you solve the problems with the internet connection that might be a reason for the verification failure. To reset network settings:
- Go to Settings > General > Reset.
- Tap Reset Network Settings.
- Enter your passcode if prompted, then confirm the reset.
This will erase saved Wi-Fi networks and passwords, so be sure you have that information before proceeding.

Fix 4: Check Apple System Status
Many times, the problems may not be present on your device but rather with the servers of Apple. First, check the Apple System Status page and be sure that there are no issues before you try other fixes.

Fix 5: Force Restart iPhone
A force restart can release the temp-stuck glitches that might be the grouse of the verification failure. Depending on your iPhone model, here’s how to do it:
- For iPhone 8 or later: Quickly press and release the Volume Up button, next to the Volume Down button. Then, press and hold the Side button until you see the Apple logo.
- For iPhone 7/7 Plus: Hold the Volume Down and Sleep/Wake buttons together until the Apple logo appears.
- For iPhone 6s or older: Keep the Home and Sleep/Wake buttons together until the Apple logo shows up.
How to Erase an iPhone Without Apple ID Verification?
If you are still having trouble erasing your iPhone after trying the methods described above, there are some alternative ways to bypass the Apple ID verification.
Way 1: Erase iPhone after 10 Wrong Passcode Attempts
To erase your iPhone using this method, you need to turn on the screen passcode, and enable “Erase Data” option.

As the title described, lock your iPhone and keep entering wrong passcodes. After 5 wrong passcode attempts, your iPhone will become unavailable or disabled. Then you need to wait 1 minute to try again. However, you need to wait about 2-3 hours before you can make your 10th attempt.
After the 10th wrong attempt, your iPhone will be erased.
Way 2: Erase iPhone in 1 Click
For a more straightforward solution, you can use a powerful tool like iToolab UnlockGo iPhone Unlocker. This program makes it possible to remove your Apple ID and erase your iPhone without the need for verification.
Main Features of iToolab UnlockGo iPhone Unlocker:
- Help you erase iPhone/iPad without Apple ID verification.
- The process is simple and fast. You can erase your iPhone within half an hour.
- After erasing, you don’t need to activate the device with Apple ID verification.
- It supports all iPhone models and iOS versions.
Not familiar with how to operate iToolab UnlockGo? Don’t worry, we have got you covered! Just follow the mentioned below steps to erase your iPhone effectively:
The first and foremost step is to download UnlockGo from the official website and install it on your computer. You can download it on your Windows and even on your MacOS.
Step 1 Now that you have the software installed on your computer, run it. An interface, as shown in the image below, will open. You have to select the “Unlock Apple ID” option from the interface. This way you will be able to remove the Apple ID associated with the device without needing the password.

Step 2 Take a USB cable to connect your iPhone to your computer. Then you need to ensure that the screen lock and Two-Factor Authentication is switched on.

Step 3 UnlockGo will now prompt you to download the latest compatible firmware package for your device. Just click the Download button, and the software will automatically fetch the correct firmware for you. The download might take a few minutes, depending on your internet speed, so please be patient.

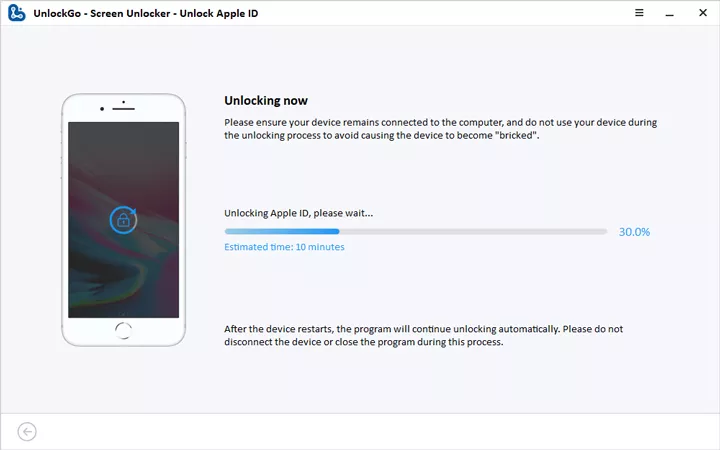
Step 4 Once the firmware is downloaded, click on “Unlock Now”, and UnlockGo will begin removing the Apple ID from your device. This process might take a few minutes, so keep your device connected during this time. UnlockGo will disable the Apple ID and unlink it from your iPhone or iPad, allowing you to set up your device with a new Apple ID.
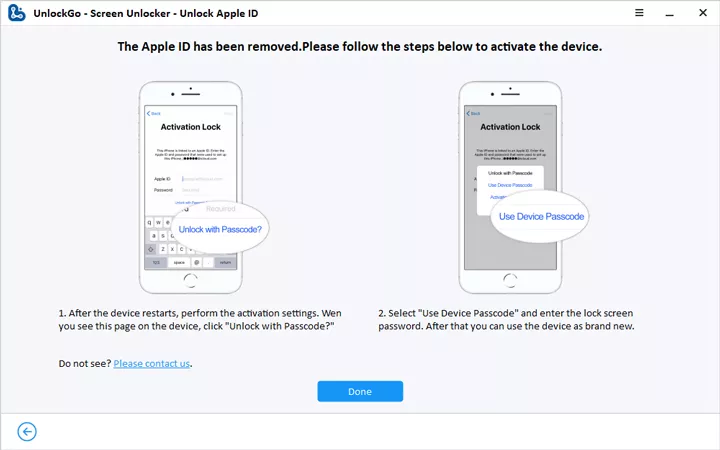
Step 5 With the Apple ID removed, UnlockGo will guide you through the activation process. You can activate your iPhone using your device passcode.
Conclusion
It could be so depressing having to deal with the “Erase iPhone Verification Failed” problem, but with the various techniques highlighted above, it is quite possible to get rid of the problem and erase your device seamlessly.
Whether you decide to troubleshoot the issue following the guidelines above or use an alternative approach like iToolab UnlockGo iPhone Unlocker, the steps to erase your iPhone are only within a few touches of the screen. What has been revealed by many people who have tried any of the two above-mentioned techniques is that the techniques work. Hence, it is worth it, to try one if not both of them to find out firsthand whether they work for you.

UnlockGo iPhone Unlocker Special Coupon
$10 OFF coupon code