
Who doesn’t cherish the convenience of Face ID on their iPhone? Being able to unlock an iPhone with a quick glance is not only faster but also safer than the traditional passcode.
But sometimes, you may want to register multiple faces on your iPhone. Perhaps you’re sharing your device with someone, want to unlock the device when wearing glasses or a mask, or just need to add another family member’s face in case of an emergency.
But can you add another Face ID on iPhone? Yes, you can have an additional face on your iPhone. However, Apple allows only two faces at any given time, so you can only add one face to the already existing one.
In this article, we will explore how to add a second face ID on an iPhone, any potential risks involved, how to remove it, and so much more, so let’s dive right in!
Which iPhone Can Add a Second Face ID?
Although an alternative Face is a feature that’s now available on iPhone, not all iPhones have it.
Here are the models that support it:
- iPhone 15 Pro Max
- iPhone 15 Pro
- iPhone 15 Plus
- iPhone 15
- iPhone 14 Pro Max
- iPhone 14 Pro
- iPhone 14 Plus
- iPhone 14
- iPhone 13 Pro Max
- iPhone 13 Pro
- iPhone 13
- iPhone 13 mini
- iPhone 12 Pro Max
- iPhone 12 Pro
- iPhone 12
- iPhone 12 mini
- iPhone 11 Pro Max
- iPhone 11 Pro
- iPhone 11
- iPhone XS Max
- iPhone XS
- iPhone XR
- iPhone X
In other words, you can add an alternative Face to your iPhone as long as you have iPhone X or a newer model.
Is It Safe to Add a Second Face ID on iPhone?
When you add a second face ID on your iPhone, it becomes less safe than just having one face, significantly if the face added isn’t your own. This is because after you add the face of someone else on your iPhone, you grant them equal access rights as yourself.
That means they can do exactly what you can – make purchases and pay with ApplePay, access all corners of your phone secured with Face ID, and so forth. It gets even worse if you use Face ID to authenticate transactions or unlock bank apps.
Hence, before you add a second face of someone else, even if a loved one, ask yourself if you really trust them. That way, you can curb misuse of your Apple device or sensitive information.
But if you are adding an alternative face of yourself, with glasses, mask, or make-up, then there really shouldn’t be as much concern since it’s still your face.
How to Add a Second Face ID on iPhone
Once you’ve assessed the risks involved and still want to add another face on your device, the procedure is pretty straightforward.
Here’s how to add second Face ID on iPhone:
- Open Settings on the iPhone and navigate to Face ID & Passcode
- Enter your current passcode to confirm your identity
- Choose the Set Up an Alternative Appearance option
- Pass the phone to the person you’re trying to enrol their face and let them follow the on-screen instructions to complete the registration. If you’re adding an alternate face of self with a different style, ensure you’re already equipped with the accessory you want to use normally while unlocking your device.
- Tap on Done when the registration process is complete

Now, in case you or the person you’re enrolling their face has physical limitations, then you can make use of Accessibility Options when registering an alternative Face ID.

Unlike the regular registration method, this setting doesn’t demand a full range of head motion when setting up the alternate face, so it’s more convenient for people with such physical limitations.
If you’re enrolling someone who is blind or has low vision, how to set up second Face ID isn’t difficult either. Just ensure that you use the accessibility feature offered by Apple, so they won’t need to unlock the device with their eyes open. Go to Settings >Face ID & Passcode, then turn off Require Attention for Face ID.

And that’s it! That’s how to add another face to face ID already existing on your iPhone under different circumstances.
How to Remove a Second Face ID on iPhone
If you think of removing the alternate face after you’ve set it up, the procedure is pretty simple:
- Open Settings on your iPhone and choose Face ID & Passcode
- Enter your passcode to verify that it’s your device
- Choose the Reset Face ID option

However, it’s worth mentioning that this method doesn’t only remove the alternate face ID. Instead, it wipes out every face data, and that includes the one for the primary Face ID.
Apple currently doesn’t offer a way to erase only the alternative Face ID, which means if you feel the person you added to your iPhone shouldn’t have Face ID access anymore, you’ll have to remove both faces and register them again.
Bonus: How to Unlock iPhone without Passcode or Face ID
You now know how to add a second Face ID on your iPhone, what devices support it, the risks involved, and how to remove it if you need the face deregistered.
But let’s assume that you forget your passcode and can’t use your Face ID (maybe due to injury). How do you unlock your iPhone?
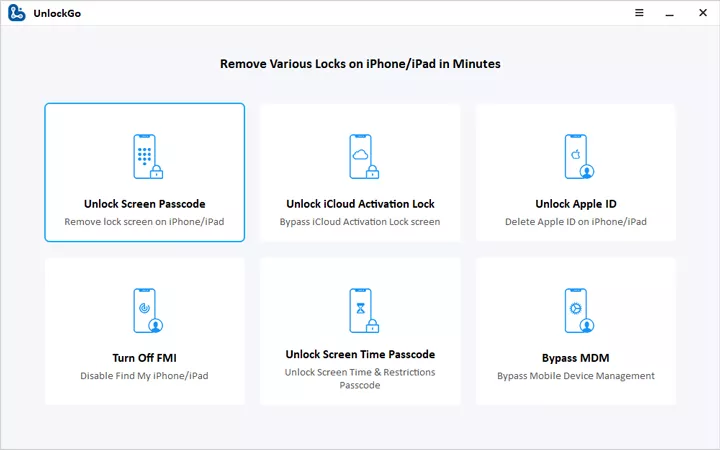
Well, in such circumstances, we recommend that you use the iToolab UnlockGo iPhone Unlocker. It is a well-engineered tool specially designed to offer reliable solutions to lock-related issues on iPhones and other iDevices with ultimate ease.
With this tool, you can:
- Remove all types of iPhone screen locks, including Face ID, Touch ID, and 4/6-digit passcode
- Remove iCloud Activation Lock without password or previous owner
- Sign out of the current Apple ID without knowing its password
- Reset Screen Time passcode and bypass MDM lock without data loss
And the best part? The program has extensible compatibility, supporting even the latest iOS 18 Beta.
In fact, there isn’t any iPhone it won’t work with, especially if you’re seeking to use it to bypass screen lock. It will even do the work on iPad and iPod Touch, making it your go-to solution for almost every lock-related issue connected to most Apple devices.
But then, just how can you use this tool to unlock your iPhone without the Face ID or the requisite passcode?
Well, it’s easy! Follow this procedure:
Step 1 Install the UnlockGo iPhone Unlocker tool on your computer. Launch the program on the computer. By this time, you should have the iPhone connected to the computer using a USB. Click on the Unlock Screen Passcode on the tool’s main interface.
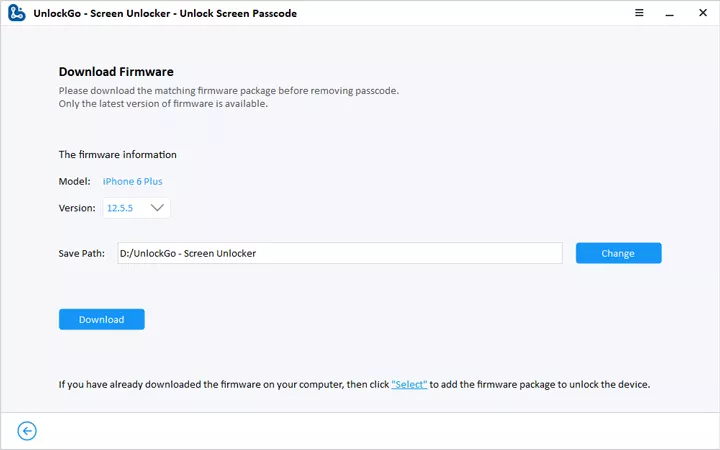
Step 2 Download the necessary firmware package by confirming the save path and hitting the Download button. The download process may take some time, so remain patient and ensure you have a stable internet connection.
Step 3 Begin the unlocking process by clicking on the Unlock Now button. Wait until the process is complete before you click on Done once the process is complete.
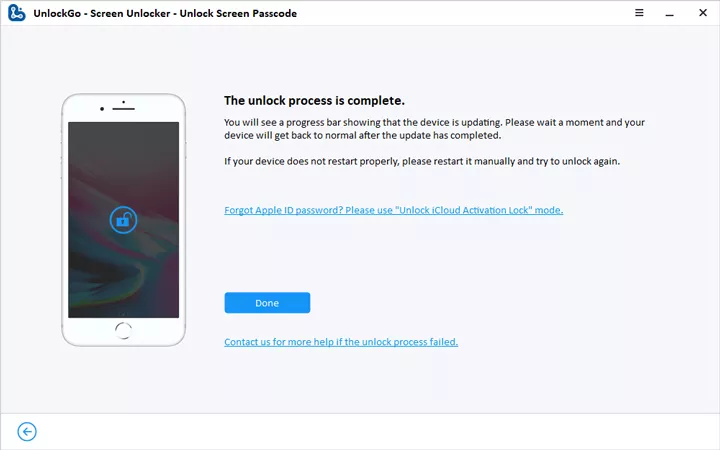
And voila! You can now access your iPhone without entering a passcode or using Face ID.
Enjoy Your iPhone with the Second Face ID
The Face ID alternative feature not only caters for those who would like to have two people on the same iPhone but also lets you add an alternate look of yourself, including with glasses, masks, or makeup.
But since every technology has its pros and cons, weigh the risks involved before adding a second Face ID on your iPhone. Remember, you can always reset the Face ID settings if you feel the need. In case of any lock-related issues, don’t hesitate to use iToolab UnlockGo iPhone Unlocker for a smooth unlock process.