You just bought a PC with the fastest Solid State Drive (SSD) available to get a 5-second boot speed, but Windows stops you right before you access your desktop; it’s password time!
Many times, entering your password every single time you log-in, feels like an extra hassle and a waste of time. No doubt, setting up a password is a must thing and it keeps your files secure, but if you’re sure that only you’re the one who’s going to access your computer, you can set up Windows 11 auto login feature.
Windows auto login feature can be found on Windows 10 and 11 both, but you must have an administrator account to enable the auto login feature.
How to Log into Windows 11 Automatically?
In this blog, we’ll share with you some of the most effective methods to enable auto login Windows 11.
- 1. Windows 11 Auto Login Using Netplwiz
- 2. Windows 11 Auto Login Using Computer Management
- 3. Windows 11 Auto Login Using Registry
1. Windows 11 Auto Login Using Netplwiz
The first method you should try is by using netplwiz. For that purpose, you need to make some adjustments in Settings. Here is our step-by-step guide on how to enable Windows 11 auto login on startup by using netplwiz.
- From the Start, go to Settings.
- Go to Accounts from the left side of the Settings window and select Sign-in options.
- Under the Additional settings, toggle on the option that says “For improved security, only allow Windows Hello sign-in for Microsoft accounts on this device (Recommended)“.
- When you’re asked for your password, enter it and proceed.
- Open the Run program by either searching in the Start or pressing Win+R. Type netplwiz and click OK.
- You’ll be directed to the User Accounts window where you need to uncheck the box that says “Users must enter a user name and password to use this computer“. Click OK to continue.
- Click on Apply, and enter your password to save the changes.
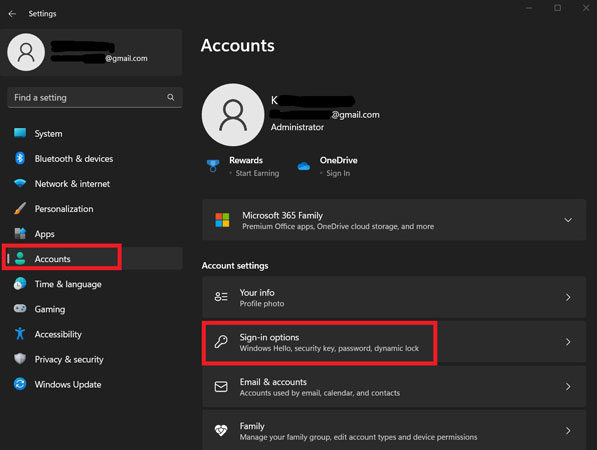
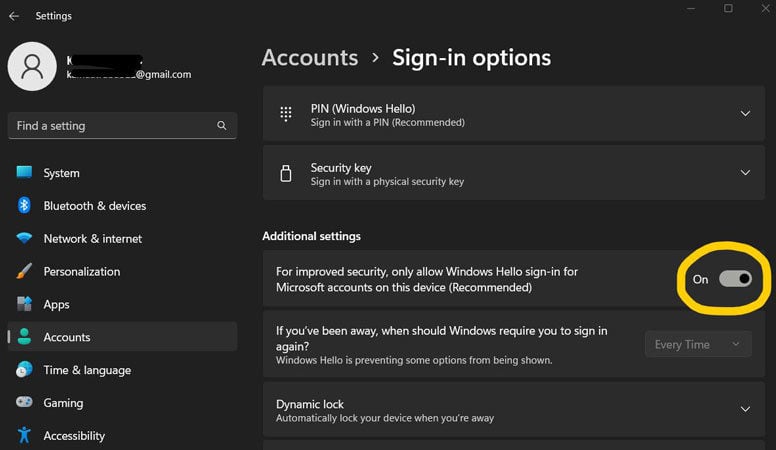
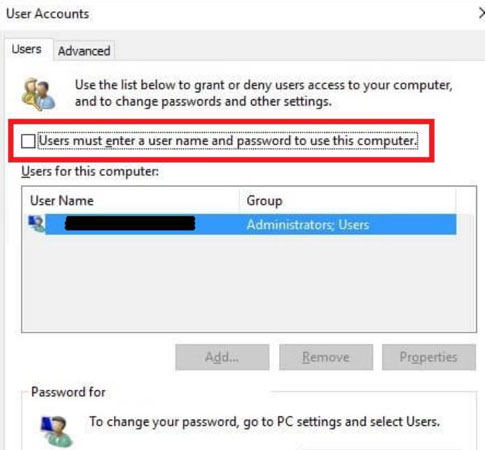
Your Windows 11 auto login has been set up. You can verify it by restarting your computer and your computer shouldn’t ask you about your password.
2. Windows 11 Auto Login Using Computer Management
You can also turn on the Windows 11 auto login with password through the Computer Management feature. It’s available in both Windows versions; 11 and 10. This method works perfectly fine and you can easily turn on the auto login feature by following the detailed steps given below.
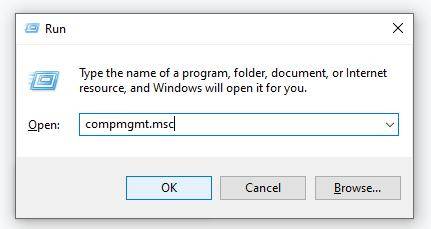
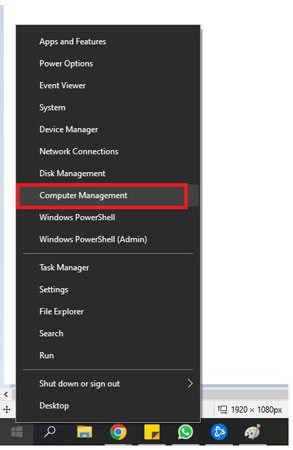
- Open the Run program by pressing Win+R. Type compmgmt.msc and hit Enter. You can also open the Computer Management option by right-clicking the Start button and choosing Computer Management.
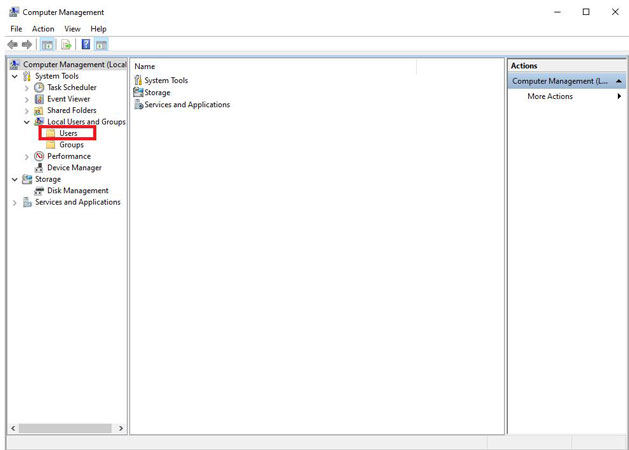
- Under the Local Users and Groups section from the left side, click on the Users folder.
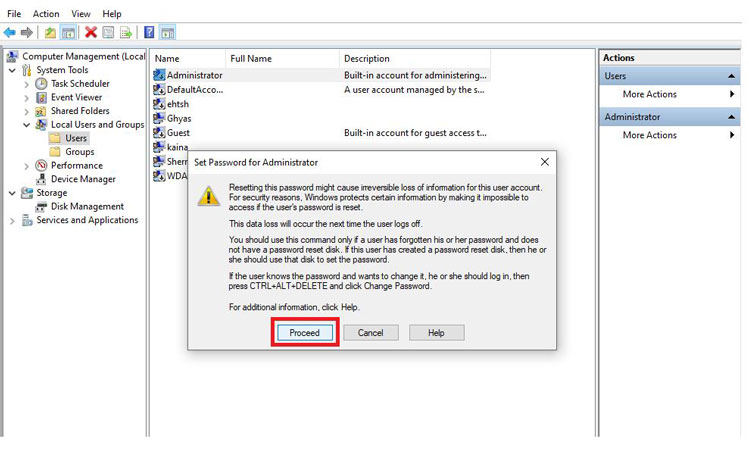
- Right-click on the user for which you want to activate the auto login. Click on Set Password… and click Proceed to continue.
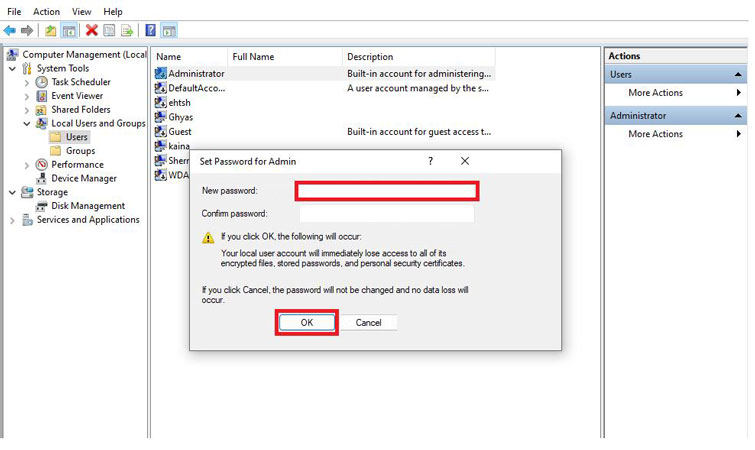
- A popup will ask you to save a new password. Leave both fields empty and click OK without setting up any password.
Or…
Now, restart your computer and see if the auto-login feature is turned on.
3. Windows 11 Auto Login Using Registry
Another method that you can try is through Windows 11 auto login registry. You can enable the auto login through regedit. The auto login Windows 11 regedit method also allows users to log in without entering a password. The term regedit comes from the term that we search for in the Run program to open the Registry Editor.
For more information on how to enable Windows 11 auto login using the registry, follow our step-by-step guide.
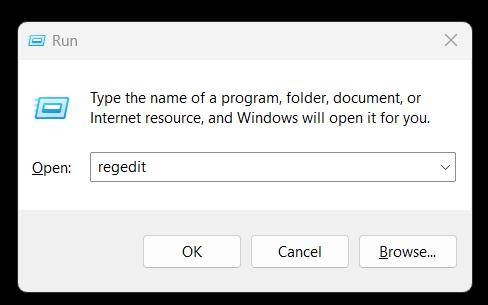
- From the Start, open Run by either searching for it or simply clicking Win+R.
- Once the Run window opens up, type regedit and click OK.
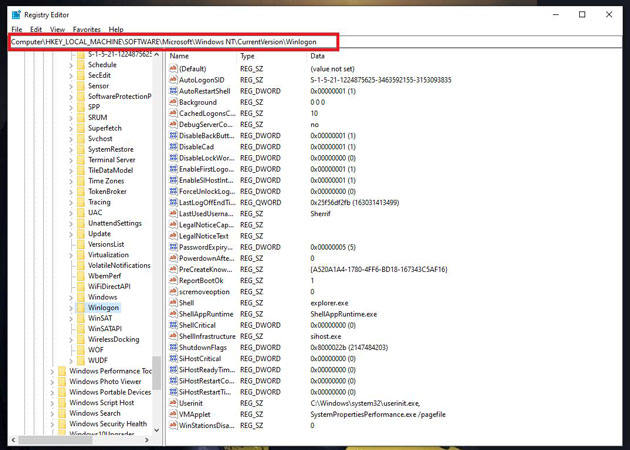
- You’ll be directed to the Registry Editor window. Click HKEY_LOCAL_MACHINE >> SOFTWARE >> Microsoft >> Windows NT >> CurrentVersion >> Winlogon.
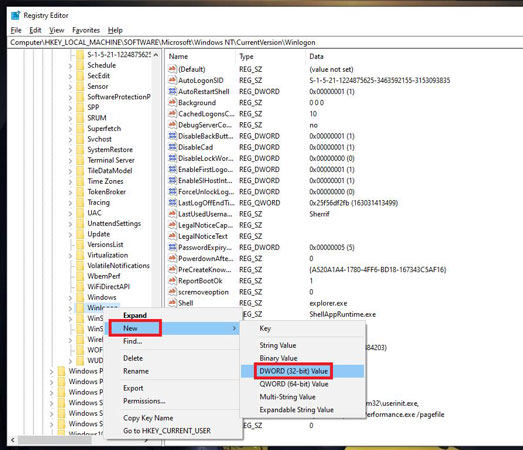
- Right-click on Winlogon, and select New >> DWORD (32-bit) Value.
- Rename the newly created value as AutoAdminLogon. Double-click on the right side and set its value as 1.
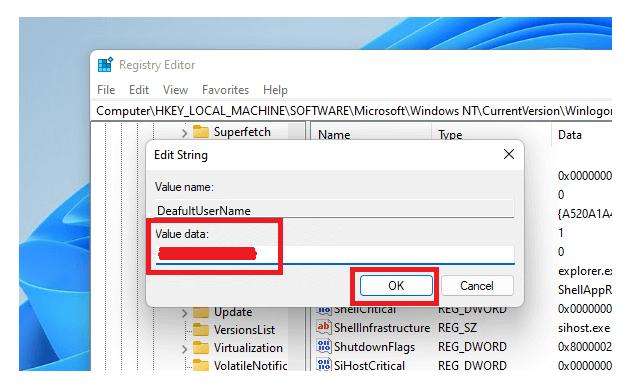
- Once again, right-click on Winlogon >> String Value, and name the new string as DefaultUserName.
- Double-click on a newly created string and rename it as your username. The name will go under the Value data section, after adding your name, click on OK.
- Right-click on Winlogon again, create a New String Value >> set name as DefaultPassowrd. Under Value Data, enter the password and click OK.
How to Fix Netplwiz Not Working on Auto Login?
If you’re unable to access netplwiz because of any possible reasons, you can try the following guide to enable Windows 11 auto login after reboot. Let’s have a look at what you need to do.
- Open Settings >> Accounts.
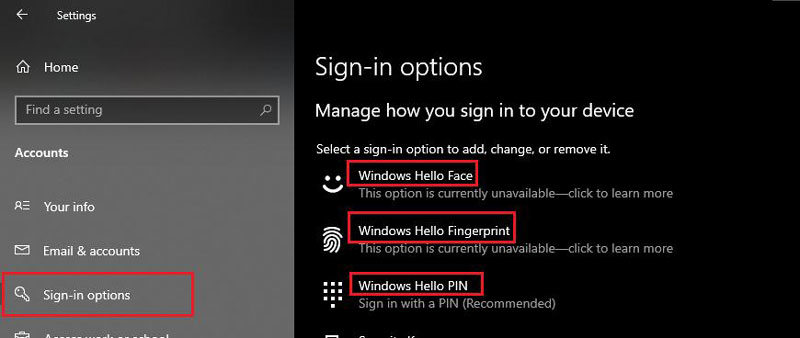
- Click on the Sign-in options.
- From the right side of the setting window, you can set Windows Hello Face, Fingerprint, PIN, and none of these sign-in options require too much time.
- Select your desired password layer and click Add.
- For instance, if you clicked on create a PIN, continue with the on-screen instructions and create a PIN.
- Enter your Microsoft account password when asked. Click on Sign in.
- Register your PIN and hit OK.
How to Get Windows Password Back When Forgot?
You might be enjoying the perks of Windows 11 auto login without password, but what if someday, you can’t sign in to your PC and see no other option to access your desktop? There are quite a few chances that you may encounter such a situation because of any system error or unknown bug.
In order to get your Windows Password back when forgotten, you need to prepare yourself with a comprehensive tool – UnlockGo Windows Password Reset Tool.
UnlockGo – Windows Password Recovery is a powerful tool that allows Windows users to reset their forgotten passwords. You can reset passwords on any of your accounts whether local or admin. The best part is its ability to create a Windows password reset disk (USB/DVD/CD) in just one click!
UnlockGo (Windows) – Windows Password Reset Tool
389,390,209 people have downloaded it
Final Thoughts
Logging in with the same password every single time you turn on your computer seems quite time-consuming especially when you’re sure that no one else would use your computer. Setting up a password is always recommended but sometimes, all we want is a quick boot speed.
For that purpose, we’ve got you this blog in which we talked about how you can enable the Windows 11 auto login feature with some of the most influential and authentic methods. We also discussed how you could get your Windows password back if you forget it or you can’t sign in to your desktop because of any error.


