Once bitlocker password or recovery key lost, things will get complicated, although bitlocker recovery key can be bypassed, but it’s not a safeguard. Best way is to disable it for unnecessary trouble. This article aims to provide them with guidance in this regard.
Everything about Microsoft Bitlocker on Windows 11
What is BitLocker Windows 11, this particular question has been bamboozling various online communities, where people seem to keep asking this question again and again. It helps protect the Windows operating system and user data, and help ensure computers cannot be tampered with, even if left unattended, lost, or stolen. Overview of bitlocker encryption in Windows you can’t miss.
Although having BitLocker has pros and cons, you may require its disabling sometimes. But to do this, it is a must for you to have an Administrator account. Otherwise, you won’t be able to disable it. Logging in as an Administrator is necessary because it allows you to access your PC’s essential files and software.
However, while logging in from your Administrator account, you may forget the password. Indeed, this would render your Windows administrator account inaccessible to you. In this case, we recommend using our premium unlocking tool UnlockGo (Windows).
How to Disable Bitlocker Encryption on Windows 11
Below here, the article lists seven different ways using which you will learn how to disable BitLocker in the command prompt.
- 1. Disable BitLocker Using BitLocker Manager
- 2. Disable BitLocker via Control Panel
- 3. Disable BitLocker Using Local Group Policy Editor
- 4. Disable BitLocker Using PowerShell
- 5. Disable BitLocker Using CMD
- 6. Disable BitLocker by Formatting Hard Drive
- 7. Disable BitLocker from the Windows Services Page
Way 1. Turn off Your BitLocker Using BitLocker Manager
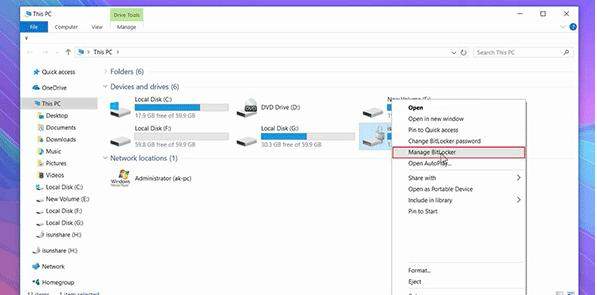
Step 1: Press Windows+ E. Click This PC > Devices > Drives option. Search for your BitLocker driver and right-click. To continue, click on the Manage BitLocker option.
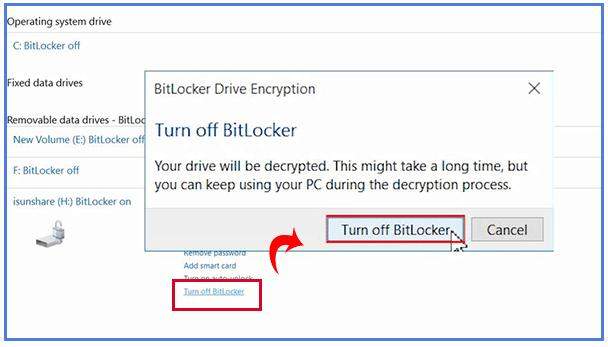
Step 2: Once you have entered the BitLocker Drive Encryption interface, click Turn Off BitLocker. After seeing the pop-up window, click Turn Off BitLocker to confirm the operation.
Way 2. Disable BitLocker via Control Panel
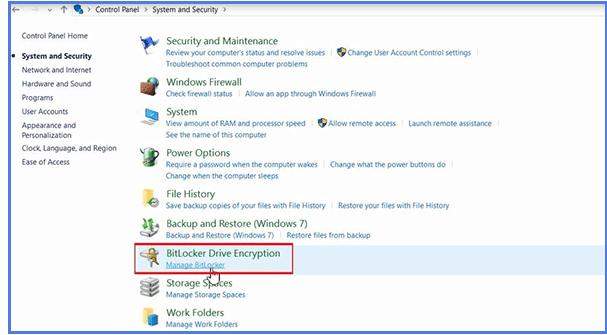
Step 1: Go to your Control Panel, Click BitLocker Drive Encryption.
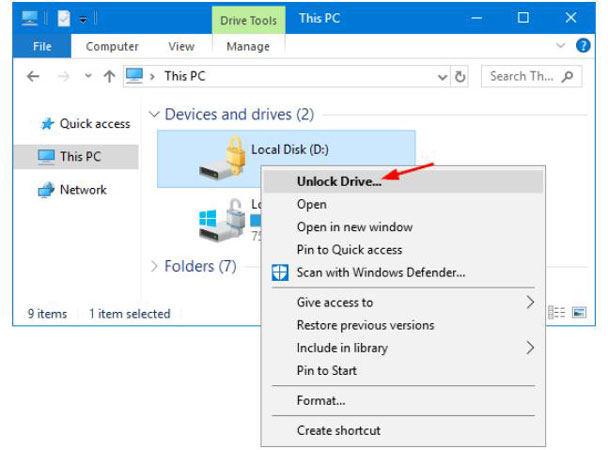
Step 2: Expand the BitLocker-protected drive and choose Unlock drive option.
Step 4: Type your password and click Turn off BitLocker.
Way 3. Disable BitLocker Using Local Group Policy Editor
Step 1: Open your PC’s dialog box by pressing Windows and R. Type gpedit.msc and click OK.
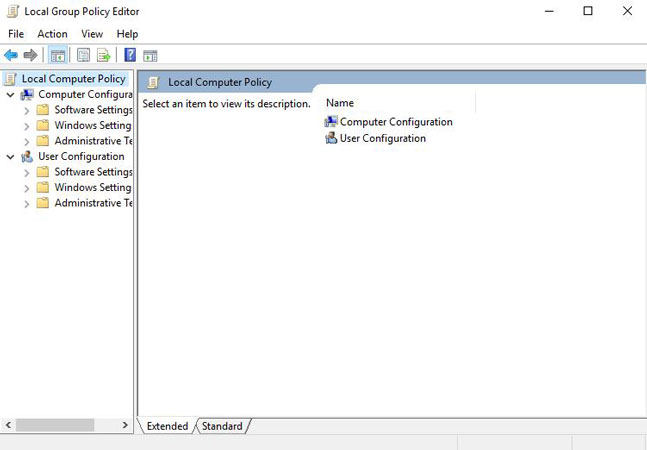
Step 2: Visit Computer Configuration > Administrative Templates. Click on Windows Components > BitLocker Drive Encryption > Fixed Data Drives.
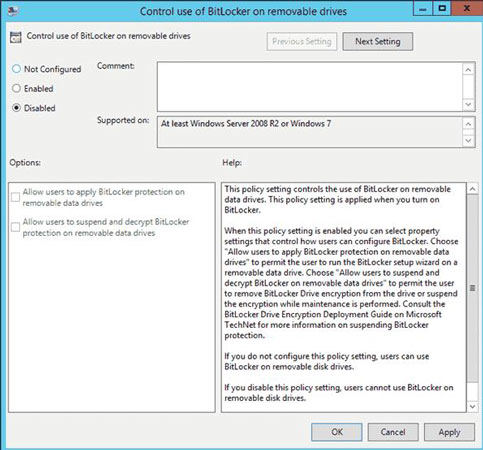
Step 3: Click the line saying Deny write access to fixed drives not protected by BitLocker.
Step 4: Now, a pop-up window will appear. There, click Not Configure or Disable. Click Apply > OK to confirm the operation.
Way 4. Disable BitLocker Using PowerShell
Step 1: Click the Start button in Windows and type PowerShell in the search box.
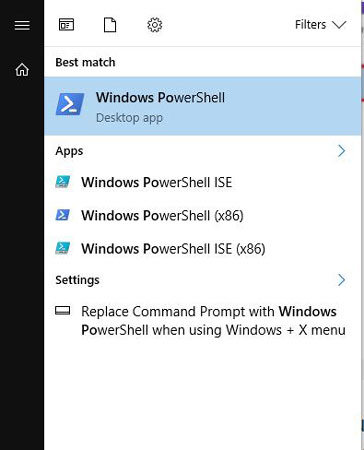
Step 2: Right-click on PowerShell. Right-click on PowerShell again and select Run as Administrator.
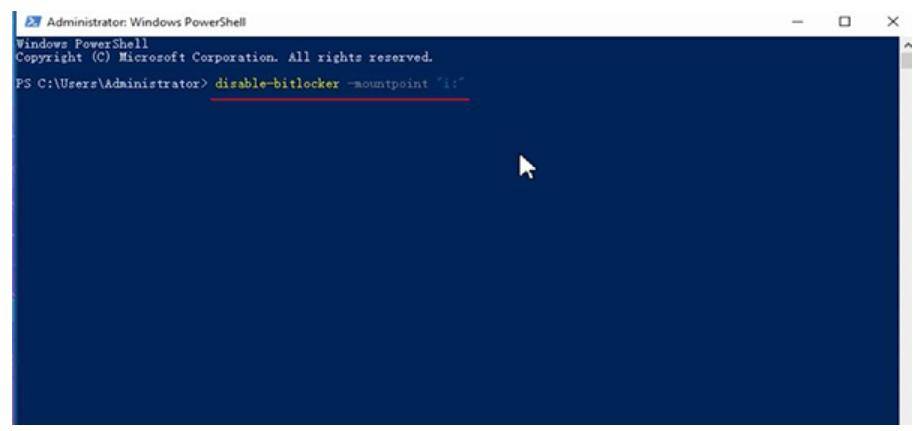
Step 3: Now, a pop-up window will appear. Thee, type Disable-BitLocker-MountPoint ‘X’and press Enterto continue.
In this step, you will have to replace “X” with the hard drive’s name, i.e., C, D, E, etc.
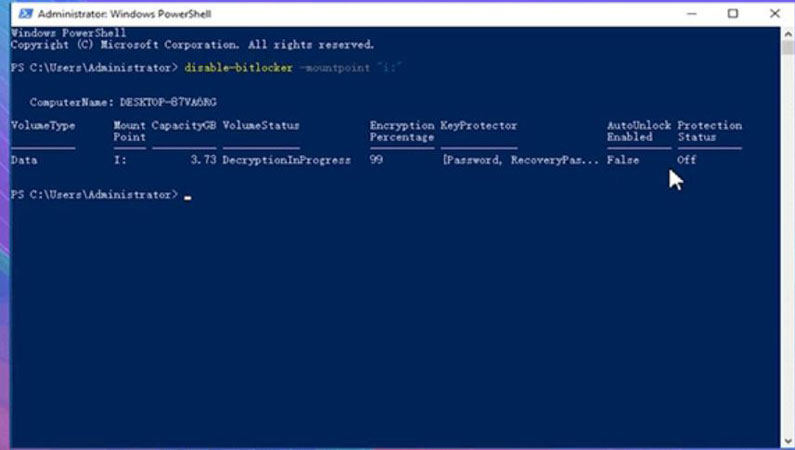
The following commands can also disable BitLocker in PowerShell:
- $BLV = Get-BitLocker Volume
- Disable-BitLocker – MountPoint $BLV
Way 5. Disable BitLocker Using CMD
Step 1: As the Administrator, open your PC’s Command Prompt. Type manage-bde -off X: Press Enter to proceed.
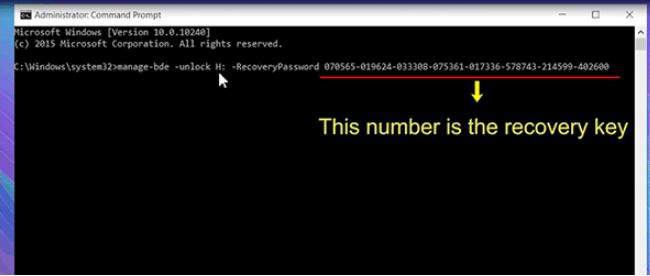
Step 2: Once you have entered manage-bde-off X, decryption will start. Let the process complete itself without causing any interruption.
Here, replace X with the name of the hard drive you are going to replace.
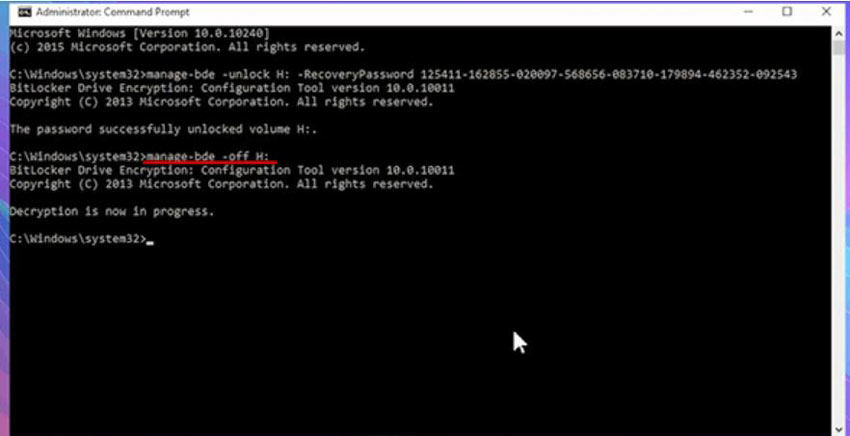
The table indicates the same method for disabling BitLocker, but for Windows 11 PCs.
| Windows 11 Home | Windows 11 Pro |
|---|---|
| Right-click Start and select PowerShell as Administrator | Now, go to Control Panel > System and Security > Bitlocker Drive Encryption |
| Type: manage-bde –protectors –disable ‘X’ | Select Suspend Protection in C drive |
Way 6. Disable BitLocker by Formatting Hard Drive
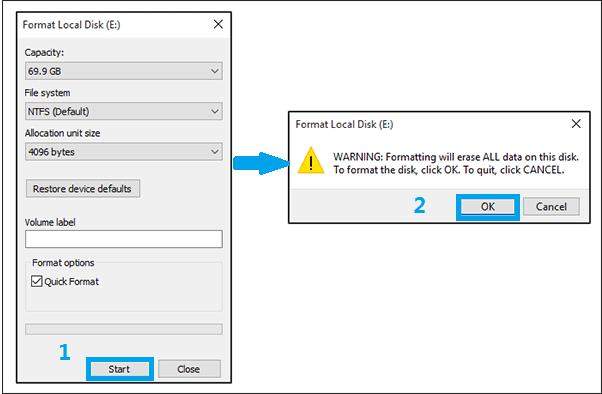
Formatting a hard drive is another easy way to disable BitLocker from your PC. To format your hard drive, proceed as follows:
Step 1: Right-click on the hard drive that BitLocker and select Format have encrypted.
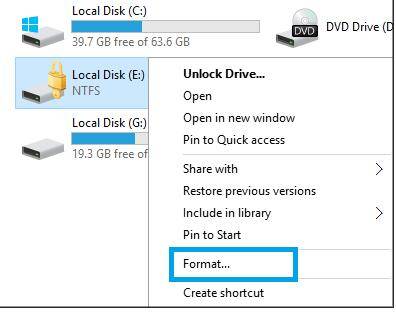
Step 2: In a pop-up window that appears, set the file systems. Then, check the box next to the Quick Format option. Click Start to proceed.
Way 7. Disable BitLocker from the Windows Services Page
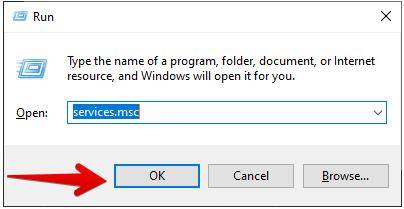
Step 1: First use the shortcut Win+R and type the command ‘services.msc’.
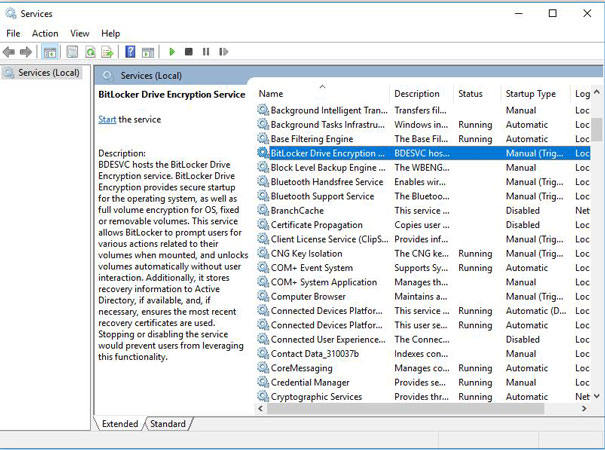
Step 2: Now from the appeared services search for ‘BitLocker Drive Encryption Service’ and open it.
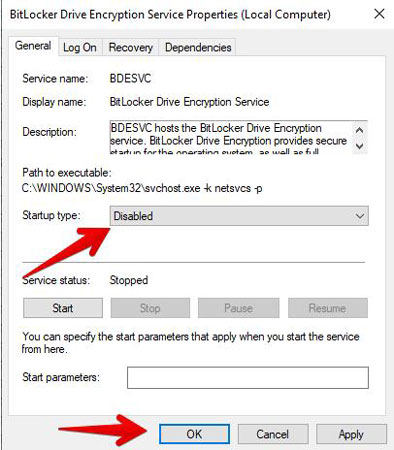
Step 3: Now click the service and ‘Disable it’ and also if the service is in the Running state, make sure to ‘Stop’ it.
Windows 10 and Windows 11 have a little difference in turning off or disabling bitlocker encryption, 7 proven ways on how to turn off windows 10 bitlocker have acquired much attention. After all, most computers these days are Windows 10.
People Also Asked Questions about Bitlocker Encryption
What are BitLocker Drive Encryption and BitLocker To Go?
If you want to know how to disable drive encryption on your PC, then the two methods given below will help you in this regard:
BitLocker Drive Encryption
This encryption method encrypts fixed hard drives and operating system drives. If anybody encrypts their OS with BitLocker, their boot loader will prompt them to authenticate their BitLocker password or BitLocker key while booting. The decryption will only occur after a proper encryption key or password has been entered. Once the key(or password) is entered, drive decryption will happen, and the Windows will load itself.
BitLocker to Go
This encryption method encrypts external drives, e.g., USBs. , The password or recovery key will be required after connecting the drive to the computer. Compared to BitLocker Dive Encryption, BitLocker To Go allows unlocking the devices on any macOS or Windows computer.
What’s the Easiest Way to Enable Bitlocker Encryption
To make your PC extra secure, you can enable Bitlocker encryption. The easiest way of encrypting any of your drives via BitLocker is to use File Explorer. First, open File Explorer. Then, right-click the file you are willing to encrypt and select Turn on BitLocker.
How to turn off Device Encryption and Standard BitLocker Encryption
Device Encryption
Step 1: In the Windows search bar, type Device Encryption Settings. Click Open once it appears in the search results.
Step 2: Select the option Off in the device encryption field.
BitLocker Encryption
Step 1: Search for Manage BitLocker in the Windows search bar. Once it appears in the search results, click Open.
Step 2: Click Turn off BitLocker on the drive you are willing to decrypt.
Step 3: Confirm the operation by clicking Turn off BitLocker.
If your desired drive is locked, clicking Unlock drive and typing the password will unlock it.
Conclusion
This guide explains how you can disable BitLocker on your PC in seven ways and its prerequisites. And you should get the administrator right to disable bitlocker on your computer, if you don’t know the password of administrator account, then try UnlockGo – Windows Password Recovery, this tool can help you reset or remove admin account password, if you want to delete the admin account to create a new account as administrator account, the all-in-one tool can help you achieve. Hope this article can help you solve how to disable bitlocker encryption on windows 11.

