

A drive turning RAW after CHKDSK can be scary, but your files may still be there. Recovery is very possible if you stop using the disk and recover your data before trying to repair the drive.
So what should you do when a Windows drive gets converted to RAW after CHKDSK? This guide explains why it happens, how to recover your files safely, and how to fix the drive afterward.
Part 1. Why Did Windows Drive Got Converted to RAW After CHKDSK?
CHKDSK is designed to repair file system errors, not intentionally cause them. In many cases, it quietly fixes small problems in the background. However, when a drive is already badly corrupted, running CHKDSK can sometimes push the file system past the point where Windows can still recognize it.
This can happen when the CHKDSK process is interrupted, the drive loses power during scanning, or the disk has too many bad sectors for CHKDSK to handle. Drives with failing hardware, worn storage controllers, or heavily damaged file system records are also more likely to become unreadable after a repair attempt.
When the file system table becomes too damaged, Windows can no longer identify NTFS, FAT32, or exFAT signatures and labels the entire drive as RAW. That is why the order of action matters so much: stop using the drive, recover your data first, and only then try to repair or format it. Running CHKDSK again on a RAW drive will not help because CHKDSK needs a readable file system to work.
Part 2. Can You Recover Data from a Drive That Became RAW After CHKDSK?
Yes. You can most likely recover files from a drive that turned RAW after CHKDSK ran. RAW simply means Windows cannot read the file system properly anymore; it does not automatically mean your files were damaged or deleted.
RAW is Windows saying it does not know how to read the drive. Since Windows cannot identify the file system, it cannot read the directories that contain file names, folder structures, or used space information. Your photos, documents, videos, music, and other files may still be on the disk, but Windows cannot locate them through the normal file system.
Think of it like a library with its records destroyed. The books are still on the shelves, but the librarians no longer know where anything is. RAW drive recovery works in a similar way because data recovery software scans raw sectors directly instead of relying on the damaged file system.
Before you do anything, follow these instructions:
- Stop using the RAW drive and do not save any new files to it.
- Do not run CHKDSK again.
- Do not format the drive before recovery.
- Do not install data recovery software on that drive.
Recover your files with data recovery software that can scan at the disk sector level before trying to repair the drive.
Part 3. How to Recover Data from a RAW Drive After CHKDSK?
Windows data recovery software like iToolab RecoverGo Windows Data Recovery was created for this purpose. When your hard drive becomes RAW, RecoverGo can scan past the corrupted file system and rebuild a viewable list of recoverable files without altering the original data.
RecoverGo does not rely on the drive’s file system to tell it where files are located. Instead, it reads disk sectors directly and supports over 1,000 file formats, including photos, videos, documents, audio files, archives, and more. It works with HDDs, SSDs, USB drives, and SD cards, and it uses read-only scanning so it does not write to the drive you are scanning.
Key Features:
- Recover files from RAW, formatted, deleted, or inaccessible drives.
- Preview recoverable files before recovery to verify the results.
- Simple three-step recovery process suitable for beginners.
- Support NTFS, FAT32, and exFAT file systems commonly used on Windows devices.
Steps to Recover Files From RAW Drive:
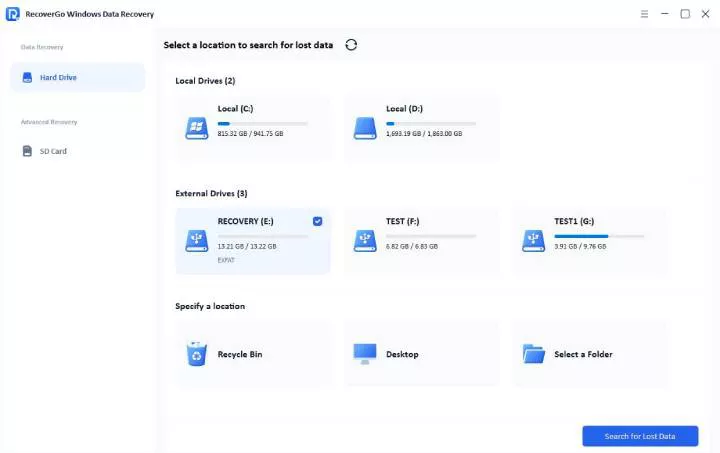
Step 1 Select the RAW Drive
Do not install RecoverGo on the RAW drive. Open RecoverGo and select the RAW drive from the window displaying all detectable storage devices. Click Search for Lost Data to start the scan.
Step 2 Scan the Chosen Drive
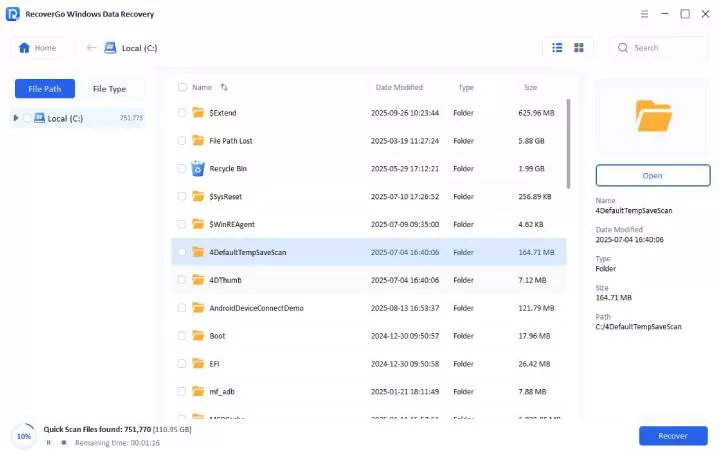
Quick scan checks common storage locations first, while Deep and Advanced scan searches the storage device more thoroughly. If you have a large drive, wait patiently and do not turn off your computer or interrupt the scan.
Step 3 Preview and Recover Your Files
Preview the files you want to restore, and choose the Recover to save them to a safe location on another drive. Never save recovered files back onto the RAW drive. After recovery finishes, open the recovered files to make sure they are usable.

Part 4. How to Fix a RAW Drive After CHKDSK?
Try repairing the drive itself only after you have recovered your files. Both repair methods below can modify the drive, and formatting will erase existing data. If your Windows drive got converted to RAW after CHKDSK, recover first and fix second.
Method 1. Use TestDisk to Recover Lost Partitions (Free, Advanced)
TestDisk is freeware that can recover lost partitions and make the files inside accessible again. It is open-source software that works much deeper in the system than typical recovery programs, so it should be used only after your files have been recovered with another utility.
TestDisk searches for partition boundaries on a drive and recreates the partition table so the drive may become readable again. Keep in mind that TestDisk has a difficult learning curve. It runs through a text-based menu, and a wrong choice can make the situation worse.
Here are the general steps:
- Download TestDisk from the official cgsecurity.org website and extract the files. Run the TestDisk executable to open its command-line style window.
- Select Create to start a new log file for this recovery session. Choose your RAW drive from the list of detected disks and select Proceed.
- Select the partition table type. For most Windows PCs, this is usually Intel.
![TestDisk quick search found RAW partition]()
- Choose Analyse to scan the current partition structure, then run Quick Search. If Quick Search does not find everything, run Deep Search.
- Use the P key to list files inside a found partition and confirm it matches what you expect. Mark the correct partition as primary using the arrow keys until it shows the letter P.
![check RAW partition boot sector status in TestDisk]()
- Select Write to save the new partition table, then confirm with Y when prompted.


Success with TestDisk is never guaranteed, especially on drives with heavy physical damage. This is exactly why recovering your data first matters so much. If TestDisk fails, it should not cost you anything you have not already saved elsewhere.
Method 2. Format RAW Drive
Formatting builds a fresh, empty file system on the drive. It can fix the RAW error, but it also erases everything currently on the drive.
Treat formatting as a last resort. Use it only after you have confirmed your files are safely recovered onto another drive. Formatting works best when the physical drive is healthy and the RAW status came from file system corruption rather than hardware failure.
Steps to format the drive:
- Open File Explorer and locate the RAW drive under This PC. If Windows shows a format prompt, close it until your data has already been recovered.
![Windows format disk before use prompt]()
- Right-click the drive and select Format. Choose a file system, usually NTFS for internal drives or exFAT for external drives used across multiple devices. Leave the allocation unit size at its default setting unless you have a specific reason to change it.
![format RAW drive in File Explorer after CHKDSK]()
- Click Start and confirm the warning that all data will be erased. Wait for the format process to complete, then check that the drive shows the correct file system and capacity.


Once formatting finishes, the drive should mount normally and appear with its full storage space available again.
Part 5. How to Prevent a Drive from Becoming RAW After CHKDSK?
Now you know what to do when a Windows drive gets converted to RAW after CHKDSK. A few simple habits can help you avoid this problem in the future.
- Make regular backups of important data on a separate drive or cloud storage.
- Use built-in utilities or third-party tools to monitor drive health and catch failing hardware early.
- If CHKDSK starts scanning your drive, do not turn off your computer or interrupt the process.
- Always eject external drives safely before unplugging them.
- Replace old or unreliable drives as soon as possible, especially mechanical drives that have been used for several years.
Also Read: CHKDSK Is Not Available for RAW Drives? Here’s How to Fix It
Final Thought
A drive showing RAW after CHKDSK can seem scary, but it is rarely hopeless. Most of the time, your files are still on the physical drive; Windows just cannot read them through the damaged file system.
The recommended course of action is simple: stop using the drive, recover your files with iToolab RecoverGo Windows Data Recovery, and then try TestDisk or format the drive. Don’t lose your files — recover them now. Scan your RAW drive for free with iToolab RecoverGo and see what’s recoverable before doing anything else.