Backing up the data on your iPhone is one of the best ways to make sure that the data on your device is protected from loss. But as easy as it can be to backup your device via iCloud, sometimes the process can fail.
In this article, we take a look at some of the reasons why this is happening and what you can do to remedy the situation.
Let’s get started.
Why Won’t My iPhone Backup to iCloud?
There are several reasons why you may be experiencing problems backing up your device to iCloud. The following are some of the most common:
- For your iCloud backup to work, your device needs to be connected to a stable Wi-Fi network.
- You also need to have adequate storage space in iCloud to store the backup or the process simply won’t work.
- Various software and hardware issues could also interfere with the backup process.
The following solutions should help you address the problem regardless of why it is happening:
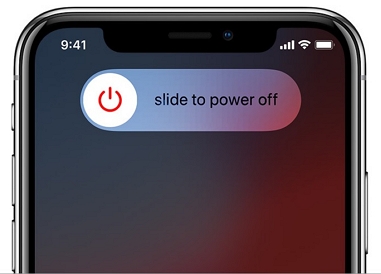
1. Restart your iPhone
Restarting your iPhone, or what is known as a soft reset is one of the best ways to get rid of some of the software issues that could be interfering with the backup. Here’s how to soft reset your iPhone:
iPhone X and later:
Step 1: Press and hold the Side Button and one of the Volume buttons until you see the Power off slider.
Step 2: Drag it to turn off the device, wait at least 30 minutes and then press and hold the Side button again to turn on the device again.
iPhone 8, 8 Plus and older models:
Step 1: Press and hold the Top or the Side button until the Power off slider appears on the screen.
Step 2: Drag the slider to turn off the device, wait about 30 seconds, and then press and hold the Power button again to turn on the device.
When the iPhone reboots, try backing up your device to iCloud again. If the process still fails, try our next solution.
2. Check Your iCloud Backup Settings
For an iCloud backup to work, the feature needs to be enabled in iCloud settings. Automatic backups simply won’t work if this option is not enabled. Here’s how to turn on iCloud backups:
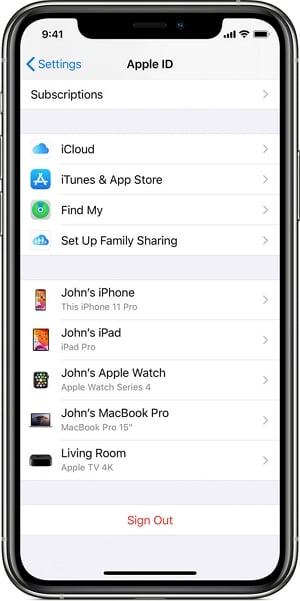
Step 1: Open Settings on your iPhone and then tap on your name at the top of the page. This will open your Apple ID settings.
Step 2: Tap on “iCloud” and then scroll down to select “iCloud Backup”.
Step 3: Tap on the switch next to “iCloud Backup” so that it moves to the “on” (green) position.
Step 4: Tap “OK” when prompted and you should now be able to back up your device to iCloud.

3. Check Your Wi-Fi Connection
Your device must also be connected to Wi-Fi if you want to back up the device to iCloud. One easy way to check if the device is connected to Wi-Fi is to check for the Wi-Fi icon at the top-right corner of the screen. If you don’t see it, your device may not be connected to Wi-Fi.
Follow these simple steps to connect the device to Wi-Fi:
Step 1: Open the Settings and then tap “Wi-Fi”.
Step 2: Turn on “Wi-Fi” by dragging the slider to the “on” position.
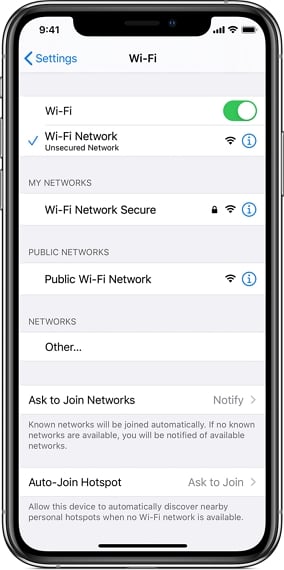
If the device doesn’t connect to a network, select a network from the list, and enter the password to connect to this network.
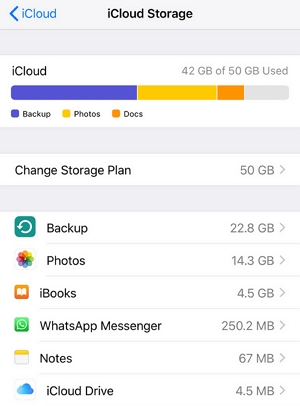
4. Make Sure You Have Enough iCloud Storage
An iCloud backup will also fail if you don’t have adequate storage space. Apple gives you 5GB of free iCloud storage space but considering a backup can take 1GB to 4GB of space, it is very easy to run out of space. Here’s how you can check how much space you have left:
Step 1: Open the Settings and then tap on your name at the top.
Step 2: Tap on “iCloud > Manage Storage”.
Here, you should see the amount of data that is on your iCloud account. If you have used up all the 5GB, then you can do one of two things:
You can delete the app-related data for some of the apps on your device. Just select the app whose data you would like to delete from the iCloud Storage page and then tap “Delete Data.” You might also want to tap “Delete Documents & Data” or “Turn off and Delete.” Tap “Delete” again to confirm.
Or, you can simply upgrade your storage plan to get additional storage space. To do this, just tap “Upgrade” and follow the instructions.
5. Update Your iPhone Software
Installing an iOS update on your device is also one of the best ways to get rid of some of the bugs and system errors that could be causing this issue. Make sure that your device is connected to a stable Wi-Fi network and is charged to at least 50% and then follow these steps to update the device:
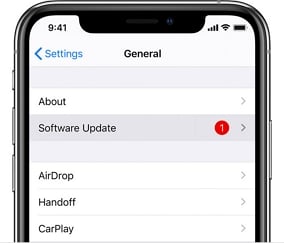
Step 1: Open the Settings and then select “General”.
Step 2: Tap “Software Update” and if an update is available tap “Download and Install” to update the device.
6. Log Out and Back into your iCloud Account
Any problems with your iCloud account can also prevent you from backing up the device. Fortunately, these problems are easily solved by logging out of your iCloud account and then logging back in. Here’s how to do it:
Step 1: Open the Settings from the Home screen and then tap on your name at the top of the screen.
Step 2: Scroll down to the bottom of the screen to tap “Sign Out”.
Step 3: Enter your Apple ID password when prompted and then tap “Turn off.
Step 4: Then tap “Sign Out” twice to confirm that you would like to sign out of iCloud.
Once you are signed out of iCloud, restart the iPhone and go back to the iCloud settings to sign back into iCloud and try the backup again.
7. Reset All Settings on your iPhone
Problems with your settings cab also interfere with the backup process. In this case, it may be a good idea to reset all settings on the device to see if fixes the issue. Keep in mind that this may mean that you will lose all your customized settings. Here’s how to reset all settings on your device:
Step 1: Tap on the Settings app from the Home screen to open Settings.
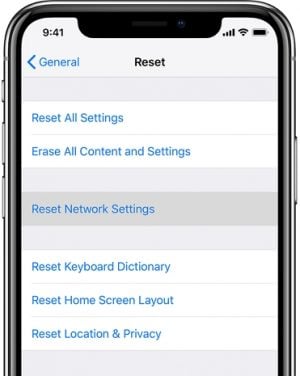
Step 2: Select “General > Reset”.
Step 3: Tap on “Reset all Settings” and enter the device’s passcode when prompted.
When the process is complete, the device will restart and you can try to back up the device in iCloud again.
8. Backup Your iPhone in iTunes or Finder
If you are still unable to back up the device in iCloud, you might want to backup the device in iTunes or Finder. To back the device in iTunes, follow these simple steps to do it:
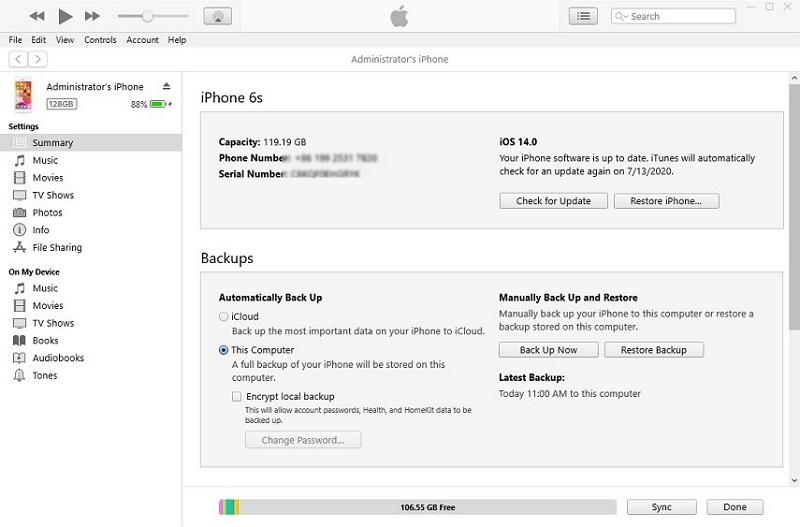
Step 1: Connect the iPhone to the computer using the device’s USB cable and then open iTunes.
Step 2: Click on the iPhone icon at the top of the screen.
Step 3: At the center of the screen, you should see the “Backups” heading. Make sure that “This Computer” is selected and then click “Back Up Now” and keep the device connected until the process is completed.
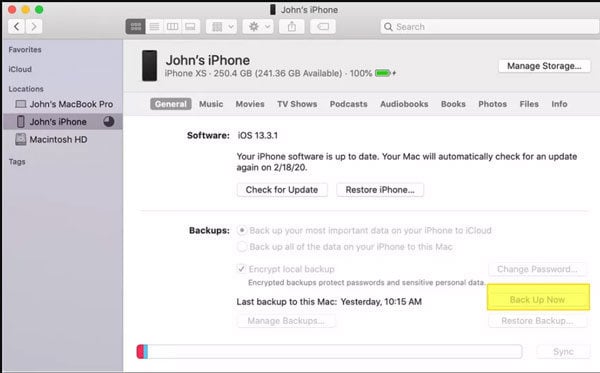
To back up the device in Finder, follow these simple steps:
Step 1: Connect the iPhone to your Mac and then click on the iPhone under “Locations”.
Step 2: In the “Backups” section, make sure that “Back up all of the data on your iPhone to this Mac” and then click “Back up Now”. Ensure that the device remains connected until the process is complete.
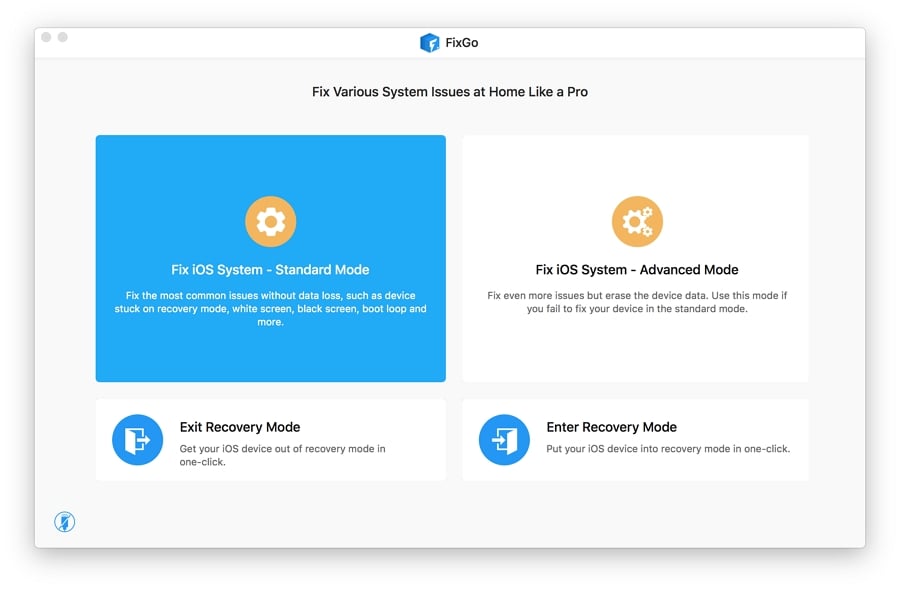
9. Use FixGo to Fix iPhone Stuck Issue
If your iPhone gets stuck in one of the processes involved in the Backup if it won’t start after the backup, iToolab FixGo can help you.
This software is designed to help you very easily fix some of the most common iOS issues including an iPhone stuck in the white/black screen, Apple logo, or a restart loop while preventing data loss on the device.