This is a simple step by step tutorial to help you use AnyGo to change GPS location and simulate GPS movement. To begin, download the iToolab AnyGo setup file to your computer. Double-click on it and follow the installation wizard to install the program. Open the program after installation.
Get Started to Use iToolab AnyGo
Before you can start using the function, you need to connect your device to your computer, either through a data cable connection or wirelessly using WiFi. Follow the steps to get your device connect to computer correctly.
Download and install iToolab AnyGo
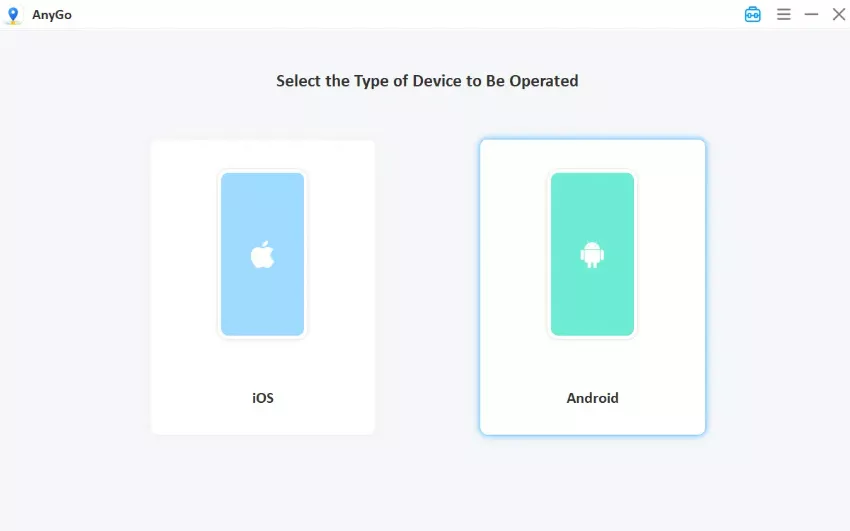
First of all, download and install iToolab AnyGo on your Windows or Mac. Next, click “Start” to select your device.

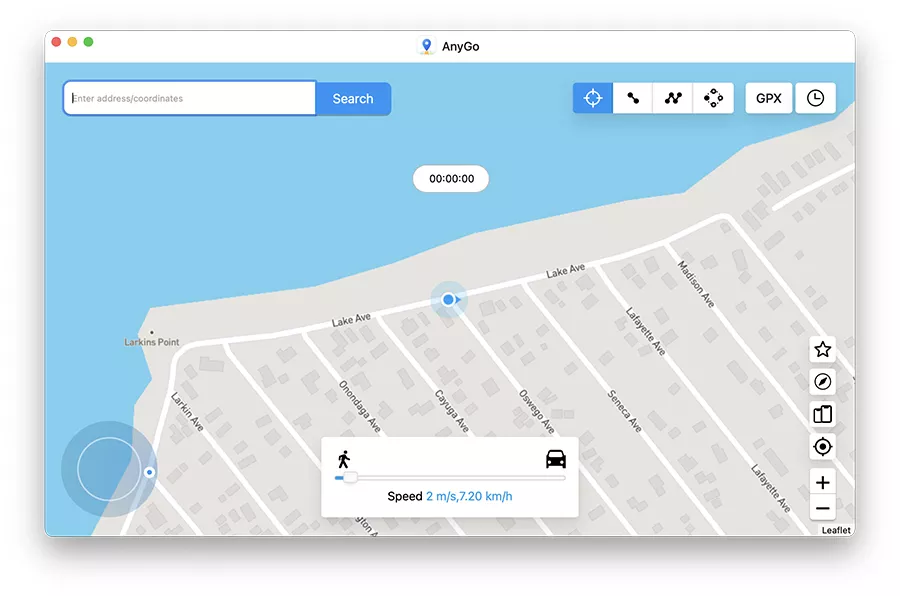
Next, you’ll enter the map, and your current location will appear.

Then, select your device operating system and then follow the steps to connect your phone.
For the first connection, you need to enable Developer Mode on iPhone or enable USB Debugging on Android.
Connect iOS devices
Note: iToolab AnyGo supports the latest iOS 16 now. If your device is iOS 16 version, you need to enable “Developer Mode” before changing location. If your device is iOS 15 or below, please ignore and skip.
Enable the “Developer Mode” on iOS 16 Device:
After connecting your device with AnyGo, you will see a guide on the interface below, please follow the guide to enable “Developer Mode” on your device before changing location.

Once turn on the “Developer Mode” toggle, you are required to restart the device. After it restarts completely, click “Turn On” and unlock with the password on your device.

Connect Android devices
iToolab AnyGo now supports the latest Android 13, before getting started please follow the steps to get your Android device connected.
Enable USB debugging on Android device
Once you’ve connected Android device to PC via USB, scoll down the notification bar and choose the Transferring Files option under the USB connection mode.

Next, Got to Settings > Search Build Number > Tap Build Number 7 times to enable developer mode > Enable USB debugging under the developer option.
Note: For Xiaomi devices, you should also enable Install via USB under Deveoper options.

Confirm USB Debugging
Now, your Android deivce will pop-up a windows asking you if you want to allow USB debugging. Click “Allow” to move on.

Note: Currently, players may select from 4 game modes on AnyGo: POGO, MHN, DQWalk, and Social Mode. It will download the VR games while you select a mode.

Enter Computer Password (Mac Version Only)
If you want to change iOS 17 location on Mac, you will need to enter the Mac password to trust your device on the Mac.

Now you’re ready to use AnyGo’s features. Check the following video to know how to use AnyGo to change the GPS location of your iPhone, iPad, or iPod touch easily.
1. Teleport to any location in the world
You can teleport to anywhere you want to go. The current location of the phone will changed in seconds.
Step 1: After the connection you should see your current location on the map that appears on the next page. If the location shown is inaccurate, click on the “Center On” icon to get the correct location.
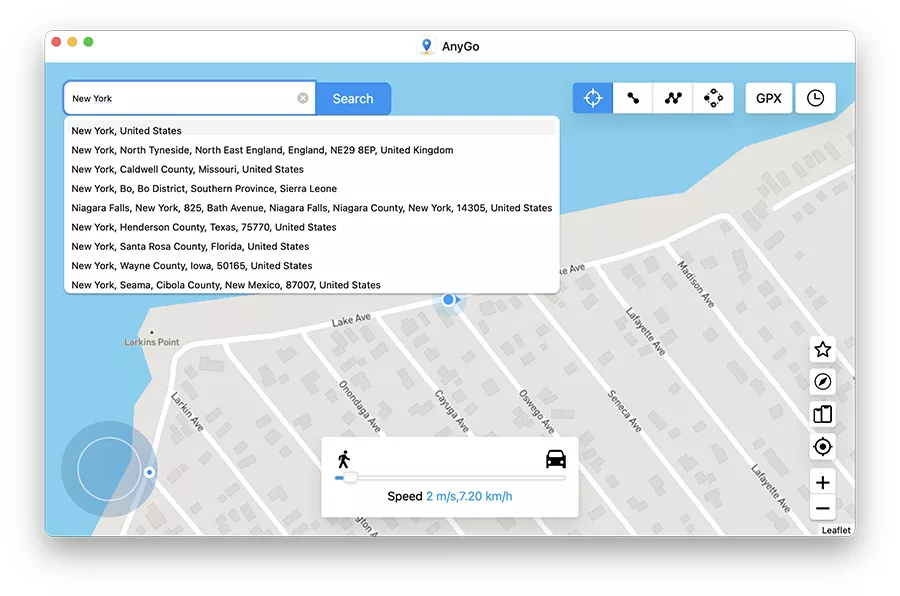
Step 2: Click on the “Teleport” icon in the upper-right corner of the screen and then enter the location you’d like to teleport to. Click “Search”.
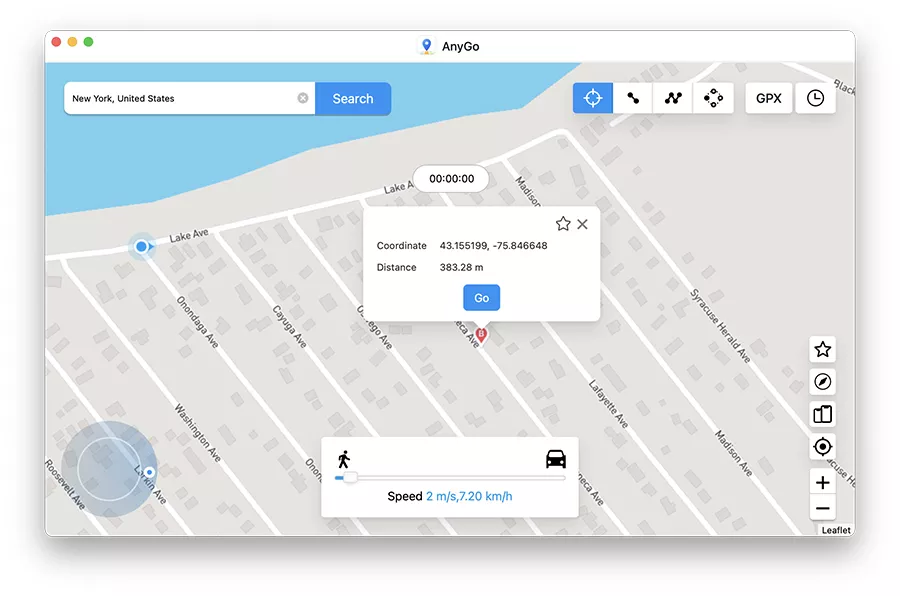
Step 3: The system will record the new desired location. Click “Go” to teleport.
2. Simulate movement along a specified route
You can also use AnyGo to simulate GPS movement between two pre-determined locations:
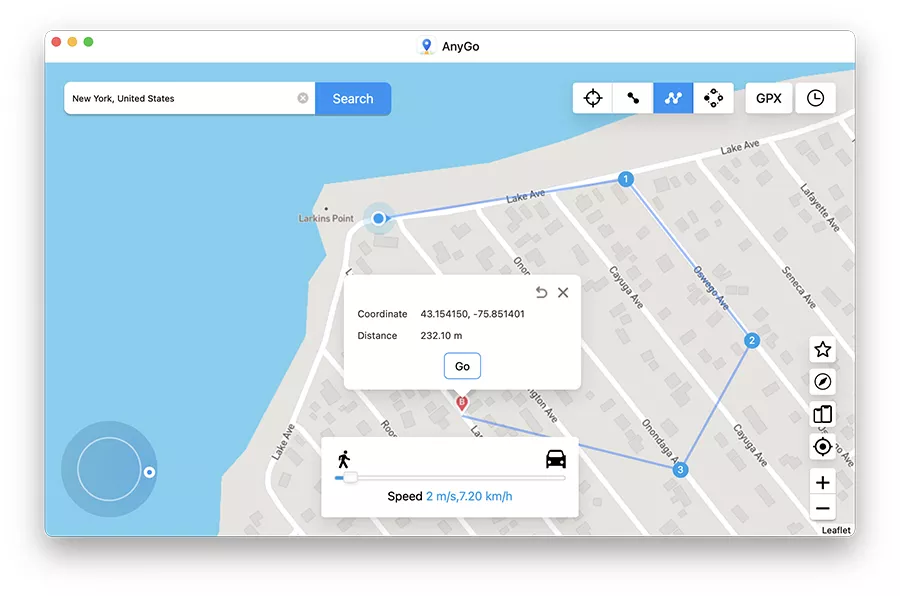
Step 1: Click on “Two-spot route” in the upper right corner. Select the place you would like to go to on the map. A popup will appear telling you how far it is.
Drag the slider at the bottom to set the speed you would like to use. You can choose the “Realistic Mode” for a different speed to looks real. Besides, you can choose walking, cycling, or driving speed. Click “Go”.

Step 2: In the popup box that appears, select how many times you would like to move between the two locations and then click “Go” to begin the simulated movement.

3. Simulate movement along a route (set by multiple spots)
If you would like to pass through many places on the map, choose the multi-stop route.
Step 1: Select the multi-stop route in the upper right corner of the screen. Then select all the locations you want to pass through.
Note: Make sure that the locations you set are along a specific route to avoid the movement appearing unnatural.
A popup will appear showing how far you will travel. Select the moving speed and then click “Go”.
Step 2: Specify how many times you want to move along the selected path and locations and then click “Go” to start the simulated movement.

The GPS on your device will now be moving along the specified path, passing through all the selected points at the specified speed. If you want an authentic experience, you can choose the “Realistic Mode” for a natural speed.
4. Jump teleport to any custom destinations directly
Jump teleport mode can help you jump from one location to the next new location directly.
Jump Manually
Step 1: Open AnyGo and connect your iPhone, you can see your current location on the map. Click on the second button “Jump Teleport Mode”.

Step 2: Select locations where you want to jump, and create a custom route. Then click the “Go” button to start your jump journey.

Step 3: Click the “Next” button to continue jump, you will jump to the next stop directly.

Step 4: When all points are completed, you can click “Done” to finish it.

Step 5: Lastly, tap “OK” to leave it. Now you have arrived at a new destination!

Jump Automatically
When you play the Pokemon Go game, we highly recommend you choose “Auto jump after Cooldown”.

To avoid any bans from game, you should strictly follow the Pokemon Go Cooldown Chart when playing Pokemon Go. However, “Auto jump after Cooldown” can set the time automatically according to the distance, which is helpful for you.

5. Use the Joystick for easier and more flexible GPS control
The joystick feature in AnyGo can save you a lot of time and effort when controlling the GPS. You can find the joystick at the bottom left of the screen.
In one-stop or multi-stop mode, the joystick is meant to help easily move your GPS from one point to another. But it goes one step further, allowing you to change direction in real-time.

The following are the main situations in which the joystick will prove very useful:
Automatic GPS Movement: To start an automatic movement, click on the “Start” button. You can then use the following actions to change direction as needed:
- Click on the left or right arrow
- Drag the spot around the circle
- Press the A and D keys on the keyboard
- Press left and right keys on the keyboard
Manual GPS Movement: You can use the “Up” arrow in the program or long-press W or the up key on your keyboard to move forward. To reverse direction, use the “Down” arrow in the program or “S” or “Down” arrow on the keyboard.
You can also easily change the direction using the 4 ways described above before moving forward or back.
6. Import GPX routes file to autowalk
GPX is used to exchange GPX location data with others, and we can use featured routes quickly and easily by importing GPX.
Step 1. Click the GPX icon in the upper right corner of AnyGo.

Step 2. Choose the GPX file you want to use and import it to AnyGo.

Step 3. After importing, choose how many times you want to repeat the route and click the “Go” button to start to follow the route in the GPX file on AnyGo easily.

7. Spoof multiple iOS or Android devices GPS at the same time
AnyGo can manage multiple iOS or Android devices at the same time, allowing you to change the location of all devices with just one click. We will use iPhone as an example.
Step 1. Click the icon of “Manage Multiple devices” in the bottom right corner of AnyGo.

Step 2. Then, you will see a small window as below. To add a new device, click the “Add” button, connect the device to the computer, and wait for AnyGo to recognize it.

Step 3. Then the interface will show all the connected devices with the “Controlled” or “Uncontrolled” status. The controlled status means the device is now in use of the virtual location, while the uncontrolled status means the opposite.
To switch the status from “Controlled” to “Uncontrolled” or vice versa, simply click the “Controlled” or “Uncontrolled” button.

Step 4. Choose the device you want to operate and select a mode to spoof the location easily.
8. Special Features of iToolab AnyGo
1. Favorite location and route
When you set a location on the map, click the “Star” icon in the upper right corner of the pop window to bookmark this location for future use.
If you create a route, click “Go” and then click the “Star” icon on the pop-up window, you can collect this walking route. The program will prompt you to name the route so that you can find it easily next time.


All favorite locations and routes will be saved in favorites. You can press the Star icon on the right side of the main interface to show the Favorites box.

2. Historical records
The “Historical Records” saves the location you use and the route you walk every time. The program will automatically record all this for you. When you want to use it next time, you can find the ” Historical Records” on the right side of the AnyGo main interface, and then you can reach the previous position or start your walking with one click. Of course, you can also add it to the collection.

3. Automatic closing the path
In the multi-spot mode, when the start and end positions are less than 50 meters, the program will automatically ask you if you want to close the path. Click “Yes”, it will close the route and overlap the start and end points to form a loop. Click “No”, the end point remains the same.

4. Returns or Loops
To make the simulated walking more natural, you can set the route to loop (A—>B, A->B) or return to the original road (A->B->A) and the number of repetitions of the route.
5. Wi-Fi wireless connection
iToolab AnyGo supports wireless connection now. Users can connect the device to the computer through Wi-Fi. You can ditch the USB data cable and connect multiple phones easily. Check the detailed guide here.
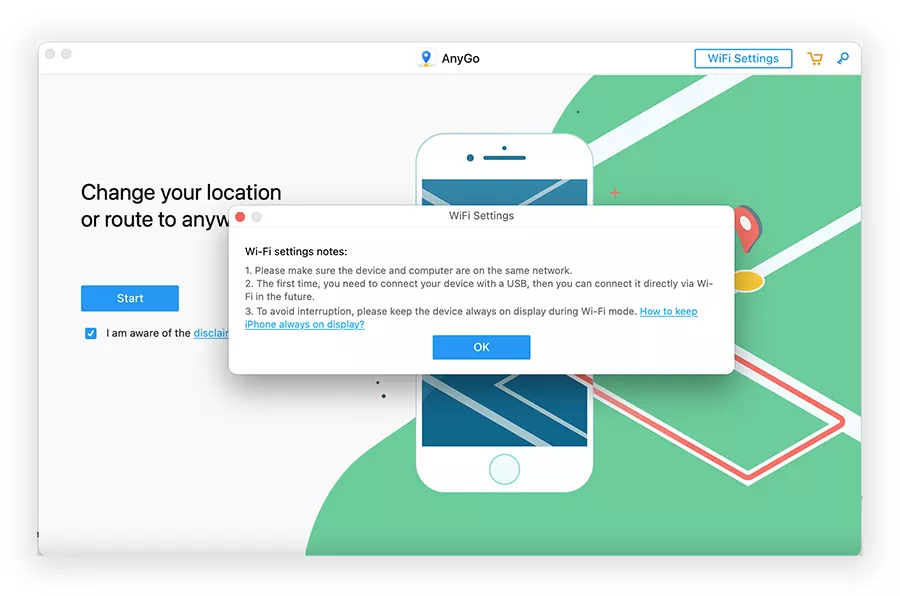
How to connect:
- Turn on the Wi-Fi on your iPhone and connect to your wireless network.
- Connect the computer to the same Wi-Fi network.
- Launch AnyGo and click Start. Wait a few seconds, the program will automatically detect all iOS devices connected to Wi-Fi.
- Choose the device you want to connect.
6. Added Cooldown Timer
To avoid the detection of cheat when playing Pokémon Go, we advise you to reference the Pokemon Go Cooldown Chart, you should wait for the predefined cooldown time with Cooldown Timer for your next action.
Note:The Cooldown Timer can be only used on AnyGo’s Teleport feature. It cannot be used on the “Two-spot route” or “Multi-spot route”.

9. Bluetooth Integration for Gaming Joystick (Windows)🔥
The Bluetooth Gaming Joystick feature allows you to spoof GPS in Pokémon Go safely—no Error 12, no cracked apps, and no bans! Learn how in 4 simple steps:
✅ Learn More: AnyGo Bluetooth Not Working? Here’s How to Fix It
Step 1 Select Bluetooth Mode:
▶ Open the Windows User Interface.
▶ Choose the Pro Mode option to enable location spoofing for your game app.

Step 2 Connect Bluetooth Between PC and iPhone:
▶ After entering Bluetooth Mode, follow the on-screen instructions to pair your PC’s Bluetooth with your iPhone.

Tip:
If you need more help, click “View complete operation” for detailed steps on connecting your devices.

Step 3 Restart Location Services (Wi-Fi or Cellular):
▶ Click the upper-right menu and follow the new instructions.
▶ For smoother and safer location spoofing, re-enable the following after 10 seconds
- Location Services
- Wi-Fi/Cellular

Important Note:
If your iOS version is below 18.0 or above 18.1.1, you may see additional instructions during this process.
10. Auto-Scan Nearby Pokémon & Battle Teams🔥
Looking for the best auto Pokémon GO scanner? iToolab AnyGo lets you automatically scan for nearby Pokémon, battle teams, and resources with clicks. You can instantly navigate to Pokémon locations or join local raid teams with ease. Here’s how to get started and enhance your Pokémon GO experience:
Step 1 Click on the Pikachu icon in the top-right corner. A navigation bar will appear with three options:
- Scan Nearby Pokémon
- Scan Nearby Battle Teams
- Search Pokémon Resources
Step 2 Click the first icon to scan for nearby Pokémon. Then, tap “Go” to automatically move to their locations. You can also adjust the spoofing speed and movement type for a more personalized experience.

Step 3 Click the second icon to scan for nearby battle teams. Hit “Go” to instantly teleport to each raid or gym.

Step 4 Click the third icon to access all available Pokémon resources, including by name or raid type. Use the filter function to find the best Pokémon you want to catch.


11. Top Pokémon Go Auto Catcher: No More Manual Tapping! 🔥
Tired of tapping non-stop in Pokémon Go? With iToolab AnyGo and Go Catcher, you can auto catch Pokémons and spin PokéStops with zero effort. It’s the perfect tool for hands-free gameplay!
Follow these easy steps to get started:
Step 1 Enter your activation code for Go Catcher. If you don’t have one, you can purchase it directly.

Step 2 Tap the “Auto” icon at the top of the screen to launch the Go Catcher feature.

Step 3 Complete the setup on your phone by following the on-screen instructions.

✅ Learn More: A Complete Guide to Using Go Catcher in Pokémon Go
Hola, como ago para pasar la conexion a otro iphone
Hola Juan, muchas gracias por tu propuesta. Anygo actualmente no admite la conexión de varios dispositivos, pero he enviado sus comentarios al equipo de I + D. Lo admitiremos en varias versiones nuevas en el futuro.
hola, ya he pagado por paypal pero no me llega el correo de confirmacion con mi cuenta, que puedo hacer?
Hi,
You can send the order number to [email protected], our support team will help you.
Hola acabo de adquirir una licencia, como cambio mi ubicación de mi pc? al parecer creo el programa solo funciona para iPhone pero cuando la compre mencionaba que mi licencia funcionaba en 5 dispositivos y una pc
Hi,
AnyGo is suitable for changing your iPhone location. The license you got is 5 iOS devices, and the program can only be registered on 1 PC.
It’s really a Great tool. But every time i start the program, it puts me in a pretty war away location. If i ask it to show me my current location, it show’s the right one.
So how can I make the program start at my location?
Hi,
you can find your previous location in the history.
Once I spoof my iPhone location (find my iPhone /share Location) if I disconnect and close my laptop will the location on iPhone revert back to normal ? Or will it stay at the spoof location until I again connect the iPhone and use the windows software etc.
Hi,
The virtual location will be retained after you disconnect, but not permanently. This is related to your iOS version. Generally, you can keep it for a few days without resetting the location.
If you want to return to normal, you can restart the device or connect to AnyGo and click “reset location”
Hi guys,
I would like to set a location, then switch off location settings, take the phone with me to another location but still have it showing that I’m at the original location, if that makes sense.
Is it possible? Thanks and kind regards.
Yes, As long as you don’t restart the phone, the modified location will remain.
Esta chido
Hi! is there a way to change your location on the go without connecting the iphone to the laptop? for example i have set it to a location then i want to move it again to a different location after like 30 minutes? Let me know asap!
thanks 🙂
Our Mac version can be connected via Wi-Fi, but you still need to modify the location through your computer.
Hi,
Can any go change location for Mac? Dose it work for locations in China?
Thabks
Hi,
AnyGo cannot change the location of the Mac computer, it only works for iPhone, iPad, iPod.
It can works in China.
Hi guys,
Thanks for the product. I want to set a location, then drive to another location (2 or 3 hour drive). What is the best way to manage the connection so it doesn’t change en-route? I wish for the spoofed location to always show. Or is that not possible?
Then, if I am at the second location and leave it connected to the first location through laptop and cable, will it always show the location I am spoofing to?
Thank you
Hi Pedro,
After you set a virtual location. It will stay in that virtual location all the time. Unless you restart your phone or reset your location with AnyGo.
Feature request:
Sort of a hybrid two-point and multi-point mode. Being able to select multiple points that are routed like two-point mode, so that the route is on paths/roads. Maybe a checkbox on “multipoint” that says “route on paths/roads” or something like that. I may have missed this feature in my rapid read of the docs.
Neat tool regardless.
Thank you for your suggestion, we will consider it.