With the release of the Android 13 Beta 3.2 version on Pixel and other Android devices, many users embraced it with both hands. Beta versions are released for all the customers to use and then use the feedback to improve the final version. Not all the features and customizations in the Beta version make it into the final version, but many of them do. Installing the Beta version is easier than installing the developer previews, and this article discusses the methods of installing it on your device.
What Are the Eligible Devices for the Android 13 Beta Program?
Android 13 Beta version is now available for many Android devices, including Google Pixel. Below is the complete list of Android models compatible with the Android 13 Beta version.
| Manufacturers | Models |
|---|---|
| Google Pixel | Pixel 4, 4 XL, 4a, 4a 5G, 5, 5a, 6, 6 Pro |
| Asus | Zenfone 8 |
| Lenovo | P12 Pro |
| Xiaomi | 12, 12 Pro, Xiaomi Pad 5 |
| OnePlus | 10 Pro |
| Asus | Zenfone 8 |
| Sharp | AQUOS sense6 |
| Nokia | X20 |
| Vivo | X80 Pro |
| ZTE | Axon 40 Ultra |
| OPPO | Find X5 Pro Find N (Available only in China) |
| Realme | GT 2 Pro |
Currently, the Android 13 Bet version supports over 21 devices from 12 manufacturers.
Before Enroll Android 13 Beta, What Do You Need to Know?
Normally Beta versions are safer to install on any device. But users should understand that Beta releases are prereleases before the complete release. So, it can contain bugs and can make the device unstable. You can run into different glitches which won’t be there in the previous version.
Also, Beta installations won’t always succeed. It can interrupt and may fail without a valid reason. These reasons may force you to revert to the stable version and opts out of the Beta release.
But remember, Beta versions are meant to find bugs and glitches in the current version before releasing the stable version. Identifying and fixing the issues in the Beta version reduce the cost spent on correcting the bugs in a released version.
Once you have install Android 13 Beta version and want to move back to Android 12, you may require to perform a factory reset. Hence, back up the data before installing the Beta version, avoiding losing your valuable information.
Method 1. Opt-in and Install Android 13 Beta on Pixel & Android Phone
Unlike Developer Preview, Beta releases target all the users to test the version. Installing a Beta version is easier than installing a developer preview, just like updating an app. You can follow the steps below to install the Android 13 Beta on the Pixel.
Step 1: Go to the Android 13 Beta download program from your PC or mobile phone.
Step 2: Use the primary Google account to login into the page if needed.
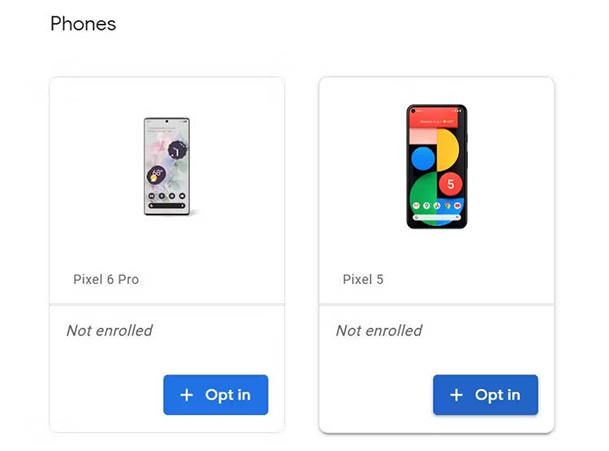
Step 3: Click the View eligible devices button to see the Pixel device list.
Step 4: Select the device you want to update with the Beta version. Then click on the opt-in button.

Step 5: Out of the 2 Beta programs, select the one you want to apply for. In this case, we can opt-out of the Android 12 Beta Program and select the Android 13 Beta Program. If you are a user who has already installed the Android 12 Beta Program, you need to opt-out of it before installing 13.

Note: In this case, you don’t need to wipe all the data in the device unless you try to install the Android 13 Beta version on top of the Android 12 Beta version without reverting.
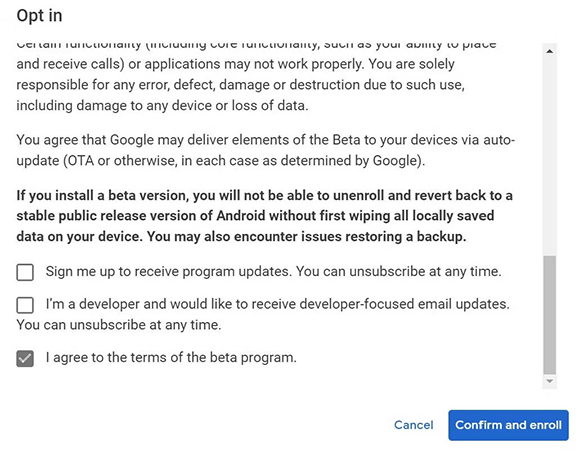
Step 6: Read through the terms and conditions ad check the “I agree to the terms of the Beta program” box to confirm the choice. If you like to receive updates about the products and promotions, you may tick the other checkbox. But it is not a mandatory task.

Step 7: Now click on the Confirm and Enrol button to install the Android Beta 13 version.
Step 8: Once your device fully updates, you will receive an OTA from Google. You can wait until you receive the system notification or go to Settings and tap on System. The tap on a System update to run the check update manually.
Method 2. Download and Install Android 13 Beta with Android Flash Tool
Users can use the Android Flash tool from Google to install Android 13 Beta version on the phone. The utility tool can handle the update installation while the user needs to perform a few activities on the phone during the installation. During the installation, your phone will get a factory reset.
Prerequisites before installation
- Google Pixel phone with Pixel 4 or higher model, and this method only works for Pixel phone
- USB cable to connect the device to the PC
- 10GB of free storage on the PC
Things to follow on the phone
To start the installation, Developer options, OEM unlocking and USB debugging need to be enabled.
Step 1: For that, go to the Settings app and tap on About Phone.
Step 2: Scroll down until you see Build Number. Then tap on it repeatedly seven times until you see a popup notice message. When asked, provide the PIN code.
Step 3: When the correct PIN code is provided, you will see the Developer options enabled on the device.
Step 4: To enable OEM unlocking and USB debugging, go to the Settings app and tap on the System. Then select Developer options and enable both the modes.
Tip: What should you do if OEM unlock missing?
Things to follow in the PC
Step 1: Connect the Pixel to the PC using the USB cable.
Step 2: Then go to flash.android.com using the browser.
Step 3: To communicate with the phone via ADB, you need to grant access by accepting the flash.android.com popup. Elect to allow ADB access from the popup to accept the permission.
Step 4: Then select add new device button to add a new device. Then select your device from the list.
Step 5: Now check the phone to accept the permission for debugging. On the phone, select Always allow from this computer option. Then tap on okay.
Step 6: Now move again to the PC, and we have to select the Android version to install. Select the phone again and choose the Android Beta 2 version. Then select install build.
Step 7: This will notify you that installing this version would factory reset the phone. Tap confirm to begin the process. This will unlock the bootloader if you haven’t done it previously. To unlock the bootloader, use the Volume keys and Power key.
Step 8: After all the above steps, Android 13 Beta 2 will be downloaded onto the PC and installed on the phone. During this time, you will see the USB connecting and disconnecting for few times. That is part of the process, and you don’t need to do anything other than waiting for the installation to finish.
Step 9: Once done, the website notifies you that the bootloader needs to be locked to complete the process. Select start and use the Volume and Power keys to load the bootloader.
Step 10: After installation, disconnect the phone from the PC. Now your device is running on the Android 13 Beta 2 version.
Method 3. Sideload Android 13 From Recovery and ADB [OTA]
To get started with method 3, you need to have a Google Pixel device of model 4 or above. Also, you need to install the Android SDK on your machine with ADB and Fastboot commands.
Preparedness
To use the OTA image, you need to download it to the PC. To download the version relevant to your device model, please visit here. If you want to use factory images, you can use them.
But its downfall is that it wipes the device’s data entirely, unlike OTA images. Furthermore, OTA images automatically detect the new Beta versions and allow you to install them.
Boot the Pixel into the recovery mode
Step 1: Switch off the phone using the Power button.
Step 2: Press and hold the Power and Volume Down buttons until you see the bootloader menu.
Step 3: Use the volume buttons to navigate through the list. Select the Recovery Mode and press the Power button to confirm the choice.
Step 4: Press the Power and Volume Up buttons again and release them to boot the device into recovery mode fully.
Step 5: Use the Volume buttons to select the Apply update from ADB from the list. Then use the Power button to select the option.
Step 6: Now, you will see a blank screen telling you to sideload the OTA.
Now you are done with setting the phone. Next, we have to start installing the OTA using the PC.
Install OTA image on Pixel phone
Step 1: Connect the phone to the PC using the USB cable. You need the ADB tools installed on your PC to proceed to the next step.
Step 2: Open a command prompt on the PC on your windows or terminal in Linux/macOS. Make sure to navigate the ADB tools location from the command prompt/terminal.
Step 3: Then type “adb sideload” in Windows or “. /adb sideload” for Linux/Mac.
Step 4: Type the name of the OTA image zip folder and press Enter.
Step 5: After completing it, return to the phone and remove the USB cable.
Step 6: Reboot the device using the Power and Volume buttons.
Final Words
In conclusion, these are the most used methods for Android 13 install on Pixel and other Android devices. Depending on your expert knowledge, you can select the method which suits you the most. If you are a user who wishes to downgrade to Android 12, check our article on How to Downgrade from Android 13 to 12 on Google Pixel. We hope this guide will help you to install new Beta versions without facing any trouble.
UnlockGo (Android)
- One-click Google lock removal
- Bypass Samsung FRP lock on Android 5~12
- Unlock Android without any tech skill
- Remove all Android screen locks
- Allows for customized plans


