Hey, I got this error “Verification failed because there was a problem connecting to the server.” Does anyone know how to solve this error? If Yes, please explain what should be done to fix it.
When setting up a new iPhone or after updating to the latest iOS, we need to login into iCloud so that data can be synced, backed up, or download apps from App Store. But sometimes it starts showing an error that Apple ID verification failed. This error can be frustrating if we do not know why Apple ID verification failed and how to fix it. But do not worry, in this article we are going to go through different causes of Apple ID verification failure and how we can fix those.
Why Does My Apple ID Keep Saying Verification failed?
It can be frustrating to not know the reason for this unexpected error at any point of using an iPhone but here we are going to give you some Apple ID suggestions for verification failure. These are some possible reasons for the Apple ID verification failed error.
- Check if you are connected to the Internet so that the iPhone can communicate with the server properly.
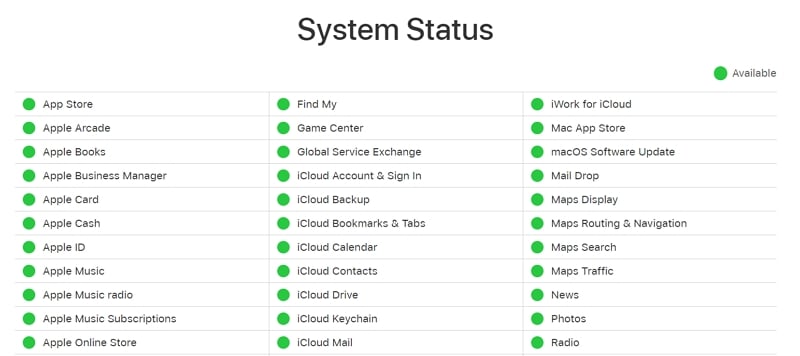
- Check if Apple services are working fine or are down due to some reason by visiting the System Page on the Apple website.
- If you are using a VPN then this may cause the issue as well.
10 Possible Ways to Fix Apple ID Verification Failed Issue
Now, we are going to walk you through the solutions if you can’t connect to the Apple ID server.
- Way 1. Force Restart Your iPhone
- Way 2. Reconnect Internet or Wi-Fi
- Way 3. Reset Network Settings
- Way 4. Sign Out of App Store and iTunes
- Way 5. Update the Time & Date
- Way 6. Check Apple System Status
- Way 7. Check If You’ve Enabled VPN
- Way 8. Change Apple ID Password and Try Again
- Way 9. Get Verification Code on iCloud
- Way 10. Update iOS to the Latest Version
Way 1. Force Restart Your iPhone
The first and easiest way to resolve the can’t connect to Apple ID server error is to restart your iPhone so that all the services can restart and if some service was facing some connectivity issue with the Apple server then it can be resolved automatically.
Also Read: How to Force Restart iPhone
Way 2. Reconnect Internet or Wi-Fi
Most common is an internet connectivity issue which causes the Can’t connect to Apple ID server error in most cases. Check if you are connected to the Internet; if yes then reconnect to the internet or Wi-Fi whichever you are using.
Way 3. Reset Network Settings
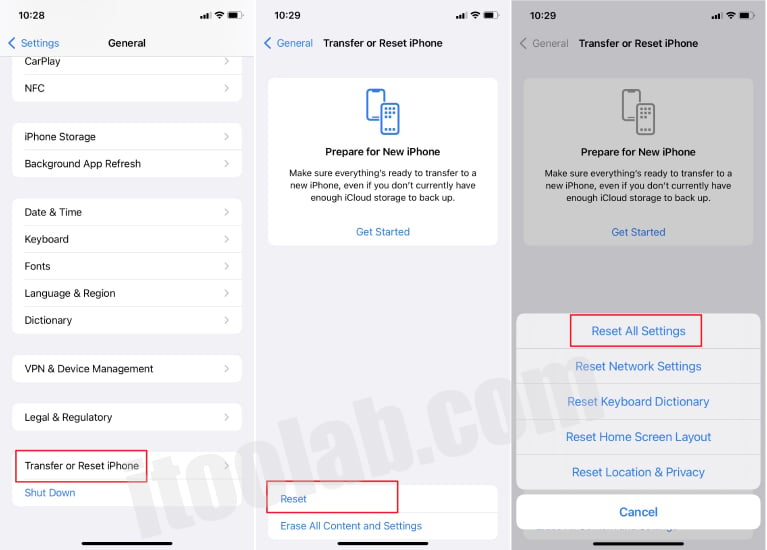
If after trying the above ways you still can’t connect to the Apple ID server then you should reset the network settings. Resetting the network setting will only reset your network and your data will not be lost because it only affects the network settings of your iPhone. Follow these to reset Network Settings.
- Open Settings.
- Tap General.
- Tap Reset.
- Tap Reset Network Settings.
- Enter your phone’s password.
- Tap Reset Network Settings to proceed.
Way 4. Sign Out of App Store and iTunes
Signing out of the App Store and iTunes and logging back in can resolve the issue and you can connect to the Apple ID server because this can establish a connection with Apple’s server.
- Open App Store App.
- Tap on your Profile in the upper right corner.
- Scroll to the bottom of the screen.
- Tap Sign Out.
Open App Store App.Tap on your Profile in the upper right corner > Tap Sign In.
Way 5. Update the Time & Date
Another way to resolve the problem connecting to the Apple ID server is to update Time & Date. You can update Apple ID settings to resolve verification failed issues. If your Time & Date and location do not match with your time zone then it can cause a problem connecting to the Apple ID server because there is a mismatch when establishing the connection. To resolve this issue:
- Open Settings App.
- Tap on General.
- Tap Date & Time.
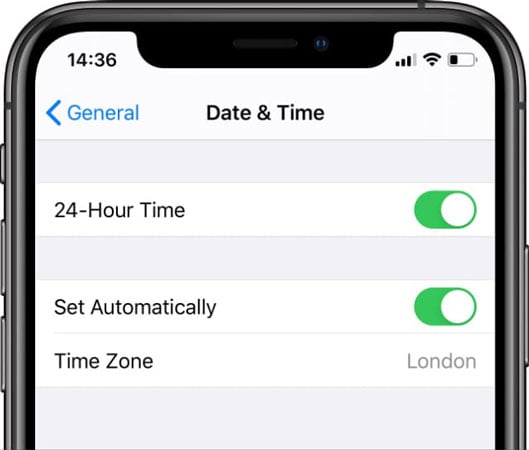
If Set Automatically is disabled then tap on it to enable it and iPhone can automatically detect the current location and set the Date & Time accordingly.
If due to some reason it is not getting the correct Date & Time you can set it manually by disabling the ‘Set Automatically’ functionality.
Way 6. Check Apple System Status
Sometimes you can still see the verification failed Apple ID server issue but that does not mean that issue is on our side because as mentioned earlier sometimes Apple’s servers are down or they are performing some kind of update due to which users can face downtime and are unable to connect to the server. To confirm this, you can visit Apple’s website and check at the time which services are running fine and which are not. Different dots against each service means different states. Green means that the service is working fine and Red means that the service is down at the moment. You can check the status periodically so you can connect again as soon as the service is up and running again.
Way 7. Check If You’ve Enabled VPN
Most of us use some kind of VPN to maintain our privacy and stay protected from different issues. VPN’s main purpose is to change the network settings and add an overlay on it to prevent malicious activities but most of the time the thing we are using to protect us can cause issues for us. Try disabling the VPN and then connect to the apple id again because this might be the problem we are looking to resolve.
Way 8. Change Apple ID Password and Try Again
Apple is very strict regarding security and it sometimes causes iCloud verification failed errors for the end-user. There is a chance that Apple has updated the password policy which is causing this issue so we can change the password and then try again.
- Open Settings.
- Tap on your name at the Top.
- Tap Password & Security.
- Tap Change Password.
- Enter the phone’s passcode.
- Enter New Password .
- Tap on Change in the upper right corner.
Way 9. Get Verification Code on iCloud
You are here because none of the above solutions worked so far but do not worry we still have other ways to resolve it. There is a chance that your phone is not synced with Apple’s server e.g you are logged in but this information does not exist on Apple’s server and that is why you are facing the issue. To resolve this:
- On any other iphone, log in with your Apple ID.
- Open Settings.
- Tap iCloud.
- Tap Password & Security.
- Tap Generate Verification Code.
- Use the generated verification code in step 5 in your iPhone.
Way 10. Update iOS to the Latest Version
With the new iOS update, some of the old features on previous iOS stop working because these are obsolete so you should update to the latest iOS if there is an update for your iPhone and this should automatically resolve the issue.
Workaround: How to Unlock Apple ID Hassle-Free
If you are planning to unlock your Apple ID using a third-party application, then we suggest downloading UnlockGo. This software is ideal for removing different Apple locks including iPhone and iPad. The good thing is that for this application you don’t need any password. Below are the steps that you can follow to unlock your Apple ID using UnlockGo – Remove Apple ID.
Step 1 Download the application on your PC and click the “unlock Apple ID” option. Don’t forget to connect the device to the PC and choose the “Trust” option.
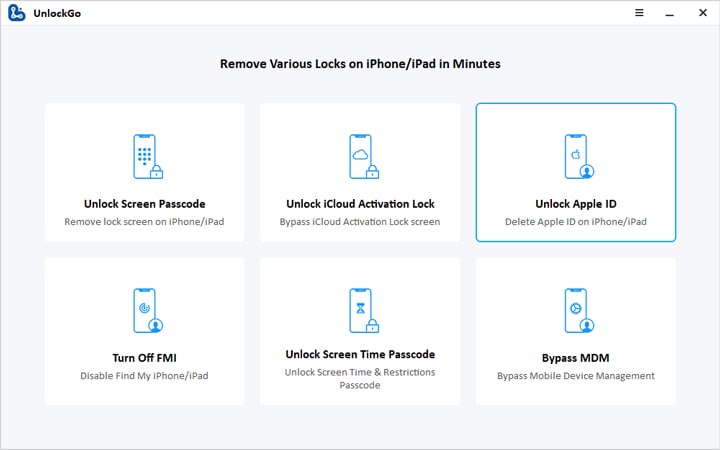
Step 2 In order to delete the Apple ID and iCloud click the “Unlock Now” option. Now confirm the screen lock and two-factor authentication will be turned on your device.
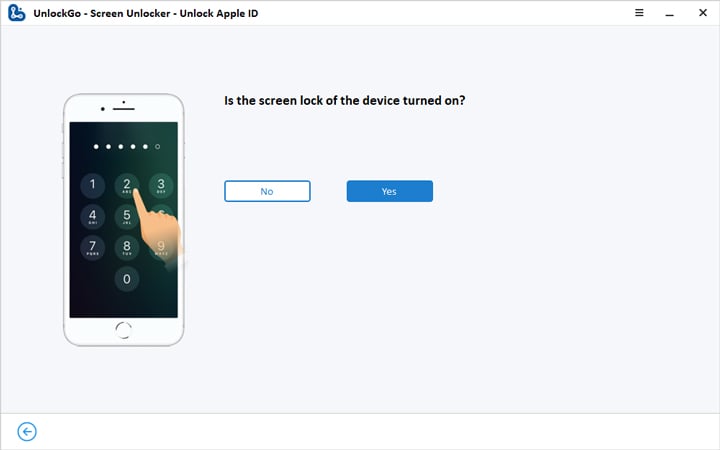
You can also manually check the two-factor authentication by going to settings and checking the Apple ID option.
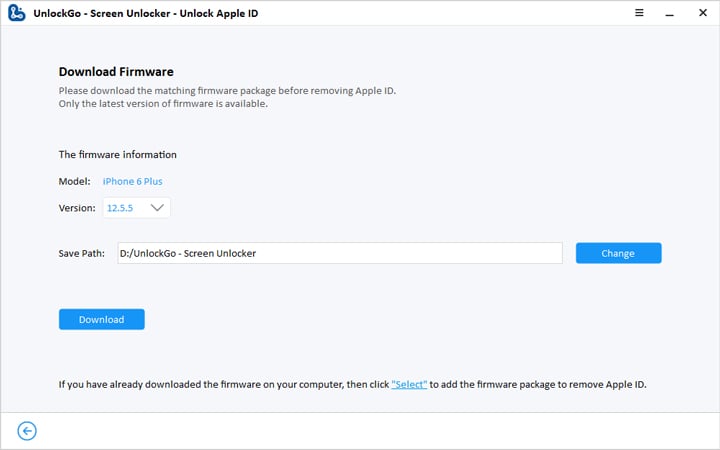
Step 3 Now, download the firmware package and the tool will automatically detect the model of your device. Make sure to choose the appropriate firmware version and click the “Download” option. It will take a few minutes to start the process.
Step 4 Once the firmware is downloaded, click the “Unlock Now” option to unlock the Apple ID. It will take a few minutes to unlock the device. Make sure that your device is connected during the whole process.
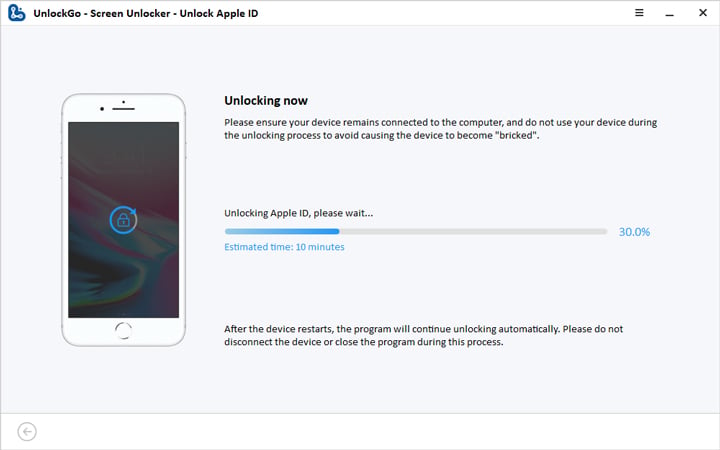
Apple ID Verification Fixed Finally
So, we have explained everything about the Apple ID verification failed error. You can try all these ways to fix this problem. Plus, you can download the UnlockGo application that helps unlock your Apple ID in no time. This application is best for removing locks without passwords.

