
We’ve found some simple tricks that will soon stop your iPad from behaving like a brick and turn it back into the technologically-advanced device it truly is.
Keep reading to find out how to fix a bricked iPad.
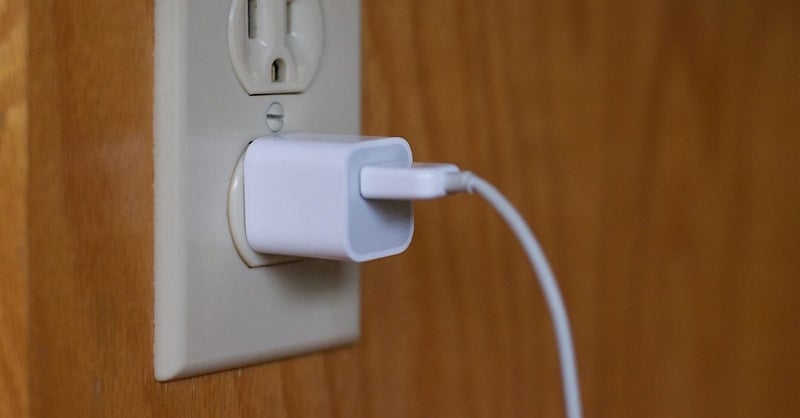
#1 Charge It Up
It’s possible that, in our eagerness to get the latest iPadOS update, we may have forgotten to charge the device before getting started. It may not be the actual update’s fault that your iPad has bricked – it could just be a dead or low battery.
Using the cable that came with your iPad, charge your device using a wall outlet as this is quicker and more effective than plugging it into another device using a USB cable.
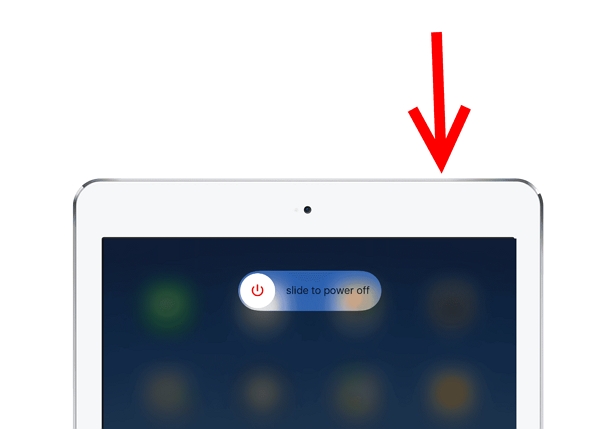
#2 Restart Your iPad
You can fix many iPad issues just by restarting the device, including a bricked iPad. Restart your device by following these simple steps:
For iPads without a Home button:
- Press and hold the Power button at the same time as either one of the volume buttons;
- Wait for the Power slider to appear;
- Drag the slider to the off position;
- Wait while your device shuts down;
- Restart your iPad.
To restart an iPad with a Home button:
- Press and hold the Power button on the top of your device;
- When the Power slider appears, drag it to the off position;
- Wait for your device to shut down;
- Turn your iPad back on.
#3 Force Restart Your iPad
Pulling the plug on your iPad can shock it into behaving like, well, like an iPad again instead of a brick. It’s a more in-depth reset than a soft restart and often produces the desired results.
To perform a hard restart on an iPad with a Home button:
- Press and hold the Home button at the same time as pressing and holding the Sleep/Wake button;
- When the Apple logo appears on-screen, release both keys;
- Wait while the reboot process completes.
On iPads with Face ID, force restart by:
- Quickly pressing and releasing the volume up button;
- Repeat the process using the volume down button;
- Press and hold the Power button;
- When the Apple logo appears, release the Power button;
- Wait for the reboot to complete.

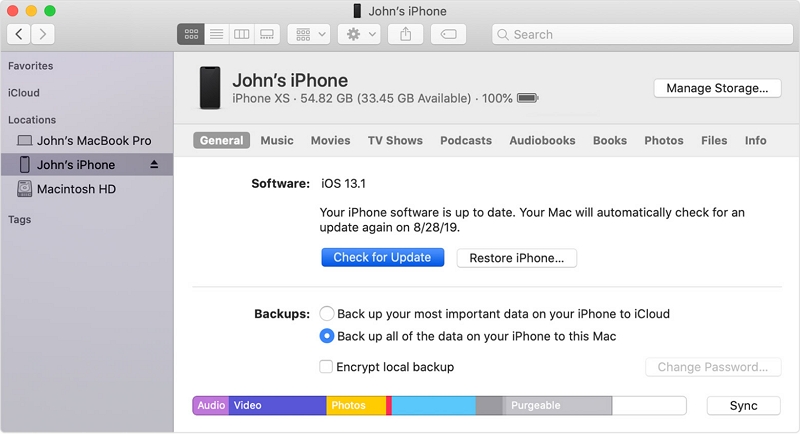
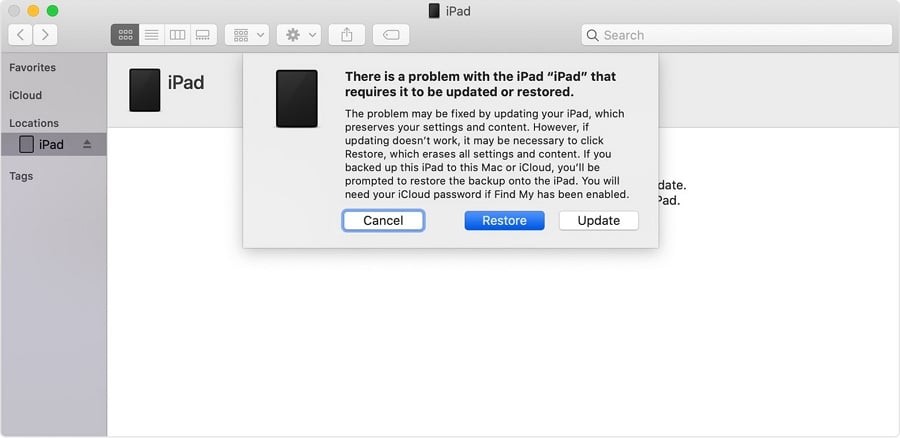
#4 Connect to iTunes or Finder and Update
If your iPad is still using an outdated version of iTunes, this could be responsible for its brick-like behaviour. Updating iTunes is a simple enough process that you can perform using the iTunes app itself or the Finder sidebar on your Mac.
To update your iPad using iTunes:
- Connect your iPad to a computer using an Apple-approved USB cable;
- If you’re using a Windows PC or a Mac running macOS Mojave or earlier, open iTunes. If you’re using a more up-to-date version of iOS, like Catalina or Big Sur, go to Finder;
- Check to see if any updates are available;
- If they are, click on the latest one and select update;
- If this fails, repeat the process, clicking on restore instead of update.
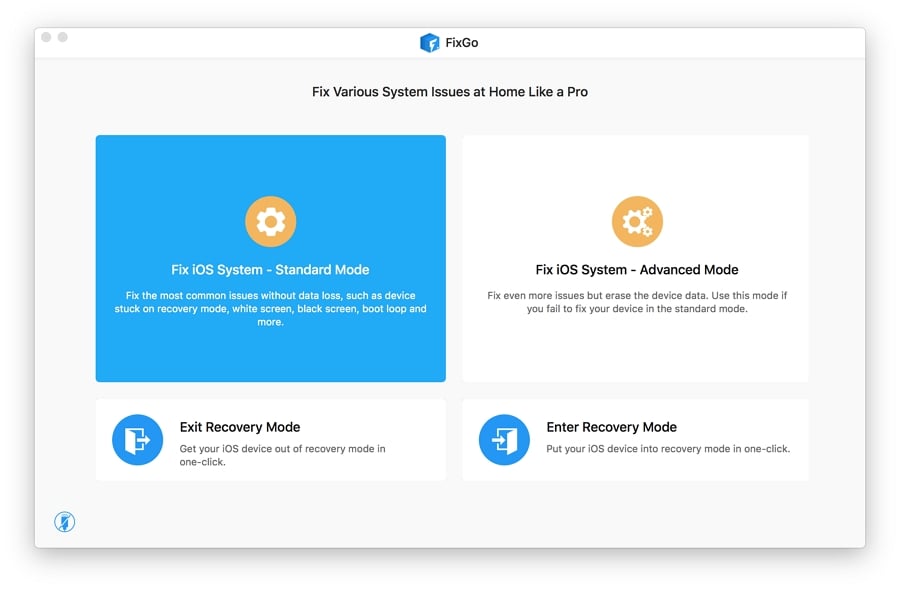
#5 Use FixGo
The FixGo system repair tool, developed by iToolab, is a versatile and lightweight app that’s capable of fixing over 200 common iOS and iPadOS issues.
Its standard option can resolve most problems but, if that doesn’t work, there’s always the more advanced mode available. The best thing about FixGo is that it won’t delete any data while performing a standard mode fix. It’s also a lot cheaper and faster than calling a technician. To get started with FixGo:
- Download and install the app onto your computer;
- Once the installation process is complete, open the FixGo app;
- In the main interface, click on Standard Mode;
- Now connect your iPad to a computer;
- Once your computer detects the iPad, click on the “Fix Now” button;
- Select “Download” if additional firmware is required;
- Select “Repair Now”.
FixGo will let you know once it’s completed the repair process, at which point, you can restart your iPad.
#7 Enter Recovery Mode
Not quite as in-depth as Apple’s DFU mode, recovery mode is nonetheless capable of fixing a variety of problems, including a bricked iPad. It enables your device to communicate seamlessly with iTunes without using the boot loader, so is the perfect solution for issues that make your iPad uncooperative or unusable.
To restore iPad in recovery mode:
- Connect your iPad to a computer;
- If your iPad has a Home button, press and hold down the Home and Sleep/Wake buttons simultaneously;
- If you have an iPad with Face ID, press and quickly release the volume down button, followed by the side button;
- Continue to hold down either the Sleep/Wake or side button;
- The Recovery mode screen should appear;
- Once you see the Recovery mode screen, wait for a prompt from iTunes;
- Click on Restore;
- If this process takes more than 15 minutes, your iPad will exit the Recovery Mode at which point you should start the process again;
- Once complete, follow the on-screen instructions to set up your device.
#8 Contact Apple Support
If your iPad is still under warranty, you can take it to any Apple store where a qualified technician will quickly transform your brick back into an iPad. You can also contact Apple Support by phone or via the online chat service.

Conclusion
iPads might be at the cutting-edge of cellular technology, but they still have their problems. Many users reported issues with the 14/13.7 update, probably because it didn’t download or install correctly. Rather than exacerbating the situation by trying ineffective fixes, however, you should now be completely prepared for a bricked iPad situation and more than capable of resolving it.