How do you add multiple stops using the Apple Maps app on the iPhone? I recently discovered that iOS 16 now enables us to add various destinations at the same time. This is quite handy, but I do not know how to do that.
iOS 16 Apple Maps didn’t get as many changes as some of the other apps in the update, but there is one major change that’s worth noting — multi-stop routing. Since this new feature is introduced for iOS 16, iPadOS 16, and macOS 13, you may not know how to plan a route on Apple Maps with multiple stops. No worries, this article will show you how to do it.
Can I Add Multiple Destinations in Apple Maps?
It can be tough to map out all of your stops without some help. That’s why you might be in the market for a tool to help plan efficient routes. Previously, if you had an iPhone, you might think Apple Maps would get the job done. However, due to various limitations in the apps, users weren’t able to add multiple stops within a single Apple Maps route.
Great news, Apple has finally listened to its users and added support for multiple destinations in Apple Maps. However, before you get too excited, this feature is only available on devices that support iOS 16, iPadOS 16, and macOS 13. Now that we know which devices will be able to use this feature let’s take a look at how it works.
How to Add Multiple Destinations in Apple Maps on iPhone/iPad/Mac
Now that you know that Apple Maps’ latest update is capable of letting you add multiple destinations in a single route, the next step is learning how to actually perform this! Well, check out this section to understand the steps.
1. Create Multiple Stops in Apple Maps on iPhone/iPad
Here is how you can enable the Apple Maps iOS 16 Multi-Stop directions feature:
- Access the Maps application on the iPhone running on iOS 16.
- Next, head over to the Search Bar and add a destination.
- Tap the Directions tab, and hit the Driving button if it isn’t already switched on.
- Now, press the Add Stop button.
- Afterward, search for a new destination, specifically the one you want to make a stop at.
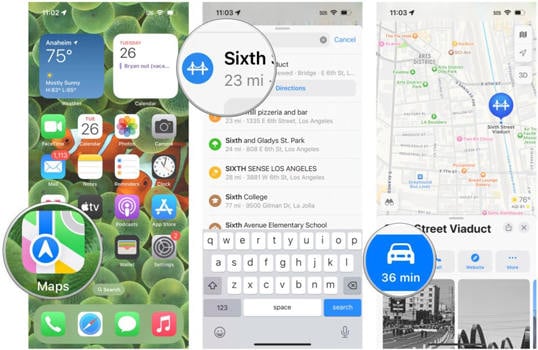
Note: Apple Maps allows you to add up to 15 stops in one go.
- Once all the stops have been added to Apple Maps, you can rearrange their order based on which one you would like to visit first. This is all done using the Drag and Drop feature.
- After the order is set, let the app calculate the fastest route for you. If you have previously set any preferences, then Apple Maps will also take that into account.
- Finally, tap on a route, giving you a preview to reach the specific Stop placed on the app.
Note: The Maps app will also show warnings, advisories, and information on tolls across highways.
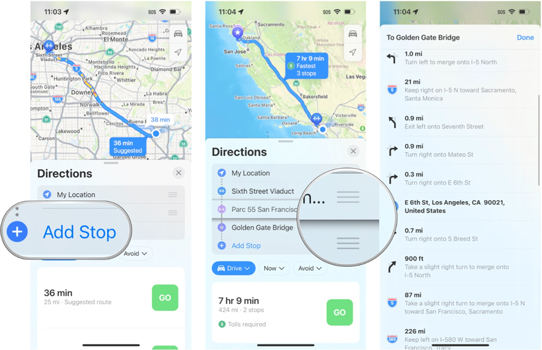
Arranging the order of each Stop is vital as Apple Maps doesn’t optimize your route automatically. It means if you put a new stop, the app will consider it as your end destination. If it isn’t the case, then use the Drap and Drop feature to adjust the order.
Performing this activity could be time-taking, but it is vital if you plan to drive on a highway where changing the stops on the phone isn’t recommended.
2. Plan Multiple Locations in Apple Maps on Mac
Similar to iOS 16, the multi-route feature is available to users in macOS Ventura, which was released on June 6, 2022. Here are the steps to use Apple Maps to add multiple stops on Mac:
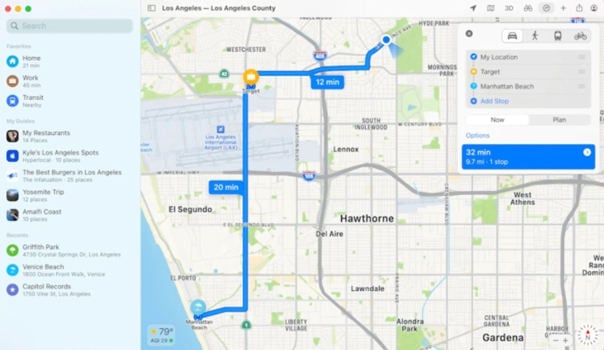
- Access your Map, and run the Apple Maps application.
- Now, go to the Search Bar and input your final destination. From the drop-down list, select the result you are looking for!
- Next, click the Directions or Create Route tab.
- Click the Add Stop button, and search for all the spots you want to visit during your drive. Add those locations.
- Now, click either Now or Plan Later. Also, you can click the Share this route on your iPhone/iPad.
Is It Possible to Fake Apple Maps Location on iOS 16?
Now that you have an idea of how to add multiple destinations to an iOS 16 device, there is another concerning issue we should talk about. It is related to your online privacy and security! There is a chance that you might be tracked by a stalker or anyone you consider to be your close associate. So, if you are unsure about that, then the best thing to do is to fake your location on Apple Maps; it doesn’t matter if you have an iPhone with iOS 16.
Well, simply enable iToolab AnyGo for iOS on your Windows or Mac system, and change the location of the iOS device in an instant. This easy-to-use software can take you to any desired destination, thus tricking the person tracking you into that you are actually present in that fake spot. This tool is compatible with all the working iPhone models and iOS versions and quite safe to use. You do not have to worry about your private information getting accessed by unauthorized entities.

168,282 people have downloaded it.
- Change GPS location on iPhone/iPad in clicks (No Jailbreak).
- Simulate GPS movement along any custom path with joystick.
- Collect and import popular GPX route files for next use.
- Mock GPS location on up to 15 devices simultaneously.
- Works well with location-based social apps and AR games.
- Fully support the latest iOS 26/Android 16.
Here is how you can fake your Apple Maps location via iToolab AnyGo:
Video Tutorial
Step 1 To start, run AnyGo on your desktop. Next, connect the iPhone or iPad via a lightning cable to the computer. Once you can access the home screen, click the Start button.

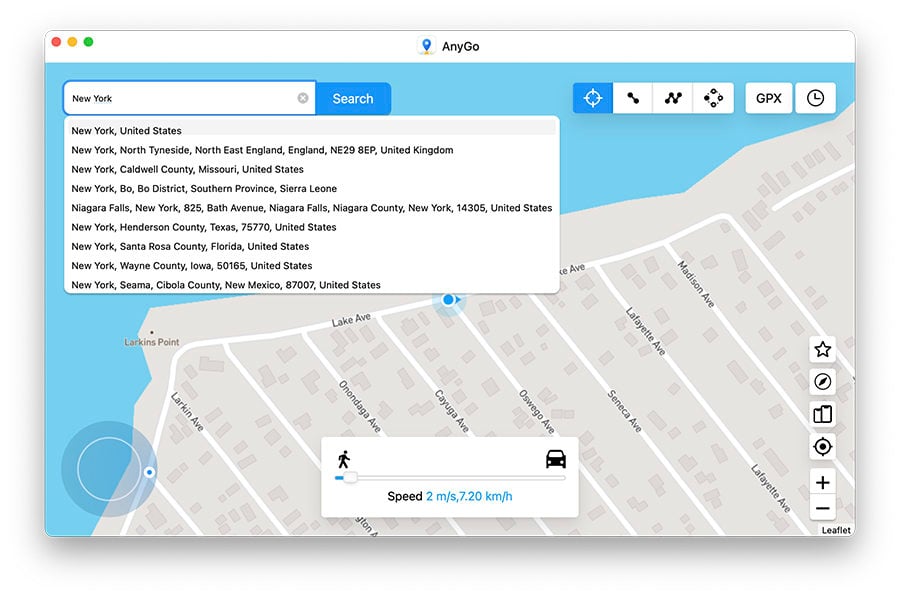
Step 2 Next, click Teleport and head over to the Search Bar to input the place you intend to fake. Once the information is entered, click Search!
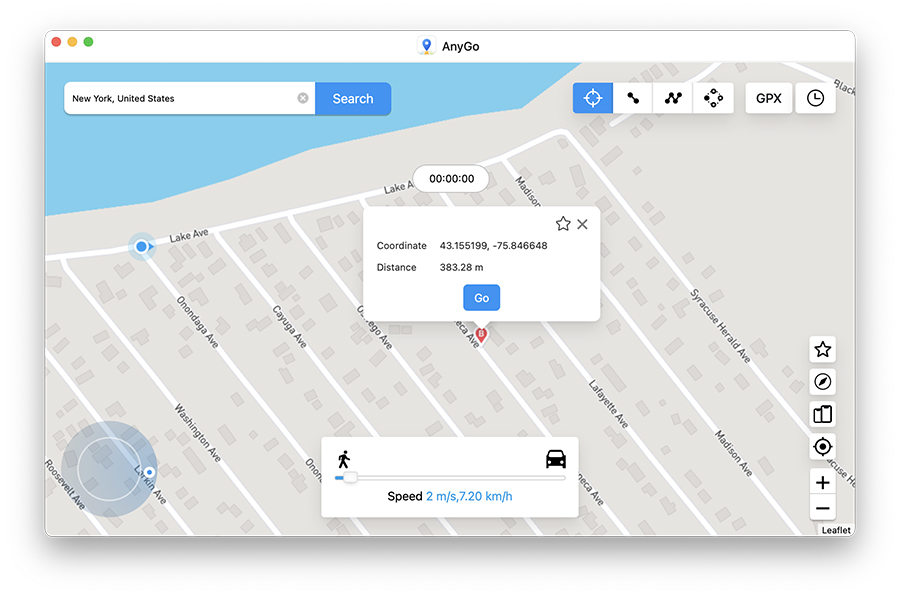
Step 3 Finally, AnyGo will share the fake spot on the map. If you are satisfied with the outcome, then click the Go button to virtually teleport your device there.
This spoofing feature is beneficial not only to keep your location hidden but also to play games like Pokemon Go in another part of the world to unlock specific rewards and catch Pokemon. So, enable AnyGo now, and control your privacy!
Also Read: iOS 16 Beta/iOS 16: How to Change Location on iPhone?
People Also Ask Related to iOS 16 Apple Maps
Here are some frequent questions about iOS 16 apple maps.
Q1. Can you make a custom route on Apple Maps?
You can make a custom route on your iPhone’s Apple Maps app by searching for the start and end points. Now, you only have to specify which one is the destination by selecting it! It is quite easy!
Q2. Can I share a route plan from iPhone to Android devices?
Yes! It is possible as Apple Maps is compatible with Android devices as well. Once you have determined the route, use the Share button to access it on a different Android phone.
Q3. How do I drop multiple pins on Apple Maps?
Once you have searched for a specific place you wish to pin, simply tap and hold the point to add the pin on Apple Maps.
In A Nutshell
Adding multiple destinations on Apple Maps after the iOS 16 update is a welcome surprise for users who spend a lot of time on the road and need the assistance of a GPS application to reach their location quickly. After reading this post, we hope you can now easily add numerous stops to your route via iPhone or Mac. Also, if you do not like sharing your location with others, just use iToolab AnyGo for iOS to spoof it instantly.

