
Recently, I updated my iOS version to the latest one – iOS 27 precisely. Unfortunately, my device has been acting up. Each time I try transferring files from my iPhone, it gets stuck on preparing to transfer. Does anyone know how to fix this error? Please help a friend.
— From Apple Community
Updating your iOS version shouldn’t bring any challenges to end-users. However, when a scenario like the above occurs, you need to look out for how to fix your device. To help you out, we decided to create a how-to guide that explains how to fix iPhone stuck on preparing to transfer after an update to iOS 27. Without further ado, let’s delve in!
Quick Way to Fix iPhone Stuck on Preparing to Transfer
iToolab FixGo is a brilliant iOS system recovery solution that offers excellent services to end-users. The software boasts of solving over 200+ iOS-related issues, including iPhone stuck on preparing update, iPhone stuck on preparing to transfer. End-users can also employ the services of the software to fix broken screens, sticky/unresponsive keys, etc. Besides iOS devices, iToolab FixGo also repairs iPadOS and Apple TV systems. This lightweight works with Windows and Mac computer systems. Also, iToolab FixGo was highly recommended by IGEEKSBLOG, cause it can fixes all iOSissues with no data loss – one reason why it’s classified as an industry-leading iOS solution.
Don’t worry about not knowing how to use this software as it is super easy for everyone. Follow the detailed procedure below to fix your iPhone stuck on preparing to transfer:
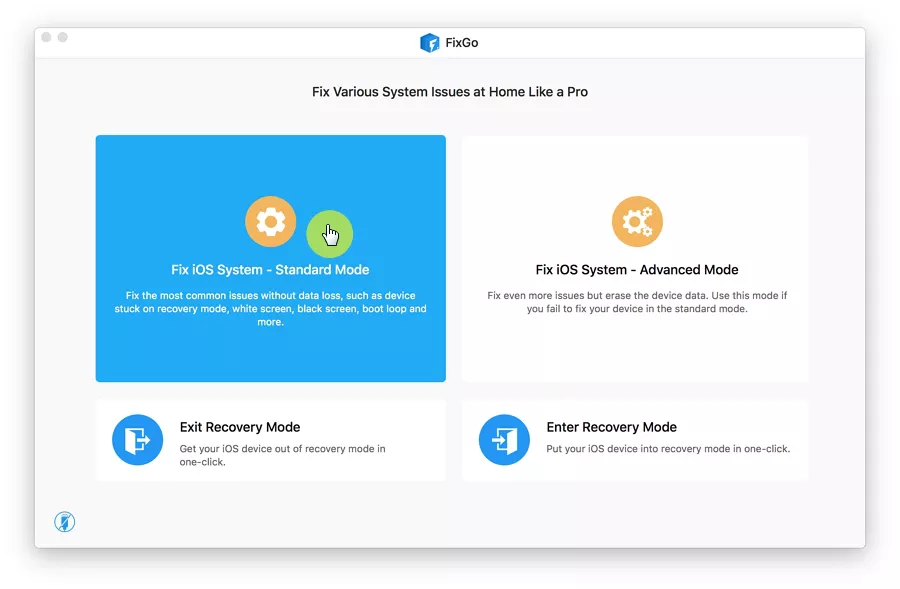
Step 1 Install the latest version of iToolab FixGo on your computer from the official website. Launch the software after the installation is complete, and connect your iPhone using a USB charging cord. Choose Standard Mode as your desired repair option. Click on Fix Now when the next page opens.
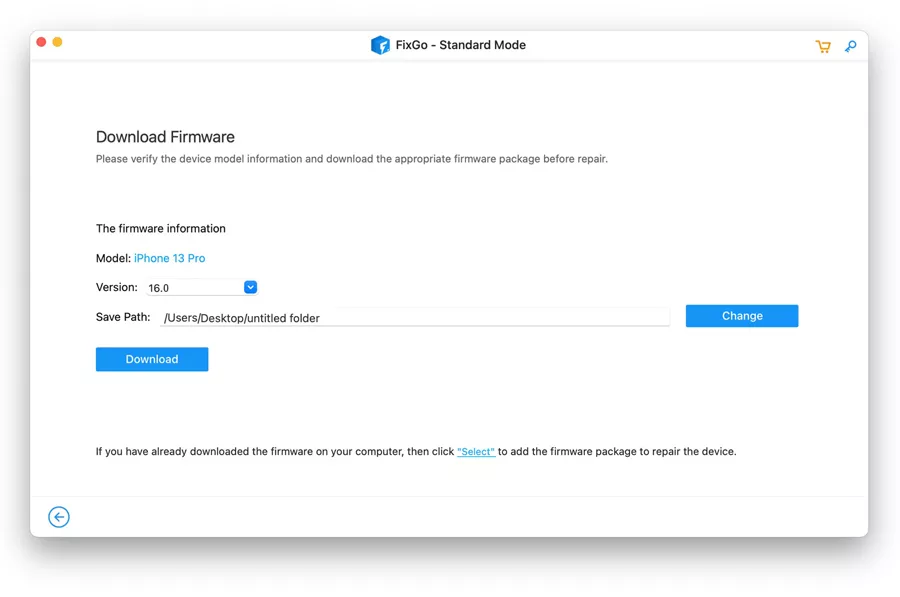
Step 2 Now that you’ve selected your preferred repair mode, iToolab FixGo will immediately scan your iPhone for the possible problem to fix. Once the scanning is over, the software will recommend a firmware package to fix your device. A download prompt will come up on your screen. Confirm your device specification with the one shown on your computer screen. If the specifications tally, click on the Download button.
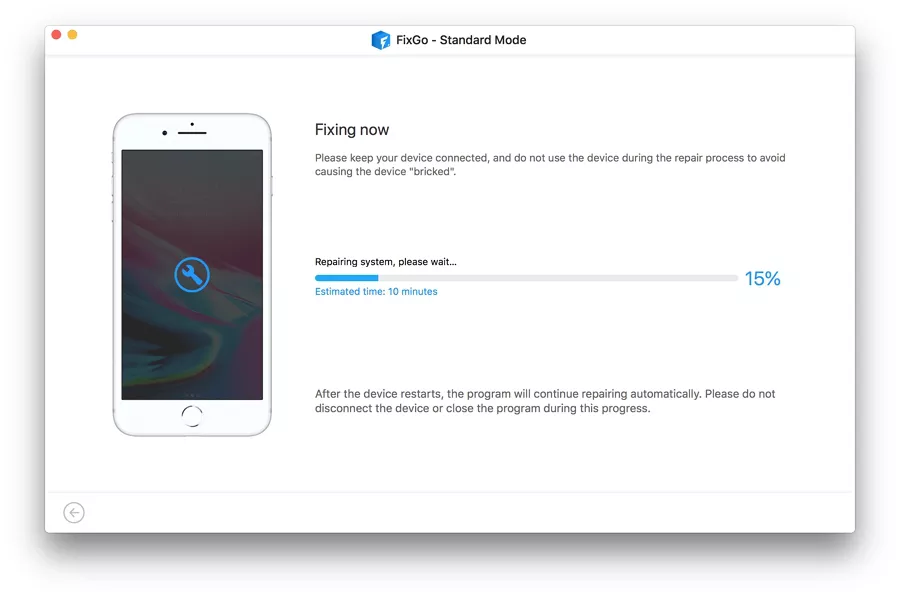
Step 3 Wait for the download to complete, and iToolab FixGo will send a repair notification to your screen. Click on Repair Now to proceed. iToolab FixGo iOS system recovery software will automatically fix your iPhone with the installed firmware package. After the repair, your iPhone will reboot and now you should be able to transfer files without difficulty.
Official Fixes to iPhone Stuck on Preparing to Transfer
Although the above is the ultimate solution, here are other solutions to fix iPhone stuck on preparing to transfer issues:
Fix 1. Check the versions of iOS on both iPhones
Confirming the iOS versions of both iPhones you are transferring data between is crucial. This is because differences in iOS versions can cause an error in data transfer. To confirm the iOS version of both iPhones, follow the instructions given below:
- On both iPhones, launch the Settings menu page.
- Click on General and then select Software Update.
- Check if both devices are running on the latest operating system. If not, try updating either one of them or both.
Fix 2. Check WiFi Network Condition of Two iPhone
Connecting both iPhones to the same WiFi source is another important criterion you must meet for you to transfer data successfully. Should you fail to meet this criterion, you may experience: iPhone stuck on preparing to transfer issues.
To avoid that, kindly run a check on the WiFi network condition for both iPhones. Follow the stepwise guide below to confirm the WiFi network condition:
- Open the Settings menu page.
- Tap on WiFi.
- Compare the WiFi source for both iDevices. If there is a difference, try reconnecting.
Should you still encounter an error while transferring data, try resetting your iPhone networks. To do that:
- Go to the Settings menu.
- Select General > Transfer or Reset iPhone.
- Tap on Reset > Reset Network Settings. Enter your passcode in the appropriate field to validate your action.
Now your WiFi and Bluetooth connection history should be wiped entirely. Try reconnecting to the WiFi again. You should be able to transfer data without any errors.
Fix 3. Use Quick Start in a Wired Way
With Quick Start, you can successfully transfer data between your iDevices with or without a wired connection. If the wireless option fails, get a USB charging cable and a 3-Camera USB Adaptor to transfer data to your iPhone 18/17/16 via Quick Start.
Are There Any Alternatives to Transfer Data to iPhone?
Besides Quick Start, there are other techniques to transfer or migrate data between two iDevices. These alternative techniques are cost-free and straightforward. No third-party tool is required. All you need is to back up your old iPhone to iTunes or iCloud backup facilities, and then retrieve the backed-up file on the new iOS device. So simple and clear. You can follow the detailed instructions below to do that:
Alternative 1: Use iTunes
Step 1: Open iTunes on your computer system and then establish a connection with your iPhone. To do that, connect your iPhone to the computer with the aid of a USB charging cable.
Step 2: iTunes should detect your device. Your iPhone should pop up on the left sidebar. Navigate your cursor to the left sidebar and click on your iPhone. A drop-down menu will pop up with several options underneath. Kindly select Summary.
Step 3: Move your cursor to the right-hand panel underneath the Backups section. Tap on Back Up Now to initiate data backup. Wait for data backup to complete then you disconnect your old iDevice from the computer system.
Step 4: Connect your new iPhone, navigate your way to where you have Summary, and click on it. On the right-hand panel, click on Restore Backup underneath the Backups section. Select the most recent backup and iTunes will immediately initiate data transfers to your new iDevice.

Alternative 2: Use iCloud
Step 1: On your previous iDevice, launch the Settings menu, and then click on your profile picture.
Step 2: Select iCloud on the next page and then hit iCloud Backup when the next new screen pops up. Tap on Back Up Now to commence data backup to iCloud storage facility. Wait patiently until the backup is complete before you proceed to the next step.
Step 3: If you’ve already set up your new iPhone, go to Settings >General. On the next screen, select Transfer and Reset iPhone > Erase All Content and Settings.

Your iPhone will restart automatically. Follow the on-screen prompts to configure your device. When you get to the Apps & Data page, tap on Restore from iCloud Backup.

Now fill in your Apple ID details correctly in the appropriate field, click on next and then select the most recent iCloud backup. Wait a while for backup to be fully restored to complete the process.
FAQs about iPhone Stuck on Preparing to Transfer
Below are some hot questions related to iPhone preparing to transfer:
Q1: Why Does it Take So Long for My iPhone to Transfer Data to My New iPhone?
Data size and WiFi connection are two important factors that affect the speed with which your data is being transferred between two iDevices. If the data size is large, you should expect data transfer or migration to be completed in minutes. An unstable WiFi connection can cause a delay in data transfer thereby increasing the time taken to transfer data between your old iPhone and the new one.
Q2: How Long Does iPhone Take on Preparing to Transfer?
Depending on the data size, and strength of the WiFi connection, the time taken to prepare data transfer between two iDevices may vary. However, if the data size is low and the WiFi connection is strong, then the transfer should be completed in minutes.
Final Thoughts
iPhone stuck on preparing to transfer after update to iOS 27 shouldn’t be a difficult task to fix anymore with the solutions provided in the article above. Select your preferred solution from the options provided above, and in no time you will see the result. However, as experts, we recommend that you use the solution involving iToolab FixGo iOS system recovery software. The software fixes any issue causing your iDevices to malfunction. Try it out now!