
Android device malfunctioning is common to see if you are an Android user. When the device is stuck in a boot loop, it freezes up, etc. Android recovery mode can be used to fix these types of problems. But do we have in-depth knowledge of the recovery mode and its uses? This article explains Android recovery mode options, covering every aspect. In the end, we will introduce you to a tool to fix Android devices stuck in recovery mode.

Part 1. What Is Android Recovery Mode?
What is recovery mode? Android Recovery Mode is a utility tool used to fix Android malfunctioning situations like screen stuck and freezes, malware effects, and to increase the device performance when it’s running on poor performance. There are various options available in the recovery mode. Knowing what they offer you is a great advantage when troubleshooting the device. Here, most of the Android recovery mode options are explained in detail.
- Reboot system now
- Reboot to bootloader
- Apply update from ADB
- Apply update from SD
- Wipe data/Factory reset
- Wipe cache partition
- Mount / System
- View recovery logs
- Run graphics test
- Power off
Option 1. Reboot system now
As the name suggests, the Reboot system now option is typically used to restart the device in normal mode after performing a task. It will turn off the device and reboot, clearing any malfunctioning issues in the device. Performing this before proceeding with a factory reset is recommended since some issues get wiped out with a restart.
Option 2. Reboot to bootloader
Reboot to bootloader option available in some Android models used to load the Android recovery menu. This bootloader menu is different from the normal mode and the recovery mode Android. The bootloader menu can flash files using the ADB and other tools.
Option 3. Apply update from ADB
What does apply update from ADB mean? Android Debug Bridge (ADB) is a tool used especially by Android developers to install the updates from the PC in the form of ZIP files to the device. Once the Android SDK is installed on the PC, users can send the commands to the phone. Using ADB, users can push files and install them on a PC device.
Option 4. Apply update from SD
When the updated files are available in the external storage like SD cards, this option can be used to locate the file and install it from there.
Option 5. Wipe data/Factory reset
Wipe data/factory reset should be handled properly since this option will erase all the data, including apps, messages, photos, videos, etc., available in the device. Any data that hasn’t been backed up won’t recover later. After using this option, users need to log in to the phone using their Google account associated with the phone. Unable to log in could result in denying access to the phone.
Option 6. Wipe cache partition
Cache refers to the temporary files stored in the device. These get accumulated with time and could cause poor performance. The wipe cache partition option can clear any unwanted cache stored in the device.
Option 7. Mount / System
What does the mount system mean? It’s not typical option users use and is not available for all devices. Mount/System option is used to access the CORE files and folders in the device. These files and folders are not accessible unless you use this option.
Option 8. View recovery logs
All the technical logs of the device can be found here. This lists all the events and actions in the recovery mode. These logs are useful when we find what’s happening behind the processes.
Option 9. Run graphics test
This option is well-suited for developers who wish to perform different tests with the Graphical Processing Unit (GPU). On some devices, the Run locale test option is also available to perform tests if the graphic test mode doesn’t satisfy what users desire.
Option 10. Power off
This option can be used to power off the device. Unlike the Reboot system now option, this won’t restart the device. After using any of the mentioned options, when the user wants to turn off the device, they can use it. Also, this is useful when you have issues with the Power button.
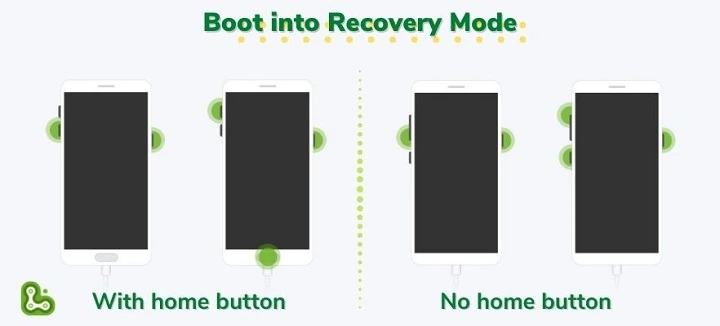
Part 2. How to Boot Android into Recovery Mode?
Entering the recovery mode on devices varies depending on the model and the brand. If you don’t find your device model or brand here or else if it’s an older version, always refer to the manufacturer’s website to avoid any confusion. Here are the ways you could use to enter the recovery mode on some popular brands among Android users.
- 1. Samsung Recovery Mode
- 2. LG Recovery Mode
- 3. Motorala & Google Pixel Recovery Mode
- 4. HTC Recovery Mode
- 5. Lenovo Phone Recovery Mode
- 6. Huawei/Honor eRecovery Mode
- 7. Xiaomi/Redmi Recovery Mode
1. Enter Android Recovery Mode on Samsung
Step 1: Press the Power button and the Volume Down buttons together for some time until the device reboots.
Step 2: Release the buttons when you see the Samsung logo on the screen.
Step 3: Now press and hold the Power button, Volume Up button, and the Bixby buttons together.
Step 4: Release all three buttons when the Samsung logo appears on the screen again.
2. Boot LG phone into Recovery Mode
Follow this instruction, you will be easy to enter recovery mode of LG Stylo 5.
Step 1: Turn off the device using the Power button.
Step 2: Find the Volume Down button and Power button at the back of the screen. Press and hold them together for 10 seconds.
Step 3: After some time, recovery mode will load onto the screen. Release both the buttons at that time.
3. Get into Motorola & Google Pixel Recovery Mode
Step 1: It is important to check the phone’s battery status before starting since it could damage the hardware if the device shuts down in the middle of an operation. The recommended battery power is to have at least 30% of the battery charge.
Step 2: Then turn off the device using the Power button.

Step 3: Press and hold the Volume Down button and Power button together for a few seconds. Press the Volume Down button again once you see the Motorola logo appear on the screen. This will enter you into recovery mode. In the case of Google pixel, you can release the buttons when you see the Android mascot.
4. Access Recovery Mode on HTC One
Step 1: To start with, disable the FastBoot on the HTC One. For that, tap on the Settings app and select Battery. Then tap on the Fastboot option and uncheck it.
Step 2: Power off the device using the Power button. Then wait for 10 seconds until the device fully shuts down.
Step 3: Press Volume down and Power buttons together. After a few seconds, release the 2 buttons. But, if you want to enter the bootloader menu, you can continue holding the Volume Down button.
Step 4: Little later, the Android recovery screen will load onto the screen.
5. Boot Android into Recovery Mode on Lenovo phone
Step 1: Like all other devices, we switch off the Lenovo device using the Power button.
Step 2: Press and hold the Volume Up and Power buttons together for a few seconds.
Step 3: Release both the buttons when the recovery menu loads onto the screen.
Note: Learn how to
Part 3. How to Exit Android Recovery Mode?
After using the recovery mode, getting out of it is a simple process. Here is the way you should follow.
Step 1: If intended to reboot the device after performing a task, use the Reboot system now option from the recovery menu.
Step 2: This reboot will restart the device in the normal mode. From there, users can use the device as usual.
Part 4. How to Fix Android Device Stuck on Recovery Mode?
Did you enter the recovery mode to remove the screen lock and find it troublesome to continue? With the introduction of iToolab UnlockGo (Android), the process has been simplified, and users will get guided into the recovery mode during the process.
The most effective solution to fix Android devices stuck on recovery mode is to use the UnlockGo for Android. It guides users from the beginning to the end until the issue is fixed. During the process, users find themselves in recovery mode. From there, they can perform any action they want.
UnlockGo (Android) can bypasses Google FRP lock apart from removing any screen lock. Currently, it is available for Windows users.
- One-click Google lock removal
- Bypass Samsung FRP lock on Android 5-12
- Unlock Android without any tech skill
- Remove all Android screen locks
- Allows for customized plans
How to remove lock screen with UnlockGo (Android)
Step 1: Connect the mobile with PC
Open the installed iToolab UnlockGo (Android) from the Pc and select “Unlock Screen Lock” option. Now connect the mobile device with the PC and click on the Start button.

Step 2: Confirm device information
Select the brand from the list. Then click on the “Unlock” button to proceed.

Step 3: Put the device into recovery mode
Putting the device into the recovery mode depends on the type of the model and the brand.
Step 4: Start Unlocking
After entering the recovery mode, follow the steps on the screen.

Step 5: Unlock successfully
Click on the done button to finalize the process and restart the phone.

Part 5. Does Recovery Mode Delete Everything?
Once you use the Wipe data/Factory Reset option, all the applications and data get completely removed. Once they get removed, recovery them back is not possible. This wipes out all the images, messages, apps, videos, images, documents, etc., in the internal space.
If the data is available on the SD card, it won’t get affected since the reset process doesn’t use an SD card. So before starting any process in the recovery mode, always recommended to back up the data to another location. For instance, users can backup important data into cloud storage. If your SD card has been encrypted, remember to unlock it before resetting.
After the recovery, it’s like having a brand-new phone in your hand with default factory settings. Before you get into home screen, you might be required to sign in Google account, Samsung account or even mi account to verify.
Conclusion
This article is a complete beginner to expert guide on using recovery mode and its uses. Android recovery mode is not for every user. It can be tricky for users who have little knowledge of technical stuff. So we highly recommend using iToolab UnlockGo (Android) to avoid such confusion and know how to get out of Android recovery mode without losing data. This tool will guide you from the beginning to the end and is easy to use, even for beginners.
Is there a way to access the file system using some kind of recovery tool? I edited the packages.xml file and soft-bricked my device. I DID make a backup of that file, but I cannot find a way to mount the filesystem so that I can fix that. The option in the recovery mode menu doesn’t do anything.
Charles.
I hard a problem with my sumsung Galaxy in Android recovering
Hi Mohamed, can you please describe your problem in detail?
Main apne phone ka password Bhul Gaya Hun
phone Bai jio phone next
Hi Krishna, you can use UnlockGo Android Unlocker to help you remove the screen password.
quiero que me ayuda de esa mi teléfono se bloqueo de ZTE A71 ayuda bloquear sin. pedirle cuenta antigua para abrir.
Hi mayer, do you want to unlock the screen lock or Google FRP lock?
So how can I remove safe mode in my itel P15 phone