
Factory Reset Protection (FRP) is a security feature on Android devices designed to prevent unauthorized access after an abnormal factory reset. While it enhances security, it can be problematic if you forget your Google account credentials or purchase a second-hand Android device. Many users look for ways to bypass FRP, especially on newer Android versions like Android 13. In this guide, we’ll explore whether FRP bypass on Android 13 is possible and provide step-by-step methods to remove Google FRP lock on any phones.
Also read:
Free and Working Methods for FRP Bypass on Android 12
Android 14 FRP Bypass: Top 2 Methods in 2026
4 Ways to Bypass FRP on Android 15 in 2026
Part 1: Is It Possible to Bypass FRP on Android 13?
Yes, bypassing FRP on Android 13 is possible, and you can easily do it yourself with or without a PC. We understand that Android 13 has introduced enhanced security measures to safeguard your device and data. However, for legitimate reasons such as forgotten credentials, it’s crucial to have methods in place to regain access and this is what you going to catch in the next section.
Part 2: How to Bypass FRP on Android 13?
Here we will discuss 2 effective methods with or without a PC that you can use to perform FRP bypass on Android 13 successfully.
So let’s check them out!
- Way 1. Bypass FRP on Samsung/Redmi/Realme/OnePlus Android 13
- Way 2. Bypass FRP on Android 13 without PC
Way 1. Bypass FRP on Samsung/Redmi/Realme/OnePlus Android 13
The easiest method to bypass FRP on Android 13 is using an Android 13 FRP bypass tool. You don’t need to go through the complicated process and you can regain full control on the Android device within minutes. It’s the best solution in case you’re not tech-savvy, or you own a phone repair shop and need to unlock lots of Android devices every day.
The most reliable FRP bypass tool we want to recommend is iToolab UnlockGo Android. iToolab team has years of experience in unlocking Android and iOS devices, therefore, it’s trustworthy. Furthermore, most popular media websites and users aroung the world have verified its utility.

Let’s look a little closer to the features!
UnlockGo Android – Best Android 13 FRP Bypass Tool
- It allows Samsung/Xiaomi/Redmi/OPPO/Realme/OnePlus users to bypass Google FRP lock on Android 13 within minutes.
- You don’t need to install any extra FRP bypass APK files.
- The tool is easy to use. You can bypass FRP within several simple steps.
- Based on the advanced technology, it guarantees a high success rate.
Let’s consider you need to perform a Samsung Android 13 FRP bypass, so you need to follow the steps mentioned below.
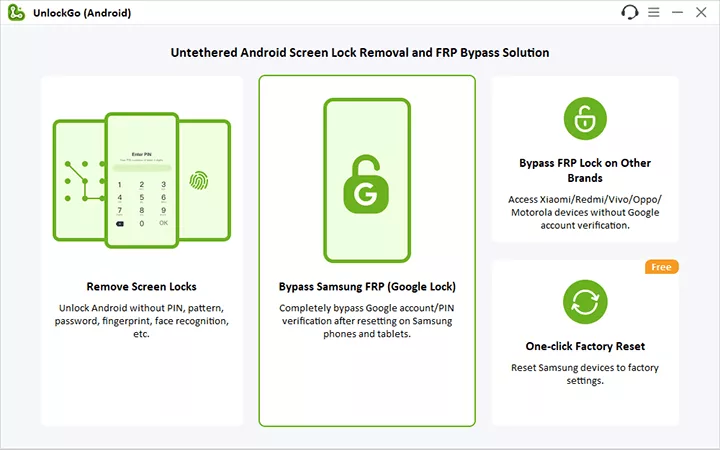
Step 1 Connect Your Device
Free download this Android 13 FRP bypass tool first and begin by connecting your Samsung device to your computer using a USB cable. Launch the program, select the “Bypass Samsung FRP” feature, and click the “Start” button to proceed.
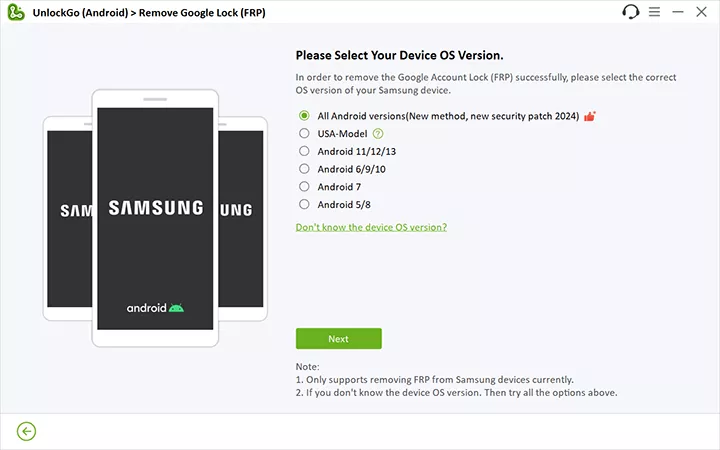
Step 2 Select the Appropriate Solution
In this step, you’ll be presented with different unlocking options based on your Android system. We recommend choosing the advanced method designed for Android 5-13 devices, which can remove Samsung FRP locks in just 3 minutes. Click “Next” to continue.
Step 3 Enable USB Debugging
Here you will get a secret code to access the hidden Samsung Diagnostics Menu (Test Menu) to enable USB debugging.

After that UnlockGo (Android) will assist you in enabling USB debugging on your Samsung device.

Step 4 FRP Lock Removal
Once you’ve followed the steps and allowed the necessary permissions, the Google account verification screen will be bypassed within seconds and your Samsung device will then be automatically rebooted.

With these simple steps, UnlockGo (Android) makes it quick and easy to remove Google FRP locks on your Samsung device, ensuring you regain access without hassle.
Way 2. Bypass FRP on Android 13 without PC
Let’s imagine you are away from your PC and want a Samsung Android 13 FRP bypass without a PC on your phone. So here comes another method that can bypass Samsung FRP on your phone, so do follow the steps correctly because the process is slightly technical.
1. Go back to the Wi-Fi network page when you see the Google account verification screen.

2. Tap on “Scan QR Code to Connect to a Wi-Fi Network”. A QR Code screen will show up, but tap on the “Gallery Images Icon”. You’ll see a message that no apps can perform this action, which is expected.
3. Now, press the “Side Key or Power/Bixby key” multiple times to open the “Recent Apps” on your Samsung Galaxy phone.
4. Once you see “Recent Apps” on the screen, tap on “My Files” and then Allow access to My Files. Click on the “One Drive” application.
5. You’ve now gained access to the Chrome Browser on your phone. Hit “Accept” and “Continue” on the Welcome to Chrome screen. When asked to turn on sync, tap on “No, Thanks”.

6. It will help you open Google Chrome. Tap on the “Search Bar” and search for “itoolab.com/frp-bypass-apk/“.
7. On the itoolab website, swipe down and download the “Package Disabler Pro” and “Notification Bar” applications.

8. Once you downloaded both apps, navigate to the site and open “Files Shortcut” (Galaxy Store).
9. Sign in to your Samsung Account and proceed to install the File Shortcut app from the Galaxy Store. Once the installation is complete, return to the page.
10. Next, open the “XShare App” from the Galaxy Store and install it. After successfully installing the XShare app, return to the website.
11. Access the Galaxy Store and install the iOS Launcher. The iOS Launcher will open automatically on your Samsung Galaxy phone upon installation.
12. Now, press “Enter” and return to the home screen of your phone. Look for the two applications you installed earlier.
13.Place both of these apps on the home screen side by side. Open the X-Share app and navigate to the Receive section.
14. Tap on “ALLOW” multiple times on every button. Close this window and return to the Home screen.
15. Launch the Files Shortcut app and navigate to the Download folder. Here, you’ll find the two applications you downloaded earlier, the “Package Disabler Pro app” and the “Notification Bar Settings apk”.
16. Install the “Package Disabler Pro” application and tap “Done” once the installation is complete.
17. Proceed to install and open the “Notification Bar” application.
18. To activate the Notification bar, access the Accessibility option and select “Installed apps”.
19. Select “Notification bar” and activate “Notification Bar Shortcut” before pressing “Allow”.
20. Return to the home screen and open the Settings app on your phone. Navigate to “Privacy” and select “Permission Manager”.
21. Within the Permission manager, locate “Files and Media”. Access the three dots at the top right corner and select “Show System”. Scroll down and find “Package Disabler Pro”.
22. Enable management of all files under “Files and media permission” for the Package Disabler Pro app.
23. Disable Wi-Fi/SIM DATA internet by swiping down.
24. Return to the home screen and open the “Package Disabler Pro” app. Agree to the terms, and enable the Admin button. Activate the Package Disabler Pro app.
25. Wait for approximately 1 minute on the activation screen. If it doesn’t progress, press the “RETRY BUTTON” and agree to the Knox license activation.
26. After activation, open the Notification bar and turn on the “WiFi/SIM DATA Connection.” Wait at least 30 seconds to ensure complete internet access. In case of a “Fail KLM Error,” press “RETRY”.
27.Return to the home screen and reopen the “Package Disabler Pro” app.
28.Wait for a minute on this screen, and if it doesn’t work, press the “RETRY” button. The Package Disabler app will open on your Samsung Galaxy phone. Tap on the Search button, and type “Setup”.
29.It will open the “Android Setup” settings. Deactivate “Android Setup” and go back to the app.
30.This time, open the “Samsung setup wizard” and tap the “CLEAR DATA” button. This action will remove the Google account verification lock and bypass the FRP lock from your Samsung Galaxy phone.
31.Return to the welcome page and complete the initial setup of your Samsung phone.
You’ve successfully bypassed the Samsung Android 13 FRP bypass.
Final Thoughts
We have covered two innovative methods for FRP bypassing on Android 13 with or without a PC. After looking into both of the solutions, we concluded that bypassing FRP with iToolab UnlockGo Android is much more efficient and time-saving than bypassing FRP without a PC method using your phone.
Because it’s a long and complicated process with multiple sub-steps that might distract your attention or cause software damage in case you attempt it wrong. So you have both options to go with, my recommendation is to try iToolab UnlockGo (Android) for a super easy FRP bypass but still, the choice is yours!
do you know a way to unlock an lgk51 by Metro by T-Mobile I can’t do none of the bypass tricks when I get to the Google password
I have a skydevice B63 elite android 13and I’m trying to bypass goggle locked
Hi Phillip, our program iToolab UnlockGo Android Unlocker can’t bypass Google FRP lock on your sky device B63 elite. You can try the method that doesn’t require a computer.
Hello , Does this (iToolab UnlockGo Android Unlocker) happen to unlock the Samsung Galaxy S23 Fe?
Hi Anthony, do you mean that you want to bypass FRP on your Samsung Galaxy S23 Fe? What’s the model and Android OS?
Dear
I recently purchased iToolab UnlockGo (Android) to remove the FRP lock on my Galaxy A14 5G running Android 12. However, the process stops at the step requiring the installation of “Alliance Shield,” with a message indicating that my device is no longer supported. As a result, the UnlockGo software has not been able to resolve my issue. If it is not possible to unlock the phone with this tool, please let me know the next steps.
Thank you for your time and assistance.
Best regards,
Hi Cesare, we didn’t find any order under your email address cesarea****@gmail.com. Can you please send an email to our support center? Please rest assured that we will help you solve the problem.
what is the phone does not have a Bixby button? I trued to do the second method but there is no other button on the phone than power and volume keys
Hi bella, if there is no Bixby button, please press the power button.
Hi I want to unlock my honor x5 plus I bought to my gf.so I take it back to my after we back up
Hi Samkelo, sorry to tell you that our program doesn’t support bypassing FRP on Honor phones. You can check whether these methods work for you or not: Huawei/Honor FRP Bypass
I love it so much
using a windows 10 with odin I need to bypass frp lock after factory reset on an android 13 samsung ao3s SM-S134DL_TFN… Is there a code for this? Will the instructions or guide above work without knowing the samsung account information? Will it work for the make and model I listed?
Hi Nachelle, iToolab UnlockGo Android can bypass FRP on Samsung A03s. You need to purchase a license code to enjoy all functions.
slow my phone upgrade to android 13
what about mobicel P11 if I need to bypass it a previous google email
Hi Msaro, there is no third-party program can bypass FRP on mobicel devices.